Classic Crispy Cannoli Shells – The Perfect Italian Pastry Base
Discover my classic cannoli shell recipe with a perfectly crisp, lightly spiced shell. Easy Italian baking tips for the ultimate sweet ricotta treat!

- Let’s Talk About That Perfect Cannoli Shell Recipe
- Classic Crispy Cannoli Shells – The Perfect Italian Pastry Base Recipe Card
- From Sicily to Your Kitchen: The Story Behind Cannoli Shells
- Why This Classic Cannoli Shell Recipe Wins Big
- Your Ultimate Guide to Essential Ingredients for Classic Crispy Cannoli Shells
- Mastering the Art of Professional Cooking: The Secret to Perfect Cannoli Shells
- Insider Tips & Secrets for Perfect Cannoli Shells
- Nailing the Perfect Presentation
- Smart Storage & Make-Ahead Hacks
- Creative Twists on Your Classic Treat
- The Real Deal Nutrition Guide
- Final Bite — Why This Cannoli Shell Recipe Wins Every Time
- Frequently Asked Questions
Let’s Talk About That Perfect Cannoli Shell Recipe
Okay, so picture this: it’s a sunday afternoon, and the kitchen smells like a little slice of sicily. you’re rolling out that dough, that cinnamon and citrus scent teasing your senses.
Then, there’s that moment when you dunk the rolled canvas onto the hot oil. the sizzle, the snap when you bite in — that’s the magic of a cannoli shell recipe done right.
Honestly, i’ve tried a bunch of cannoli recipes over the years, but nailing the cannoli shells was always the hard part.
They’re kind of picky—the thickness, the oil temp, sealing those edges neatly. but once you get it? it’s like owning a little italian bakery in your own kitchen.
Trust me, there’s nothing quite like homemade shells paired with a luscious sweet ricotta filling.
If you’ve ever wondered how these crispy beauties came to be so popular or why so many folks rave about an italian cannoli over anything else, stick with me.
We’re diving deep into all the yums.
Classic Crispy Cannoli Shells – The Perfect Italian Pastry Base Recipe Card
⚖️ Ingredients:
- 2 cups all-purpose flour (250g), plus extra for dusting
- 2 tablespoons granulated sugar (25g)
- 1/4 teaspoon ground cinnamon
- 1/4 teaspoon fine salt
- 2 teaspoons white wine vinegar or lemon juice (10ml)
- 2 tablespoons unsalted butter, cold and cut into small cubes (30g)
- 1 large egg yolk
- 1/2 cup dry white wine (such as Pinot Grigio) or enough to bring dough together
- Vegetable oil for deep frying (such as canola or sunflower oil)
🥄 Instructions:
- Sift together flour, sugar, cinnamon, and salt in a large bowl.
- Add cold butter cubes and rub into the dry mixture until it resembles coarse crumbs.
- Mix egg yolk, vinegar (or lemon juice), and about half the wine into the flour mixture. Gradually add more wine as needed until a firm, slightly tacky dough forms.
- Turn dough onto a floured surface; knead gently until smooth (~5 minutes). Wrap in plastic and refrigerate for at least 1 hour.
- Divide dough into manageable portions. On a well-floured surface, roll each portion thinly (~1.5 mm thick) and cut into 4x4 inch squares or ovals.
- Lightly brush edges with water to seal, then wrap dough squares around metal cannoli tubes, pressing edges firmly.
- Heat oil to 350°F (175°C) in a deep pan or fryer. Fry the cannoli shells in small batches, turning occasionally until golden brown (~2–3 minutes).
- Place fried shells on paper towels to drain and let cool slightly before carefully sliding shells off the metal tubes.
From Sicily to Your Kitchen: The Story Behind Cannoli Shells
Cannoli have a rich history stretching back to sicily, where they were first made as a carnival treat. it’s wild to think such a simple combo—crispy fried shells holding smooth, sweetened ricotta—could carry so much cultural weight.
These days, cannoli are a staple in italian baking and beyond, popping up everywhere from fancy bakeries to family dinners across the us.
People love them not just for their taste but for the experience : that crunchy shell is a perfect contrast to silky ricotta filling .
And the best part? this cannoli shell recipe isn’t intimidating once you get the hang of it. you’ll want to set aside a cozy afternoon because the whole process takes about an hour and a half—from mixing to frying.
But honestly, it’s worth every minute.
The skill level falls into the medium range. it’s hands-on but approachable if you have patience and a little kitchen love.
Plus, cost-wise? you’re working with everyday staple ingredients like flour, sugar, and wine. no fancy gear needed besides a few basic tools and those nifty metal tubes—the shell recipes depend on those for that signature shape and snap.
You get around a dozen shells per batch—about 6 cannoli if you're thinking two shells per serving. Perfect for sharing or treating yourself with a couple of these crunchy delights.
Why This Classic Cannoli Shell Recipe Wins Big
Here’s the thing: homemade cannoli shells have a few advantages you won’t get from the store-bought ones. they’re fresher, with flavors that pop—like the subtle hit of cinnamon and citrus zest in the dough.
Plus, you control the texture, so no soggy or dull bites here.
From a health standpoint? sure, these are a treat, but the ingredients are pretty straightforward, with the main indulgence coming from the frying oil and that luscious cream filling.
If you want to keep it lighter, you can tweak the amount of sugar or go for a wine-based dough instead of heavier substitutes.
The richness of the ricotta filling pairs beautifully with the crisp shell without being too overwhelming.
Cannoli are versatile, too. they're a knockout dessert for special occasions—think birthdays, holidays, or that impromptu italian-themed dinner party. honestly, they bring that wow factor to the table without a fancy bakery bill.
Compared to other pastries, their combination of crunchy shell and creamy filling is unique. while say, a cream puff is all soft, cannoli give you that whole texture party.
And, you can play around with fillings, but the classic italian baking approach always comes back to sweet, flavorful ricotta.
It’s a game-changer.
Alright, enough talk — now you probably wanna dive into the details and get your hands messy with the ingredients.
Coming up next, i’ll walk you through everything you need to make these perfect, golden cannoli shells at home. you’ll see, once you try this cannoli shell recipe , your dessert game will never be the same!
Your Ultimate Guide to Essential Ingredients for Classic Crispy Cannoli Shells
Alright, so you’re thinking about making some italian baking magic with a homemade cannoli shell recipe , huh? honestly, nothing beats the crunch of fresh, golden cannoli shells paired with that luscious sweet ricotta filling.
But before you jump into frying those beauties, let’s chat about the key ingredients and tools that’ll make or break your italian cannoli dreams.
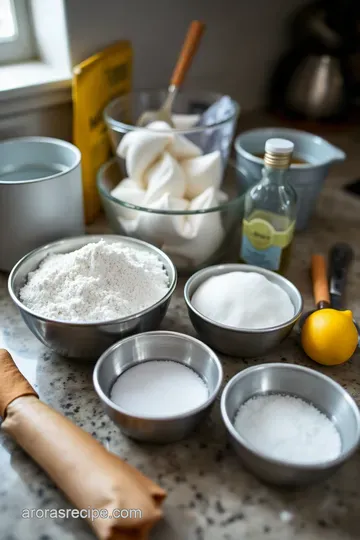
Premium Core Components: What You Really Need
First off, for the dough—you want to be super precise here. use 2 cups (250g) of all-purpose flour . no shortcuts—good flour means a sturdy shell that holds up to the creamy filling without sogging out.
Toss in 2 tablespoons (25g) granulated sugar , just a pinch of 1/4 teaspoon ground cinnamon , and 1/4 teaspoon fine salt .
These little flavor notes in the shell add that subtle warmth we all crave.
Now, the wet stuff: if you’re like me and slightly fancy, grab 2 teaspoons (10ml) white wine vinegar or lemon juice —this is what tenderizes the dough.
For fat, use 2 tablespoons (30g) unsalted butter, cold and cubed ; you want it to melt just right, helping the shell crisp up when fried.
Mix in 1 large egg yolk and slowly add around 1/2 cup (120ml) dry white wine —think pinot grigio. the wine’s acidity makes a noticeable difference in texture, trust me!
Storage tip: keep your flour and spices in airtight containers, away from heat and moisture —they’ll last months, but only if stored right.
For the dough, after kneading, wrap it tightly and chill for at least 1 hour ; this resting step is non-negotiable for smooth rolling and that signature crunch.
Signature Seasoning Blend: Flavors That Make Your Shells Sing
Here’s a fun tidbit—adding cinnamon to the shell dough isn’t just tradition; it’s flavor science! the subtle spiciness amps up the contrast with the sweet ricotta filling .
Similarly, a little citrus zest—lemon or orange—is a game changer, giving your shell a fresh vibe that’s far from boring.
If you’re feeling adventurous, think about herbs. yeah, weird, but a tiny pinch of fresh rosemary or even star anise infused in the frying oil creates a whisper of aroma that’s unforgettable.
These flavor enhancers take your cannoli recipes from “meh” to “holy moly” impressive.
Pro tip: If you’re doing a regional twist, Sicilian cooks sometimes swap cinnamon for more warm spices like nutmeg—feel free to experiment here. Just remember, keep it light!
Smart Substitutions for When Life Throws You Curveballs
Life happens—maybe you’re out of white wine or don’t drink alcohol. no worries! swap in seltzer water or a mild vinegar-water combo to keep the dough’s tenderness.
If you want to skip butter, olive oil isn’t quite the same, but coconut oil can lend a subtle tropical flair.
Need a gluten-free bin? try a 1:1 gluten-free flour blend, but heads up—it might be trickier getting the dough stretchy enough to wrap around your cannoli forms without cracking.
Also, for frying oil, canola or sunflower is the classic choice, but if you’re feeling old-school sicilian, lard is authentic and adds fantastic flavor and texture.
Emergency hack: If you forgot your cannoli forms, tightly rolled parchment or aluminum foil can work in a pinch. Just be super careful while frying!
Kitchen Equipment Essentials: Tools I Swear By
Now, don’t underestimate your kitchen gear. cannoli forms are the mvps here—those metal tubes about 4 to 5 inches long.
They keep your shells perfectly tubular while frying and give you that classic shape.
A sturdy rolling pin is key. i’ve ruined more than one batch because i just eyeballed dough thickness—so get a rolling pin with thickness guides or measure! aim for about 1.
5 mm (1/16 inch) thickness—thin enough to crisp but not so thin you get holes.
For frying, a deep frying pan or a deep fryer is your best bet. use a thermometer to keep oil steady at 350° f ( 175° c) —too hot, you burn the shells; too cool, they soak up oil and get soggy (gross).
Once fried, drain them on paper towels and cool before sliding off the molds, or risk breaking your beautiful shells.
Trust me—i've learned that the hard way with broken shells and lots of frustration.
Wrapping It Up Before We Fry
Making cannoli shells from scratch isn’t just about ingredients—it’s about love, patience, and a bit of trial and error. getting those shells just right means measuring carefully, understanding your dough's texture, and knowing your tools.
Once you’ve mastered the basics, you’re halfway there to filling those crispy shells with that dreamy ricotta filling and impressing everyone with homemade italian goodness.
Next up, let’s dive into the actual dough prep and frying steps so you can make those perfect cannoli shells you’ve been dreaming about.
Trust me—you’re gonna want to get your hands messy with this classic crispy cannoli shell recipe.
Ready to make it happen? Let’s go!
Mastering the Art of Professional Cooking: The Secret to Perfect Cannoli Shells
Alright, so you’re ready to dive into the world of italian baking and tackle that elusive, crispy, golden crust with a homemade cannoli shell recipe .
Honestly, the first time i tried making cannoli shells at home, i thought it was gonna be this impossible, delicate dance.
Turns out, with the right professional cooking method , it’s more like a chill jam session — just gotta have your tools, time, and mindset on point.
Essential Prep Moves: Get Your Mise en Place Tight
Let me tell you, mise en place is the unsung hero here. it’s french for “everything in its place,” but in my kitchen that just means setting out your flour, sugar, cinnamon, butter, and that crisp dry white wine ahead of time.
Trust me, when you suddenly realize you forgot the cinnamon as the oil heats to 350° f ( 175° c) , chaos ensues.
While your dough chills for about an hour (yeah, patience sucks sometimes), use that time wisely to clean up, prep your cannoli forms, and set your frying station.
Time management here is key. having everything organized means when you start frying, you’re not running around trying to find a slotted spoon or a plate lined with paper towels.
Keep your frying oil steady at 350° f , no more no less—that’s when the magic happens, and those shells get that perfect snap.
Don’t forget safety! hot oil at the wrong temp or careless handling of those metal cannoli tubes is a recipe for disaster.
Use long tongs or a spider skimmer to lower and lift shells out gently. oh, and keep kids or curious pets well away from your hot frying zone.
Step-by-Step Breakdown: Let’s Get Cooking!
- Sift together your flour, sugar, cinnamon, and salt — don’t skip this! It ensures even mixing.
- Cut in cold butter until it looks like coarse crumbs.
- Mix your egg yolk, vinegar , and half your white wine, then slowly add more until you get a slightly tacky dough.
- Knead lightly for about 5 minutes and wrap that baby up for 1 hour chilling .
- Roll out thin, about 1.5 mm thick—think 1/16 inch , like a nice poker chip thin.
- Cut dough into squares (4x4 inches), brush edges with water, and wrap it tight around the metal tubes.
- Heat oil to the golden standard of 350° F ( 175° C) and fry shells for roughly 2– 3 minutes ‘til you see that beautiful golden brown.
- Drain on paper towels, cool slightly, and then carefully slide off the molds. Pro tip? Wait until they’re not piping hot or they’ll snap.
I remember burning a batch because I got distracted by a phone call. Classic rookie mistake. Sometimes your best shells come out of the strictest routines—no distractions allowed.
Pro Tips and Tricks: How to Nail It Every Time
Professional chefs swear by these methods: seal your dough edges tight with water, avoid tears by rolling evenly, and most importantly — keep a thermometer handy.
You’d be surprised how many home cooks guess their oil temp and get greasy or burnt cannoli shells.
If the dough tears, just patch it by pinching edges together. better than tossing and starting over—which i’ve also done more than once.
Also, removing the metal form only when shells cool down is critical to avoid cracking or deformation. these little quality checkpoints make all the difference in your final product.
Struggling with oily or soggy shells? your oil is probably too cool. or maybe the dough was too thick in spots, making it hard to fry through.
Adjust and test; this is a hands-on art!
Winning Strategies for Your Cannoli Kitchen Success
Oh, the list of mistakes: over-thick dough, poor oil temp, rushing dough rest time. Avoid ‘em all, and you’re cooking with gas.
Make-ahead? yep, you can fry cannoli shells a day ahead and store in airtight containers—they hold crispness surprisingly well. just don’t fill them too early, or the luscious ricotta filling will soak in and ruin that crunch.
When you fill your shells, keep that sweet ricotta mixture chilling until serving. i like to add mini chocolate chips to my cannoli filling for that classic italian touch no one can resist.
If you want a foolproof cannoli recipe easy enough for the weekend, mastering these cooking methods for your cannoli shells is the biggest win. It’s all about control—timing, temp, and touch.
Speaking from experience, getting your shell recipes right turns you from just a baker into a true cannoli artist. just imagine biting into the first crisp shell bursting with creamy ricotta filling —oh my gosh, total italian dessert heaven.
Next up: Additional Information to level up your cannoli game...
Insider Tips & Secrets for Perfect Cannoli Shells
Alright, spillin’ the tea here—making cannoli shells from scratch isn’t just baking, it’s kinda like crafting a delicious little piece of italian history.
When i first tried this cannoli shell recipe , boy, was it a journey! but once you get the hang of it, you’ll feel like a sicilian pastry pro.
Pro tip? keep your dough chilled — trust me, it’s magic. letting it rest for at least an hour makes rolling it out way easier and keeps the shells flaky and crisp.
Don’t rush it; chill time is your friend here.
Another thing i learned the hard way: oil temperature is 🔑. if it’s too low, you end up with greasy-soggy shells.
Too hot? they burn ridiculously fast. so grab a thermometer, set it around 350° f ( 175° c) , and try to keep it steady.
That steady sizzle is music to your ears—and your taste buds.
Oh! and here’s a small secret for flavor: toss in a little cinnamon and some citrus zest (lemon or orange) right into the dough.
It gives your italian cannoli that subtle aroma that screams authenticity. i like to add a splash of white wine too—something like pinot grigio works great.
This adds depth to the dough you just can’t beat.
Nailing the Perfect Presentation
When it comes to serving, presentation can make or break your dessert cred. i like to go simple but elegant.
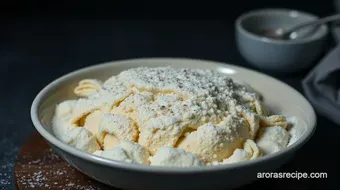
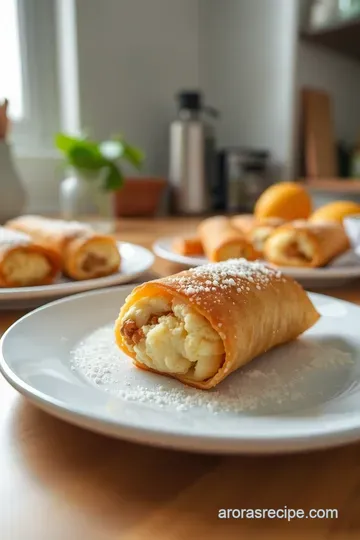
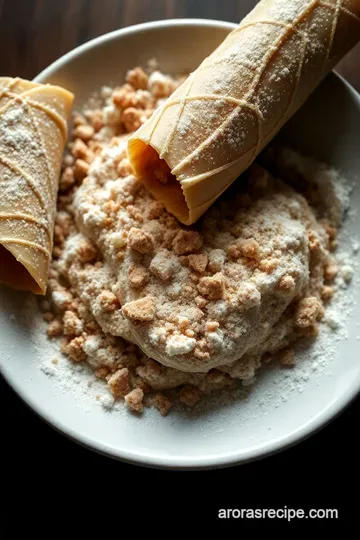
After sliding the cannoli shells off the molds (once they’re cool!), sprinkle a little powdered sugar for that classic snowy look.
For garnishes, fresh mint leaves or chopped pistachios are my go-to. they add a pop of green that contrasts beautifully with the golden shells and creamy ricotta filling .
Plus, a tiny drizzle of dark chocolate sauce can take your loaf from homey to fancy overnight.
Color matters too! the creamy white of sweet ricotta against the golden brown shell is a win. if you want to get playful, scatter some fresh berries around your plate — reds and blues look killer and add freshness to every bite.
Smart Storage & Make-Ahead Hacks
So you’ve nailed these shells, and let’s be honest, you want to savor ‘em later. here’s what i do: store your cannoli shells in an airtight container at room temp .
They'll stay crisp for up to 3 days . don’t refrigerate them unless they’re already filled, or you’ll lose that crunch.
If you want to make this a cannoli recipe easy for parties, prepare shells ahead but fill them right before serving .
Filled shells tend to get soggy quickly (and no one wants that sad moment). reheat empty shells very briefly in a 300° f oven if they lose a bit of their snap, but no microwaves—trust me, they just turn chewy.
Creative Twists on Your Classic Treat
After cooking this recipe a few times, you realize how versatile it is. Want a twist? Swap the wine for sparkling water for a non-alcoholic dough version that’s still wonderfully light.
For the ricotta filling , add mini chocolate chips (a personal fave) or swirl in some zest or cinnamon for a flavor boost.
Going seasonal? toss in crushed roasted hazelnuts in the filling during fall. or try fresh strawberries mixed into your cannoli filling come summer—so fresh and delish!
Also, if you’re watching gluten, experiment with gluten-free flour blends, but heads up, you might need to tweak frying times or thinness to keep that crisp texture.
Regional style? sicilian recipes sometimes add a dash of anise or vanilla bean to the oil during frying for subtle, aromatic notes that are next-level.
The Real Deal Nutrition Guide
Wondering what you’re putting down the hatch? a serving of two shells (without filling) clocks in at around 220 calories with about 8 grams of fat and 32 grams of carbs .
The richness mainly comes from frying and the butter in the dough.
The ricotta filling adds protein (hello, dairy lovers!), and using sweetened ricotta means a little sugar spike, so balance it out with fresh berries or nuts on the side for some fiber and antioxidants.
If you’re watching portions, stick to one or two cannoli per person and savor every bite.
Honestly, eating homemade italian baking goodies like these feels like a treat, but they’re totally manageable if you eat mindfully.
Plus, making them yourself means you can control the sugar and fat way better than store-bought options.
Final Bite — Why This Cannoli Shell Recipe Wins Every Time
Making your own cannoli shells may seem daunting at first, but it’s honestly one of the most rewarding baking experiences.
There’s nothing like biting into that crisp pastry, knowing you made it from scratch . i still remember the first time my family took a bite and just went quiet—yeah, it was that good!
So, don’t stress the process. take your time, chill the dough, fry carefully, and fill last minute. these little gems are perfect for sharing (or sneaking a few solo—no judgment).
And once you get hooked, you’ll find yourself experimenting with fun cannoli recipes and fillings like a pro.
Go on, give this classic cannoli shell recipe a whirl. Your taste buds—and your guests—will thank you!
Frequently Asked Questions
What’s the secret to getting perfectly crispy cannoli shells using this cannoli shell recipe?
The key to crispy shells lies in rolling the dough thin—about 1.5mm—and maintaining the frying oil at a steady 350°F (175°C). Too thick, and the shells become doughy; too thin, and they risk tearing. Also, proper sealing of the dough edges with a bit of water helps prevent oil from seeping in and making them soggy.
Can I make the cannoli shells ahead of time, and how should I store them?
Yes, you can make the shells a day or two in advance. Store them in an airtight container at room temperature to keep the crispness intact. Avoid refrigerating as the moisture may soften the shells. Fill them just before serving to maintain that delightful crunch.
Are there any good substitutions or variations in the classic cannoli shell recipe for dietary preferences?
Definitely! For a non-alcoholic version, replace the white wine with seltzer water for a similar texture. To explore different flavours, try adding orange zest or cinnamon sugar to the dough. For frying, coconut oil or lard can impart unique tastes, while gluten-free flour blends can be experimented with, though texture may vary.
How do I prevent the cannoli shells from cracking when removing them from the metal forms?
Allow the shells to cool slightly but not completely; letting them rest just enough helps them hold their shape and become sturdy. Removing the molds too soon risks them being soft and prone to cracking, while waiting too long can make them stick. Patience is key here—careful gentle sliding off after cooling ensures intact shells.
Is this cannoli shell recipe difficult for beginners, and what tips can help during preparation?
This recipe sits at an intermediate level due to precise rolling, frying temperatures, and working with metal forms, but it's very doable with care. Chill the dough well to make rolling easier and keep your workstation dusted with flour to avoid sticking. Use a kitchen thermometer to monitor oil temperature accurately, and don’t rush the frying process—taking your time really pays off.
Are the cannoli shells healthy, or should I be mindful of certain nutritional factors?
Cannoli shells are a treat with about 220 calories per serving of two shells, largely from carbs and fats due to frying. While delicious, they are best enjoyed in moderation, especially if you’re mindful of sugar and fat intake. Pairing them with lighter fillings like ricotta or fresh fruit can help balance the indulgence.
Previous Recipe: Decadent Nobu Black Cod Recipe – Miso-Glazed Perfection at Home
Next Recipe: Decadent Pecan Pie Cheesecake Recipe: My Favourite Holiday Dessert Bar