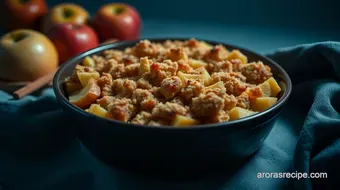
Classic Easy Apple Crisp — A Cozy, Crunchy Autumn Favourite
Discover my classic apple crisp recipe easy to make with simple ingredients and a buttery oat topping. Perfect for a cozy fall dessert—give it a try!

- Sweet Memories and Crunchy Comforts: Why This Apple Crisp Recipe Easy Is a Must-Try
- Classic Easy Apple Crisp — A Cozy, Crunchy Autumn Favourite Recipe Card
- The Backstory Behind the Best Apple Crisp
- Why You'll Love This Easy Apple Crisp Recipe
- Your Must-Have Guide to Essential Ingredients for the Best Apple Crisp Recipe
- Mastering the Professional Cooking Method for the Best Apple Crisp
- Extra Apple Crisp Recipe Easy Secrets You’ll Love
- Make Your Apple Crisp Look Just As Good As It Tastes
- Storing Your Apple Crisp Like a Pro
- Mix It Up: Creative Twists for Your Apple Crisp Fix
- What’s Inside That Yummy Crisp? Your Nutrition Cheat Sheet
- Frequently Asked Questions
Sweet Memories and Crunchy Comforts: Why This Apple Crisp Recipe Easy Is a Must-Try
Alright, so picture this—it's a chilly fall evening, leaves crunching underfoot, and my kitchen smells like a cozy bakery. i’m sitting with my mom, who’s jokingly dubbed herself mom on timeout because, honestly, she’s earned a break from all the hustle.
We’re digging into an apple crisp that’s super simple to whip up but tastes like it took hours. that moment made me realize: an apple crisp recipe easy enough for any busy person is pure gold.
You know that warm, homey feeling you get from comfort foods? this apple crisp hits exactly that sweet spot between nostalgic and no-fuss .
It’s like the hug you didn’t know you needed after a long day. plus, making it together with my mom brought out stories about old family recipes, the kind that don’t ask for fancy ingredients—just love and time in the oven.
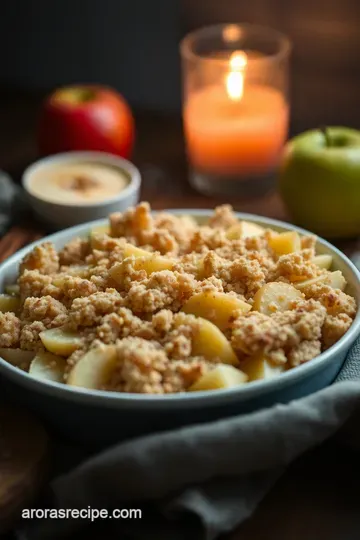
Classic Easy Apple Crisp — A Cozy, Crunchy Autumn Favourite Recipe Card
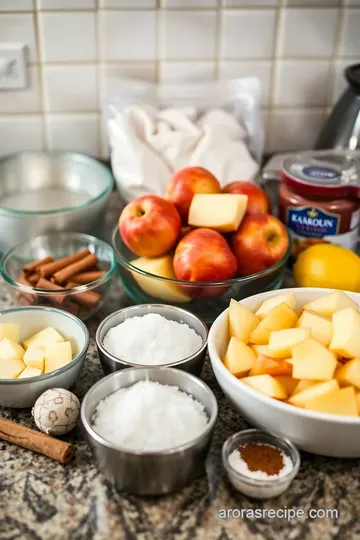
⚖️ Ingredients:
- 6 medium tart apples (e.g., Granny Smith), peeled, cored, and sliced (~900 g)
- 3/4 cup granulated sugar (150 g)
- 1 tbsp lemon juice (15 ml)
- 1 tsp ground cinnamon (2 g)
- 1/4 tsp freshly grated nutmeg (optional) (1 g)
- 2 tbsp all-purpose flour (16 g)
- 1 cup rolled oats (90 g)
- 1/2 cup all-purpose flour (60 g)
- 1/2 cup light brown sugar, packed (100 g)
- 1/2 tsp ground cinnamon (1 g)
- 1/4 tsp salt (1.5 g)
- 1/2 cup unsalted butter (115 g), cold and cut into small cubes
🥄 Instructions:
- Preheat the oven to 350°F (175°C) and prepare the apples by peeling, coring, and slicing them evenly.
- Make the filling by tossing the sliced apples with lemon juice, granulated sugar, flour, cinnamon, and nutmeg until well coated.
- Prepare the crisp topping by combining rolled oats, all-purpose flour, brown sugar, cinnamon, and salt. Cut in the cold butter cubes until the mixture resembles coarse crumbs.
- Assemble the dish by spreading the apple filling evenly in a baking dish and sprinkling the oat topping over it.
- Bake uncovered for 40–45 minutes until the topping is golden brown and the filling is bubbling, ensuring the apples are tender when pierced.
- Allow the apple crisp to cool for 5–10 minutes before serving so the filling thickens slightly.
The Backstory Behind the Best Apple Crisp
So, what's the deal with apple crisp anyway? it’s an american classic with roots tracing back decades—basically, an apple crumble cousin that stole hearts during the early 1900s because it was easy and affordable.
Back then, folks didn’t have fancy ovens or gadgets, so this recipe was a total lifesaver.
Fast-forward to today, and crisp recipes like apple crisp have made a major comeback. why? because everyone’s craving simple desserts that still pack punchy flavors—especially during apple harvest time or cozy autumn nights.
Apple crisp shows up at potlucks, family dinners, and even fancy brunches. it’s that one dessert that’s both classic and cool, and honestly, one of the first apple recipes easy enough for beginners to nail.
If you’re worried about time or skill, don’t sweat it. this recipe takes about an hour top to bottom . it’s beginner-friendly, with easy steps like slicing apples and mixing a buttery oat topping.
Plus, it’s light on the wallet—using common pantry staples that you probably have chilling in your kitchen right now.
And hey, it yields about six hearty servings, so perfect if you wanna impress a small crowd or just have leftovers for snack time debates (because, trust me, it’s hard to stop at one slice).
Why You'll Love This Easy Apple Crisp Recipe
Okay, let’s get real about why this recipe rocks. first up—health perks. apples bring in fiber and antioxidants, helping with digestion and giving you a little health boost.
The cinnamon? that magic spice adds flavor and has inflammation-fighting properties. now, it’s still a dessert (hello sugar and butter!), but it’s one that feels a little more wholesome than your average cake or pie.
What really makes this apple crisp stand out is the mix of textures—the juicy, tender apples below a crunchy, golden oat crumb.
Unlike an apple pie, you don’t have to wrestle with tricky pastry. that buttery crispiness on top? that’s where the magic happens.
Seriously, the topping is like the rockstar of all apple crisp recipes —simple ingredients that come together into pure crunchy bliss.
And if you’re planning a special treat, apple crisp is versatile as heck. thanksgiving? check. saturday movie night? double-check. or just because you accidentally bought too many apples and need a solution pronto.
Compared to similar desserts like apple pie or cobbler, this recipe is way easier and requires less skill or clean-up.
No rolling dough or fancy lattice work here—just easy prep, tasty results, and happy smiles.
Alright, after all this chat about juicy apples and crumbly toppings, i bet your mouth’s watering. next up, i’ll take you through the ingredients for this easy apple crisp recipe that’s close to my heart.
.. and to my mom’s well-deserved timeout. get ready for simple pantry staples that transform your kitchen into a cozy apple paradise.
Your Must-Have Guide to Essential Ingredients for the Best Apple Crisp Recipe
Alright, y’all, let’s have a little heart-to-heart here. if you want that best apple crisp that’ll make everyone ask for seconds (or thirds, no judgment), your starting point is nailing the ingredients.
Seriously, i’ve been down the road of burnt sugar disasters and mushy apple messes, so learning the premium core components is no joke.
Let me spill the tea on what you need to nail this apple crisp recipe easy style.
Premium Core Components: It’s All About the Basics, Baby!
Here’s the deal: for about 6 servings , you’ll want to use 6 medium tart apples – granny smiths are the og choice because their tartness perfectly balances the sweet topping.
That’s about 900 grams or roughly 2 pounds if you’re thinking metric. oh, and to thicken your filling without turning it gluey, toss in 2 tablespoons of all-purpose flour (16 grams).
The sugar? not too much, but enough to sweeten things up without stealing the show — 3/4 cup granulated sugar (150 grams) hits the spot here.
Plus, a splash of 1 tablespoon lemon juice (15 ml) keeps those apples looking fresh and gives a subtle zing.
Trust me, skipping lemon juice is a rookie mistake i learned the hard way.
Butter — never ignore the butter. half a cup (115 grams) of unsalted, cold butter cubes say hello! the key word here is cold.
If it melts too early, your crispy topping turns sad and oily instead of delightfully crumbly.
Wanna grab your measuring cups and spoons? Be sure you’re precise — like US cups or metric grams — it might sound extra, but trust me, it’s a game changer.
Storage tips? keep your apples in the fridge if you’re not prepping right away; they’ll stay firm longer. butter? store it wrapped tight in the fridge until you’re ready to cube it.
And remember, fresh rolled oats (about 1 cup or 90 grams) should be sealed tight in an airtight container to avoid that dreaded stale taste.
Signature Seasoning Blend: Spice It Like You Mean It!
Don’t be shy with the cinnamon — that warm, comforting aroma is half the charm of any apple dessert recipe.
Use 1 teaspoon in the filling , paired with a dash of freshly grated nutmeg (about 1 gram). for the oat topping, sprinkle in 1/2 teaspoon cinnamon too, plus a pinch of salt.
These tiny flavor boosts jazz up the whole dish.
Herbs? not common in an apple crisp, but imagine dropping a few fresh sage leaves nearby—or better yet, a tiny sprig tucked in as you bake for a subtle herby scent.
Totally optional but kinda cool for impressing your guests.
A little trick i’ve learned from my mom on timeout days (aka when the kids are wreaking havoc and i’m desperate for easy meals): adding a pinch of vanilla or even a tiny bit of bourbon to your crisp topping can elevate it from everyday to fancy fast.
Regional twist? Down South, pecans often crash the topping party. West Coast vibes might lean into a smoother cinnamon-ginger combo. Play around—apple crisp recipe easy style means freedom!
Smart Substitutions: Your Kitchen’s Best Backup Plan
Let’s be real: sometimes, life throws curveballs, and you’re out of brown sugar, or you’re going dairy-free because Aunt Linda is visiting. No worries! Here’s the scoop:
- Brown sugar? Swap with coconut sugar for a richer, caramel flavor or regular granulated will do in a pinch.
- Butter? Vegan butter or coconut oil works wonders. Just keep it cold and measure the same amount.
- Gluten-free flour blends can replace your all-purpose flour if you’re avoiding gluten — no compromise on taste here.
If it’s the season and apples are scarce, pears or peaches can ride shotgun for a similar dessert vibe.
Kitchen Equipment Essentials—Keeping It Simple
No need to stress on fancy gadgets. Here’s what helped me turn out a perfect apple crisp total of 20+ times:
- A 9x9 inch baking dish (or anything close in size)
- A good sharp knife and a peeler — cuz no one wants weird apple chunks
- Measuring cups and spoons for precision (trust the process)
- A pastry cutter or two forks to cut the cold butter into the topping — game changer for that perfect crumbly texture
- And of course, your oven set to 350° F ( 175° C)
If you’re missing a pastry cutter, no biggie — just use two forks or your fingers (giggle, but it works).
Keep your tools organized in a drawer or container close by, so prep feels like second nature. Honestly, that’s half the battle when you’re juggling busy schedules and still crave homemade goodness.
Phew! if you’re nodding along and thinking, “yeah, i can do this,” then you’re already halfway to making the best apple crisp of your dreams.
Knowing your ingredients and tools inside out is the secret sauce to an easy apple crisp recipe.
Up next, I’ll walk you through the step-by-step instructions to put all this tasty knowledge into action. Get ready to bake something that’s cozy, crunchy, and will have your whole fam saying, “Wow, you nailed this!”
Mastering the Professional Cooking Method for the Best Apple Crisp
Okay, so let’s chat about cooking this apple crisp recipe easy style—but with that pro flair you might not expect in a home kitchen.
Seriously, nailing a dessert that looks and tastes like it came from a fancy joint is all about prep , timing , temperature , and a sprinkle of patience.
Here’s how you totally boss it, step-by-step.
Essential Prep: Mise en Place Like a Pro
First thing’s first: get into the groove of mise en place —french for “everything in its place.” i know it sounds fancy, but really, it just means prep your ingredients before you even touch the oven.
Peeling, coring, and slicing your tart apples? do it all before mixing anything. i once winged it, half-way through making an easy apple crisp recipe, and the chaos was real.
Slices went everywhere, my sugar and spices were off balance, and i almost forgot the lemon juice (which saves the apples from turning brown, fyi).
Pro tip? line up your measuring cups, spices, sugar, and the flour for both filling and topping. you’re basically running a mini kitchen station, so stay organized with a big bowl for apples and one for your crumb topping.
And oh, time management is your best bud here. set aside a solid 15 minutes of active prep —because rushing the peeling is just gonna make you crabby.
Got kids? this is the perfect task to delegate (they’ll love tossing the apples with cinnamon).
Step-by-Step Bliss: Follow These Like a Pro Chef
Alright, here’s where things get fun.
- Preheat your oven to a steady 350° F ( 175° C) . This temp is gold for apple crisp — slow enough to soften apples and get that crisp topping just right.
- Toss sliced apples with lemon juice, sugar, flour, cinnamon, and a touch of nutmeg. This coating is what makes the filling sing.
- Mix your topping — oats, brown sugar, flour, cinnamon, salt — then cut in cold butter cubes with a pastry cutter or two forks until you get those perfect pea-sized crumbs.
- Spread the apples evenly in a 9x9 inch dish. No clumps here; you want uniform cooking.
- Sprinkle topping evenly—don’t just plop it on—make it rain oat goodness.
- Pop it in the oven for exactly 40- 45 minutes . No peeking every 5 minutes, I swear! Just trust the golden brown topping and the bubbling filling around the edges as your signals the magic is happening.
- Let it rest for about 5- 10 minutes before digging in. This little pause thickens the juices, so no drowning apple mess.
Visual cues? When the topping is golden brown and the apples are fork-tender? You’re home free.
Pro Techniques: What Makes This a Next-Level Crisp
Here’s where i geek out — cutting in cold butter just so is what makes that topping flaky and crumbly, not greasy.
Honestly, i’ve ruined a batch by letting the butter soften too much. so keep it chill, baby!
Also, toss your apple slices gently. Overmixing can bruise them, and nobody wants mushy mush.
One crucial checkpoint? the filling should be just thick enough—not watery, not pasty. if your filling looks too runny either before baking or after, next time add a touch more flour or less juice.
Troubleshooting: If topping browns too fast but apples aren’t cooked, loosely cover the dish with foil and bake longer.
Success Secrets You’ll Thank Me For
Common mistake? Rushing the cooling stage. The filling continues to thicken after the oven. Skipping rest time is like eating lasagna right outta the oven—hot mess in a bad way.
Quality assurance tip? use those tart granny smith apples—they stand up to baking, balancing sweet and tang beautifully. oh, and don’t skip that lemon juice.
It’s the mvp for fresh flavor and color.
Wanna get fancy? Make the topping ahead! Keep it in the fridge for a day. When ready, sprinkle it over the apples and bake fresh. Instant crunchy love without a last-minute scramble.
This whole process taught me that even with an easy apple crisp recipe , you’ve gotta respect your ingredients and timing.
It’s like mom on timeout always says: a little patience, a little prep, and you get the best apple crisp —the kind that makes everyone at the dinner table swoon.
Ready to dive deeper into variations, serving ideas, and some cool upgrades? Hang tight for the next part: Additional Information coming right up!
Extra Apple Crisp Recipe Easy Secrets You’ll Love
Alright, so you’ve got the base down for this apple crisp recipe easy to whip up, but lemme spill some personal pro tips that i swear make all the difference.
When i first tried this recipe, i learned the hard way that cold butter is your best friend . seriously, don’t soften it too much before chopping into the topping.
That cold butter chunks create the best crumbly texture — like mom on timeout style deliciousness. plus, keeping a sharp serrated knife handy when slicing your apples helps keep those pieces nice and even, so they cook uniformly.
No one wants mushy bites mixed with crunchy slices.
Now, here’s a little time-saver that i started using after a chaotic weeknight baking attempt: prep your apple filling the night before and store it in the fridge.
When you’re ready to bake, just mix your topping and pop it in the oven. it cuts active prep time almost in half, which is perfect if you’re chasing toddlers or juggling work calls — anyone else with me here? you’re welcome!
And for jazzing up the flavors, i like to toss in an extra pinch of freshly grated nutmeg with the cinnamon.
That little bonus swirl of spice just lifts up the whole apple party in your mouth. also, if you love your desserts a tad more tart, a splash more lemon juice will brighten it right up.
It’s my secret for balancing the sweetness without losing any of that coozy appeal.
Make Your Apple Crisp Look Just As Good As It Tastes
Here’s the thing — part of what makes this best apple crisp stand out is how you present it. maybe you’ve been there, serving something tasty but just kinda throwing it on the plate.
Trust me, a few simple plating tricks can make your apple dessert recipes shine like a pro.
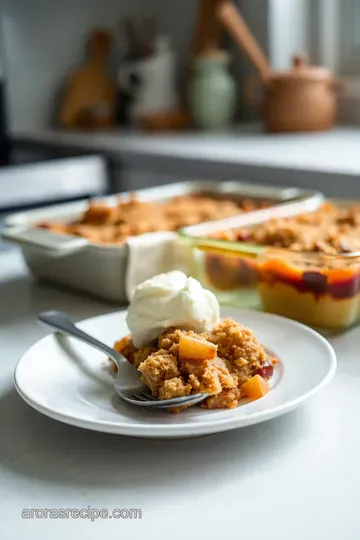
Try scooping a generous portion onto a warm plate or bowl, then plop some creamy vanilla ice cream or a spoonful of whipped cream right on top.
The melty swirl contrast is pure magic. sprinkling a tiny pinch of cinnamon or a few chopped toasted nuts over the top not only boosts flavor but also adds that eye-catching sparkle.
And if you’re feeling fancy, dress up the edge with a crisp mint leaf or a small apple slice fanned out.
Don’t underestimate the power of color combos : golden brown topping, white cream, and a green apple slice? insta-win!
Honestly, a dessert that looks good makes people want to dig in faster. and hey, i’m all about that visual appeal because it ups the fun factor—perfect for holiday dinners or casual get-togethers.
Storing Your Apple Crisp Like a Pro
Made a batch and worried about leftovers? i got you. store your apple crisp in an airtight container in the fridge for up to 3 days.
I usually cover mine tightly with foil or plastic wrap just to keep that topping from drying out. if you want to make it ahead for a party or family feast, you can even prep everything except baking, then bake fresh on the day.
Trust me, that fresh-from-the-oven smell is totally worth it.
When reheating, pop a serving in the microwave for about 45 seconds to 1 minute, or heat in a 350° f oven for 10- 15 minutes.
This brings back that crispy top and warm apple juiciness just like the first time. heads up though: reheating in the microwave may soften the topping a bit, so oven reheating is ideal if you want that crunch preserved.
Mix It Up: Creative Twists for Your Apple Crisp Fix
Okay, so the classic apple crisp is a huge win, but sometimes you want a little twist, right? Here are some fun ideas to tweak the recipe.
Swap out some apples for pears or peaches in summer for a seasonal twist. or stir in dried cranberries and a handful of chopped walnuts into the filling for a little bite and chew.
For my vegan or dairy-free buddies, switching out butter with coconut oil works beautifully and still gives you that crumble goodness.
If you’re watching carbs or sugar, try reducing the sugar in the topping and using a sugar substitute — it won’t be quite the same, but still tasty!
Regional flare? try adding a pinch of ginger or cardamom for a warm spice vibe, or drizzle some maple syrup over before baking for that classic northeastern american sweetness.
Honestly, i’ve spent so much time experimenting on this i feel like apple crisp scientist number one, and each variation brings its own cozy vibes.
What’s Inside That Yummy Crisp? Your Nutrition Cheat Sheet
Let’s keep it real — dessert is dessert. but this apple crisp isn’t just empty calories. thanks to the apples, you get a good dose of fiber and vitamins, plus the oats in the crisp topping lend some heart-healthy whole grains.
Each serving clocks in around 320 calories, which feels totally reasonable for a homemade dessert, especially paired with fresh fruit and no crazy ingredients.
If you’re counting carbs or watching sugar, just remember the brown sugar and sweet apples do add sugar naturally — but balance it out by enjoying this as a treat, not an everyday snack.
Portion control is key, and a small serving alongside some protein, like yogurt or nuts, can make it part of a balanced meal.
Honestly, making this easy apple crisp recipe has been a little slice of comfort for me — a non-fussy dessert that feels like a warm hug from the kitchen.
It’s the kind of recipe that turns hectic days into cozy nights and brings smiles to the table. so if you’re itching to try it, go for it! you’ll have dessert ready that tastes as great as the love you put into it.
And hey, when you nail that perfect crisp crumble, don’t be shy to brag a little! you just made the best apple crisp , no contest.
Frequently Asked Questions
What makes this apple crisp recipe easy compared to other desserts?
This apple crisp recipe is designed for simplicity—no fancy techniques or special equipment needed. With straightforward steps like slicing apples, mixing a crumbly oat topping, and baking in one dish, it’s perfect for beginners or anyone wanting a quick, comforting dessert without fuss.
Can I make apple crisp recipe easy ahead of time and reheat it later?
Absolutely! You can prepare and bake the apple crisp a day ahead. Store it covered in the fridge, then reheat in a preheated oven at 325°F (160°C) for about 15–20 minutes until warmed through and the topping is crisp again. This makes it a great dessert for busy days or entertaining.
What are some good variations or substitutions to try with this apple crisp recipe easy?
Try adding chopped nuts like pecans for crunch or mix dried cranberries into the apples for a fruity twist. For dietary needs, swap butter with vegan butter or coconut oil, and use a gluten-free flour blend to make it gluten-free. Spice it up with pumpkin pie spice or ginger for cosy autumn vibes.
How should I store leftovers and how long will apple crisp keep?
Store leftovers covered in the fridge for up to 3–4 days. Warm individual portions in the microwave or oven before serving to bring back that lovely crisp topping and tender filling. Avoid freezing, as the texture of the topping may change and get soggy upon thawing.
Is apple crisp a healthy dessert option?
While deliciously comforting, apple crisp does contain sugar and butter, so it’s best enjoyed in moderation. Using tart apples boosts natural fibre and vitamins, and adding oats offers some heart-healthy benefits. You can also reduce sugar or substitute with natural sweeteners for a lighter version.
Any tips to get the crispiest topping on my apple crisp?
Keep your butter cold and cut it into the dry ingredients until the mixture resembles coarse crumbs—that’s key for a crunchy topping. Also, avoid covering the crisp while baking to let steam escape, ensuring the oats brown nicely. For an extra golden finish, sprinkle a little brown sugar on top before popping it in the oven.
Previous Recipe: Cajun Crawfish Fettuccine Recipe with Creamy Garlic Sauce — A Southern Favorite
Next Recipe: Easy Southern-Style Hushpuppy Recipes: Crispy & Homemade Perfection