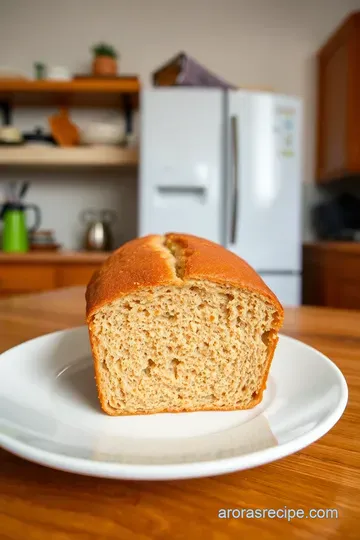
Golden Honey Wheat Bread: Soft, Sweet, and Wholesome Loaf
Discover my easy honey wheat bread recipe with a soft crumb and gentle honey sweetness. Perfect for cozy breakfasts and sandwiches—give it a try today!

- Why You’ll Fall in Love with This Honey Wheat Bread Recipe
- Golden Honey Wheat Bread: Soft, Sweet, and Wholesome Loaf Recipe Card
- From Classic Roots to Your Kitchen Counter
- Why This Honey Wheat Bread Beats the Rest
- Getting Ready to Bake: Follow Me to the Ingredients
- The Essential Ingredients Guide for Your Honey Wheat Bread Recipe
- Mastering the Professional Cooking Method for Your Honey Wheat Bread Recipe
- Insider Tips and Tricks for Your Honey Wheat Bread Recipe
- Making Your Homemade Bread Look as Good as It Tastes
- Storage and Reheating — Keep the Flavor Fresh
- Switch It Up: Creative Twists on Honey Wheat Bread
- Nutrition That Actually Makes You Feel Good
- Frequently Asked Questions
Why You’ll Fall in Love with This Honey Wheat Bread Recipe
Okay, so picture this: it’s a lazy sunday morning, and i’m standing in my kitchen, the smell of fresh bread wafting through the air.
The warm, golden crust of my honey wheat bread recipe just came out of the oven. i tear off a slice, spread some butter that melts instantly, and take a bite.
Man, that sweet, nutty flavor mixed with that soft crumb? pure comfort. honestly, that moment felt like a little slice of heaven.
If you’ve ever wondered how to make bread that’s both wholesome and just a bit sweet, you’re in the right place.
This recipe isn’t just about making bread. it’s about reconnecting with simple, honest food that fills your home with warmth.
Whether you’ve tried your hand at baking before or you’re just diving in, this honey wheat bread will quickly become your go-to.
Golden Honey Wheat Bread: Soft, Sweet, and Wholesome Loaf Recipe Card

⚖️ Ingredients:
- 2 cups whole wheat flour (freshly sifted if possible)
- 1 cup all-purpose flour
- 2 1/4 teaspoons active dry yeast (1 packet or 7g)
- 1 teaspoon salt (6g)
- 2 tablespoons honey (preferably raw or mild-flavored)
- 1 1/4 cups warm water (about 110°F / 43°C)
- 2 tablespoons olive oil or melted unsalted butter
🥄 Instructions:
- Activate the Yeast: Warm the water to around 110°F, stir in honey and yeast, and let sit for 5-10 minutes until foamy.
- Mix the Dough: In a large bowl, combine whole wheat flour, all-purpose flour, and salt. Pour in the yeast mixture and olive oil/butter, stirring until a shaggy dough forms.
- Knead the Dough: Turn the dough onto a floured surface and knead for 8-10 minutes until smooth and elastic, adding small amounts of flour if needed.
- First Rise: Place the dough in a lightly oiled bowl, cover with a damp towel or plastic wrap, and let rise in a warm spot until doubled in size (about 1 hour).
- Shape and Second Rise: Punch down the dough, shape it into a loaf, place it in a greased 9x5-inch pan, and let rise until puffy and nearly doubled (30-40 minutes).
- Bake the Bread: Preheat the oven to 375°F and bake the loaf for 30-35 minutes until golden brown and hollow-sounding when tapped; internal temperature should reach about 190°F.
- Cool Before Slicing: Remove the loaf from the pan, transfer to a cooling rack, and let cool completely (at least 1 hour) before slicing.
From Classic Roots to Your Kitchen Counter
Did you know that the tradition of mixing honey with wheat bread goes way back? for centuries, honey has been used instead of sugar to naturally sweeten breads, adding not just flavor, but also a touch of moisture and softness.
This blend really kicked off in american farmhouse cooking—simple ingredients, straightforward methods, and flavors that stick with you.
Fast forward to today, and honey oat bread or oat quick bread variations are popping up everywhere. folks love baking gluten-friendly versions too, thanks to the surge in gluten free recipes bread that still taste rich and satisfying.
But keep in mind, while this is a medium difficulty recipe, it’s a rewarding challenge that doesn’t require fancy gadgets—just a little patience for rising dough and kneading.
A typical loaf takes around 1 hour and 50 minutes total from start to finish—most of that is hands-off rising time.
And the best part? you’re getting about 10 hearty slices, enough to share (or not, no judgment here).
Cost-wise, the ingredients are super affordable. Whole wheat flour, honey, yeast, some oil—it’s all pantry staples, making this recipe wallet-friendly but feel-like-a-treat worthy.
Why This Honey Wheat Bread Beats the Rest
Let’s dive into the juicy bit—why should you pick this honey wheat bread recipe over the bazillion options online?
For starters, it’s nutritionally solid . whole wheat flour shines with fiber and protein, while honey adds antioxidants and a gentle sweetness without the crash of refined sugar.
If you’re on the lookout for gluten free ideas or gluten free breads that still pack a punch, slight tweaks with gluten-free flours can transform this recipe, making it yours no matter your dietary needs.
One of the coolest things? compared to plain white bread, this loaf has a richer texture and that lovely honey aroma that makes breakfast feel cozy, not rushed.
Plus, the crumb stays soft even after a couple of days, so no need to rush eating it!
I find it’s perfect for special occasions —like sunday brunches, holiday breakfasts, or even casual dinner sides. imagine dipping a thick slice into homemade soup or slathering it with jam on a chilly morning.
Honestly, it makes meals feel a little more special without adding effort or stress.
Compared to honey oat quick bread or other quick breads, this yeast-risen loaf has that chewiness and depth that only comes from slow rising.
If you’re someone who loves a dense but tender loaf, it’s a game-changer.
Getting Ready to Bake: Follow Me to the Ingredients
Now you’re probably itching to know what goes into this beauty, huh? well, i’m about to walk you through every ingredient you need to make your own loaf of golden goodness.
From the warm water that wakes up your yeast, to the drizzle of olive oil that keeps everything tender—trust me, you’ll want to keep reading.
Ready to fill your kitchen with that irresistible smell? Let’s jump straight into the ingredients that make this bread uniquely yours —and absolutely delicious.

The Essential Ingredients Guide for Your Honey Wheat Bread Recipe
Alright, friends, let’s dive into what really makes a honey wheat bread recipe sing. i mean, you can throw together any old flour and water, but getting those premium core components right? that's where the magic happens.
And trust me, after a few kitchen mishaps—like that one time i forgot to proof my yeast properly—i'm telling you, measuring and choosing the right stuff saves the day.
Premium Core Components: The Real Deal
First off, the flour. for this recipe, you want 2 cups (240g) of whole wheat flour plus 1 cup (120g) of all-purpose flour .
If you can, sift that whole wheat before measuring. freshly sifted? oh, totally worth it! it makes your dough lighter and your crumb softer.
Here’s a quick tip: whole wheat flour can carry a bit more bite, so the all-purpose flour balances the texture.
Speaking of measurements, i always say keep a kitchen scale handy if you can. accurate weigh-ins (grams or cups) are clutch because too much flour can wreck your loaf, making it dense or dry.
I’ve been there.
Salt is crucial , too – exactly 1 teaspoon (6g) to make sure your bread isn’t bland but don’t overdo it—it can stop the yeast from doing its thing.
Then comes the yeast, the heartbeat of your bread. you’ll need 2 ¼ teaspoons (1 packet or 7g) of active dry yeast .
Quality yeast should be plump and beige, not powdery or expired. an expired packet? yeast won’t foam , and that’s a total bummer.
Side note: i learned the hard way because my bread was a flat pancake once—yikes.
For sweetness, go for 2 tablespoons (42g) of honey , preferably raw or mild-flavored. It not only adds gentle sweetness but helps your crust brown beautifully.
About liquids, use 1 ¼ cups (300ml) of warm water around 110° f ( 43° c) . too hot and you kill the yeast; too cold and it won’t activate.
Just like goldilocks said— you want it just right.
Lastly, 2 tablespoons (30ml) of olive oil or melted unsalted butter —this keeps your bread moist and soft. oh, and yes, olive oil gives a nice subtle flavor, but butter? that’s my personal cozy fave.
Signature Seasoning Blend: Keepin’ It Simple, But Flavorful
Now, this bread doesn’t call for crazy herbs, but sometimes i like tossing in a teaspoon of cinnamon or nutmeg to cozy it up when fall rolls around.
But for the classic, the star is really the sweetness of the honey oats or oat quick bread vibe you can add if you sprinkle some rolled oats on top before baking.
Trust me—adding oats not only amps the texture but also gives you a slight nutty crunch. if you’re going for a gluten-free spin—hey, glutenfree baking ? no problem—just pick oats certified gluten-free and swap out some flour with a gluten-free mix.
It's a cool way to use gluten free recipes bread without losing flavor or chew.
Smart Substitutions: Because Life Happens
No whole wheat flour? don't sweat it. i sometimes swap it out for whole spelt flour or even a mix with white whole wheat flour.
When i did that last week, the loaf still came out tasty and moist.
If you ran out of honey (gasp!), maple syrup works as a neat alternative for that sweet hit. and butter lovers, you can switch olive oil for melted butter for a richer loaf.
For those looking for gluten free breads , swap traditional flour for blends like rice flour or almond flour but be warned : the texture changes! the bread might be crumbly but still tasty.
Oh, emergency replace your yeast with instant yeast? Use slightly less water and cut rise times a bit. Worked wonders for me mid-baking once when I was low on supplies.
Kitchen Equipment Essentials: What You Really Need
Let me be real with you. you don't need a fancy stand mixer or bread machine here. a large mixing bowl , measuring cups and spoons , and a decent 9x5 inch loaf pan do the job.
I swear by having a dough scraper or spatula —it saves your hands when the dough gets sticky. also, cover your dough with a damp towel or plastic wrap for rising.
Trust me, your kitchen will thank you for less mess.
And here’s a little trick: if you have an oven thermometer , check your oven temp! my oven once ran hot and burned my first crust.
Total heartbreak. you want a steady 375° f ( 190° c) for baking our loaf.
Store your loaf in a breathable bag or a cloth to keep that crust crisp. Plastic bags? Save those for day-two or three because they soften the crust.
Honestly, once you nail the ingredients and tools, the rest feels way less intimidating. the process comes alive, step by step.
Up next, i'll walk you through the actual baking journey—how to get that dough just right, watch it rise, and pull out a golden, bubbly loaf.
If you love playing with variations like honey oat bread or exploring gluten free ideas , you're gonna adore this.
Ready to roll up your sleeves? Let’s get into the instructions!
Mastering the Professional Cooking Method for Your Honey Wheat Bread Recipe
Alright, buddy, i’m gonna let you in on some of those secret pro moves that really turn a basic honey oat bread or an oat quick bread into a bakery-worthy loaf.
You know, the kind where you bite in and it just hits all the right notes—soft, chewy, slightly sweet, with that golden crust.
I’ve been down the kitchen road a few times, with my fair share of bread fails (oh, the sticky dough disasters!), so these tips come straight from learning the hard way.
Get Set with Essential Prep Steps — Mise en Place Magic!
First off, mise en place isn’t just chef talk for “put your stuff out.” it’s the backbone of smooth sailing in the kitchen, especially when you’re dealing with timed rises and temperature-sensitive yeast.
Before you even think about mixing your dough, measure out all your ingredients—your flours, honey, yeast, salt, and water. i swear by using a little bowl for each, so when you’re ready, everything flows.
When i tried baking my honey wheat bread recipe once without this, i grabbed the salt instead of sugar (yeah, rookie move), and whoa, no one wants salty bread.
Timing’s clutch here. you wanna activate the yeast in warm water heated to around 110° f ( 43° c) — not hot or you’ll kill the yeast party.
Then, give it about 5 to 10 minutes until foamy bubbles form. that's your green light. don’t rush this wait, it’s like yeast’s warm-up routine.
Also, have your workspace clean and prepped. it sounds obvious, but clutter leads to mistakes. i like to wipe down my counters and keep a damp towel handy to cover my dough while it rises.
Safety-wise? keep an eye on temps when baking, y’all. oven thermometers are life savers. too low, and your bread won’t bake through; too high, and you end up with a crusty burnt top and gummy inside.
Speaking of that…
Follow the Step-by-Step Process Like a Pro Boss
Here’s the cliff notes on the bread action:
- Activate yeast in honey-sweetened warm water (110° F, 5- 10 minutes ).
- Mix whole wheat flour, all-purpose flour, and salt in a big bowl.
- Pour yeast mixture and olive oil in, combine till you get a shaggy dough.
- Knead for about 8- 10 minutes until the dough feels smooth and elastic (not gluey).
- First rise: cover, warm spot, about 1 hour or until doubled.
- Punch down, shape, loaf pan, second rise: 30- 40 minutes until puffy.
- Bake at 375° F ( 190° C) for 30- 35 minutes until golden brown and sounds hollow.
- Let cool fully on rack before slicing, minimum 1 hour .
Watch out for the visual clues. when the loaf is shiny, golden, and dull-sounding when thumped, you’re golden (pun intended).
And don’t be like me and slice too early—waiting lets the crumb set so no gummy bites.
Expert Tips You’ll Actually Use
Okay, now that you’re acing the basics, here’s where the pros separate from the weekend bakers:
- When kneading, don’t drown your dough with flour just ’cause it’s sticky. It should be a bit tacky—that’s perfect hydration for a soft crumb.
- Use a light oil or butter in your pan for that perfect easy-release crust.
- Critical checkpoint: your dough should roughly double in size both times you let it rise. If it ain’t doubling, your yeast might’ve gone bad or the environment too cold.
- Struggling with dense bread? Try placing a pan of hot water in the oven during rising phases—it helps create a humid environment for better dough bounce.
- If you end up with a tough crust, maybe reduce oven heat slightly or cover with foil halfway through baking.
Winning at Bread Baking — Success Tips That Work
Now, here’s some real talk from someone who’s burned a few shelves:
- Don’t skip the resting phases. It’s tempting to binge-bake, but patience makes perfect.
- Check yeast freshness—expired yeast means dead dough.
- Store leftover honey oat bread in a paper bag or loosely wrapped in kitchen cloth to keep crust crispy AND crumb soft.
- Want to save time? Try this as a make-ahead: bake loaves, cool completely, slice, and freeze. Toast slices later, and voila! Fresh bread whenever you want.
- Oh, and beware of over-kneading — bread can get tough. It’s a subtle skill, but your dough should stretch a bit without tearing.
Honestly, mastering this honey wheat bread recipe opened up my brain to other yumminess like glutenfrei baking and gluten free breads.
It’s like a gateway drug to healthier homemade options. plus, you’re not just making bread; you’re creating a little moment of magic that’s way better than store-bought any day.
So, if you’re vibing with the idea of wholesome honey oat bread or want gluten free recipes bread style, this method’s got your back.
Stick with me, 'cause next up we’re diving into Additional Information you won’t wanna miss — like flavor twists, storage hacks, and how to jazz up your loaf like a bakery boss!
Insider Tips and Tricks for Your Honey Wheat Bread Recipe
Alright, real talk — whenever i’m making my honey wheat bread recipe , i always stumble into a few little hiccups before it turns out just right.
Here’s the deal: patience is your best buddy. don’t rush the rising time! that’s when the magic happens. if you try to speed that part, you’ll end up with dense bread, and nobody wants that.
Oh, and here’s a little chef secret: warm your water just right — around 110° f . any hotter, and you might kill your yeast.
I actually use a thermometer because i’m a bit paranoid about it. you can also jazz up the dough by stirring in a teaspoon of cinnamon or a pinch of nutmeg.
It gives the bread a subtle cozy vibe, especially in fall.
When it comes to kneading, don’t overdo it. i used to think “more kneading = better bread,” but turns out, slightly under-kneaded dough can give you a softer, fluffier crumb.
Just make sure it’s elastic and doesn’t stick like crazy. if your dough is too sticky, dust with a little flour, but keep it tacky to avoid dryness.
Last thing on the time-saving front: once you’ve punched down your dough, if evenings are crazy, you can pop the shaped loaf in the fridge overnight for a slow second rise.
It’s an easy cheat for fresh bread in the morning without the morning sweat.
Making Your Homemade Bread Look as Good as It Tastes
Presentation might sound fancy, but with bread, it’s all about the little extra touches. when you slide that warm loaf out of the oven, brushing the crust lightly with melted butter is a total game changer.
It adds shine, plus a slight hint of yum.
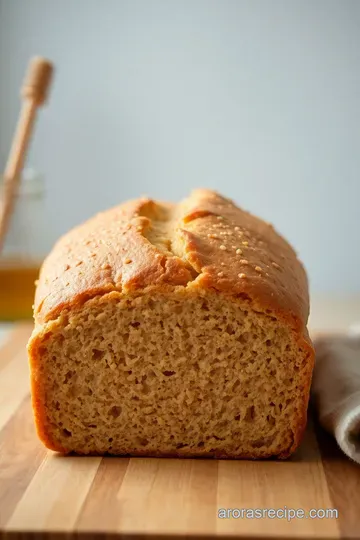
To keep things interesting, sprinkle some honey oats or rolled oats on top before baking. it looks rustic, kind of like those cozy bread baskets you see in little americana diners.
Bonus: it adds a nice texture contrast.
Color is key too! your crust should be a deep golden brown, signaling all that sweet honey has caramelized just right.
If you want to impress, slice the loaf thick and serve it with colorful spreads — think berry jams, or avocado smash.
These pop visually next to the warm wheat tones, making your simple bread look like a million bucks.
Storage and Reheating — Keep the Flavor Fresh
Okay, so you made this beautiful loaf, and no way you’re gonna eat it all in one sitting. been there, done that, got the bread coma.
Here’s how i preserve that fresh-from-the-oven goodness.
Wrap your bread in a clean cotton dish towel or a paper bag for room temp storage. avoid plastic unless you wanna sad soggy crust vibes.
The loaf should stay fresh for about 3 to 4 days this way — perfect for daily toast or sandwiches.
If you’re looking to store a little longer, slice it and freeze it in a zip-top bag. toast slices right from the freezer when you’re craving that honey oat quick bread vibe.
To reheat, i usually toss slices in the toaster or oven set to 350° f for 5- 7 minutes until toasty warm and the crust regains a bit of crunch.
Microwave? nah, save yourself the disappointment; it turns chewy real fast.
Switch It Up: Creative Twists on Honey Wheat Bread
I gotta admit, i love switching up this honey wheat bread recipe based on the season or what’s in my pantry.
In spring, throwing in some lemon zest and poppy seeds gives a fresh zing that pairs great with brunch. for the winter months, mixing in warm spices like cinnamon and cloves makes it extra cozy.
If you’re into glutenfri baking (gluten-free baking), you can easily substitute wheat flour with gluten-free blends designed for bread, like oat-based flours or chickpea flour mixes.
Just remember, gluten-free dough will be stickier and denser, so handle it gently. there are great gluten free recipes bread that borrow heavily from this honey oat bread style, giving you a similar wholesome taste.
For those watching sugar, swap honey for mashed bananas or applesauce to keep that natural sweetness but cut back on refined sugars. You might be surprised how versatile this bread is!
Nutrition That Actually Makes You Feel Good
Bread sometimes gets a bad rap, but this hearty loaf packs a nice nutritional punch. each slice serves up about 140 calories with 4 grams of protein and good fiber from the whole wheat flour.
Plus, the natural honey provides antioxidants and a gentle sweetness that beats processed sugars any day.
I like to think of this bread as part of a balanced breakfast, stacked with healthy fats and protein — like almond butter or smashed avocado topped with a sprinkle of chili flakes if you’re feeling spicy.
If you’re counting sodium, keep in mind this recipe has about 180mg per slice, mostly from salt — so no need to stress over small amounts, especially if you enjoy it alongside fresh fruit or homemade preserves.
Wrapping It Up
Honestly, baking this honey wheat bread recipe has been one of my fave kitchen adventures. it’s simple but satisfying — kind of like making your own little warm slice of comfort.
Whether you're craving the wholesome goodness of a honey oat bread , experimenting with gluten free ideas , or just in it for the joy of kneading some dough, this recipe's got your back.
So go ahead, give it a whirl! i promise it’s worth the wait — your kitchen will smell like a cozy bakery and your taste buds will thank you.
Nothing beats homemade bread fresh from the oven, friends. don’t forget to share with the people you love — because bread tastes better when it’s shared.
Frequently Asked Questions
Can I make the honey wheat bread recipe without an oven thermometer?
Yes, you can definitely make this honey wheat bread recipe without an oven thermometer. Just preheat your oven to 375°F (190°C) and use the oven’s built-in thermostat. However, an oven thermometer helps ensure your oven is at the right temperature, which is especially handy if your oven tends to run hot or cold, giving you a more reliably baked loaf.
How should I store my homemade honey wheat bread to keep it fresh?
Once your honey wheat bread has cooled completely, store it wrapped in a clean kitchen towel or paper bag to keep the crust crisp while preventing it from drying out. For longer storage, you can freeze sliced bread in a sealed plastic bag and toast slices straight from the freezer. Avoid storing bread in plastic bags at room temperature for too long, as it tends to get soggy.
What are some good variations or flavour additions for the honey wheat bread recipe?
Feel free to get creative! Adding a handful of toasted sunflower seeds, oats on top, or mixing in a teaspoon each of cinnamon and nutmeg can give your bread a lovely twist. You could also swap the honey for maple syrup for a different but equally delicious sweetness. These small changes can personalise the loaf to your taste.
Why is it important to let the bread cool completely before slicing?
Letting your honey wheat bread cool fully (about an hour) allows the crumb to set properly and prevents it from becoming gummy or doughy when sliced. Cutting into hot bread releases steam that can make the texture dense and sticky, so patience here really pays off with the perfect slice.
Can I substitute whole wheat flour with something else in this honey wheat bread recipe?
Absolutely! If you don’t have whole wheat flour, whole spelt flour or white whole wheat flour are great substitutes that still deliver a wholesome flavour and texture. Just be mindful that alternative flours might alter the rise and crumb slightly, so keep an eye on the dough consistency during kneading.
How do I know if my honey wheat bread dough has risen enough?
The dough should roughly double in size during the first rise, which typically takes about an hour in a warm spot. A good test is to gently press a finger into the dough—if the indentation springs back slowly and partially remains, it’s ready for shaping. Avoid under or over-proofing to get an airy yet sturdy loaf.

Previous Recipe: Easy Cooking Rockfish: Pan-Seared Rockfish with Lemon Herb Butter
Next Recipe: Authentic Greek Gyro Meat Seasoning: My Easy Family Favorite Blend