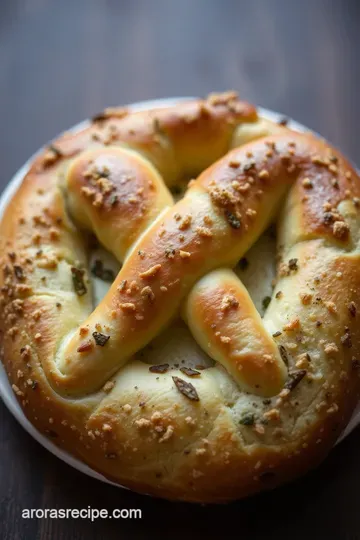
Savory Seasoned Soft Pretzels
Discover my savory seasoned pretzel recipe with a crispy crust and herb-coated finish. Perfect for snacks using pretzels or festive holiday treats!

- Getting to Know Our Savory Seasoned Pretzel Recipe
- Savory Seasoned Soft Pretzels Recipe Card
- Essential Ingredients Guide for Your Seasoned Pretzel Recipe
- Mastering the Professional Cooking Method for Your Seasoned Pretzel Recipe
- Unlocking the Secrets of a Seriously Awesome Seasoned Pretzel Recipe
- Frequently Asked Questions
Getting to Know Our Savory Seasoned Pretzel Recipe
You ever had one of those snacks that just hits different? like, it’s crunchy, salty, a little herby, and just perfect for munching while watching your fave show or chilling with friends? oh man, that’s exactly how i felt the first time i baked this seasoned pretzel recipe at home.
I was skeptical, honestly. pretzels seemed like something fancy bakeries made with some secret magic. but guess what? making your own baked seasoned pretzels is way easier—and more fun—than you’d think!
Pretzels have a special place in my snack rotation, especially now that i know how to nail their classic chew and salty crust, plus kick it up a notch with some killer seasoning.
Whether it’s the simple sea salt or something wild like pizza flavored pretzels , the possibilities are endless. and hey, if you love snacks using pretzels or want to wow your gang with cool pretzel holiday snacks , this recipe’s your new go-to.
Why Pretzels? A Bite of History Meets Today’s Snack Scene
Okay, let’s get a little nerdy. pretzels? they’ve been around since, like, medieval europe—probably germany or somewhere nearby—and were originally thought to bring good luck.
They were simple, tasty, and symbolized peace. fast forward to today, and pretzels? they’re everywhere: at baseball games, in snack aisles, at oktoberfest, and now making their way into creative twists like the salty pretzel recipe world we dive into here.
Making pretzels at home can feel like a mini celebration of tradition mixed with your own flair. plus, with this recipe, you’re not just baking; you’re creating a snack that’s fun to make.
It takes about an hour and a half from start to finish—not too bad if you ask me—and it’s medium difficulty.
So yeah, it might take a little elbow grease, like boiling the dough in a baking soda bath (weird step, but super important!), but trust me, the crust you get is worth it.
Cost-wise? super friendly. flour, yeast, and some simple seasonings are all you need to create a batch big enough for a handful of friends or a cozy movie night.
And with eight pretzels per batch, your snack stash is solid.
What’s So Great About This Seasoned Pretzel Recipe?
Now, besides tasting absolutely delicious (I always sneak a couple before anyone else gets near), there are some cool benefits to homemade seasoned pretzels.
First off, they’re a bit healthier than store-bought stuff. you control the salt, skip any preservatives, and you can add wholesome herbs like parsley—giving you a little boost while snacking.
Plus, the dough is made fresh with simple ingredients—no funky additives—so you can brag you made your own snacks, not just microwaved some bagged pretzels.
These pretzels also shine on special occasions. holidays, game nights, backyard parties—they’re like the perfect crowd-pleaser. imagine pulling out a tray of hot, buttery pretzels with seasoning , and watching everyone dive in.
People love snacks with that little homemade touch and unique flavors. you can even customize them! wanna try salt and vinegar vibes? or a smoky paprika kick? this flavor pretzels recipe lets you play around till you find your fave.
Compared to other snack ideas, these pretzels have an edge. they’re more filling than chips, more versatile than plain breadsticks, and way cooler when everyone asks where you got them.
Seriously, i’ve had friends asking me to make these for their birthdays after just one bite.
So if you’re ready to upgrade your snack game with some crunchy, fluffy, totally addictive treats, stay tuned. next up, i’ll walk you through the ingredients you need to get this party started.
Trust me, once you sniff that garlic and herb butter melting on freshly baked pretzels—you’ll know it was worth every minute.
Savory Seasoned Soft Pretzels Recipe Card

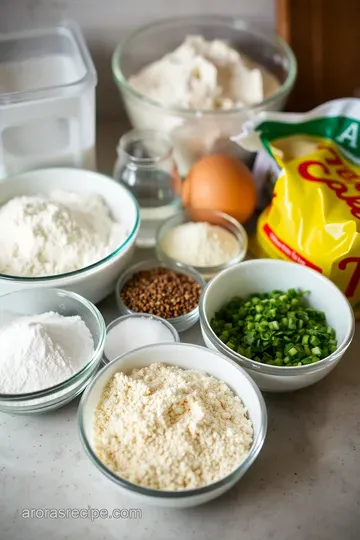
⚖️ Ingredients:
- 4 cups all-purpose flour (480g)
- 1 tablespoon granulated sugar (12g)
- 2 teaspoons instant yeast (7g)
- 1 1/2 teaspoons kosher salt (9g)
- 1 1/2 cups warm water (approx. 110°F/43°C)
- 10 cups water
- 2/3 cup baking soda (160g)
- 2 tablespoons unsalted butter, melted (30g)
- 1 teaspoon garlic powder
- 1 teaspoon dried parsley flakes
- 1 teaspoon sea salt flakes (or kosher salt)
- Optional: 1/2 teaspoon smoked paprika or chili flakes
🥄 Instructions:
- Combine warm water, sugar, and yeast; let bloom for 5 minutes until foamy. Gradually mix in flour and salt, then knead until smooth and elastic (8-10 minutes). Cover and let rise for 1 hour until doubled in size.
- Punch down the dough and divide into 8 equal portions. Roll each piece into a 20-inch rope and shape into a pretzel.
- In a large pot, bring 10 cups of water and 2/3 cup of baking soda to a boil to prepare the baking soda bath.
- Drop each pretzel into the boiling bath for 30 seconds, then remove with a slotted spoon and place on baking sheets. Brush each with melted butter.
- Sprinkle garlic powder, dried parsley, and sea salt flakes (plus optional smoked paprika or chili flakes) over the pretzels. Bake in a preheated oven at 425°F (220°C) for 12-15 minutes until golden brown.
- Allow the pretzels to cool slightly on a rack before serving warm.
Essential Ingredients Guide for Your Seasoned Pretzel Recipe
Alright, let me spill the beans on what really makes this savory seasoned soft pretzels recipe pop! when i first tried nailing pretzels with seasoning at home, i seriously underestimated the power of having the right ingredients.
You don’t want your salty pretzel recipe turning out blah, right? let’s talk about the basics — from the premium core components to those sneaky smart swaps that saved me in a pinch.
Premium Core Components: What to Pick and How Much
Here’s the deal. when it comes to ingredients, precision matters. for starters, you’ll wanna use 4 cups (480g) of all-purpose flour —that’s both in us and metric, so no excuses! the flour quality? go for a good brand, none of that bargain bin stuff because it affects texture badly.
Then there’s 1 ½ cups (360ml) warm water , ideally at around 110° f ( 43° c) —warm enough to wake up the yeast, but not kill it.
One time, i got impatient and used hot water straight from the tap—ended up killing the yeast, and my dough was a sad lump.
For that punch of flavor, the unsalted butter is key. use real butter, not margarine (trust me, it makes a difference).
You need about 2 tablespoons (30g) melted, to brush on before seasoning—don’t skip this step, it helps the seasonings stick like glue.
Oh, and for the salt? use sea salt flakes if you can. they’re way better than regular table salt—those crystals add crunch and flavor bursts.
I store my salt flakes in an airtight container, away from moisture, and they last forever. the same goes for dried parsley flakes and garlic powder: check the "best by" date and sniff ‘em before use—stale spices won’t bring the magic.
Signature Seasoning Blend: Where the Fun Begins
You know every seriously good pretzel snack deserves a killer seasoning combo, right? my go-to mix is simple but packs that perfect savory punch: garlic powder , dried parsley flakes , and sea salt flakes .
Honestly, this combo nails the classic flavor profile. sometimes, if i’m feeling a bit cheeky, i add a pinch ( ½ teaspoon ) of smoked paprika or chili flakes —hello, smoky or spicy vibes!
One tip: mix the spices together in a small bowl before sprinkling so every bite gets equal love. also, if you're into regional flavors, you can try swapping parsley for rosemary or thyme for a kind of mediterranean twist.
And if you want to get wild, the pizza-flavored pretzels idea is totally doable—think oregano and crushed red pepper in the mix.
Smart Substitutions That Save the Day
Listen, life happens. sometimes, you forget one ingredient or need a dietary tweak. no worries—i've been there! for example, if you don’t have instant yeast, you can use active dry yeast ; just proof it in warm water until foamy (about 5- 10 mins).
For the butter haters or dairy-free folks, try olive oil for brushing—it won’t be exactly the same but will keep pretzels moist.
Or swap regular flour for bread flour if you want a chewier chew (i love this variation—it’s like going pro with mouthfeel).
And emergencies? no baking soda at home? you can try baking powder but it won’t give you the classic pretzel crust explosion.
So, as much as i hate being a downer, keep that baking soda bath sacred!
Kitchen Equipment Essentials: Keep It Simple, Foolproof
To whip up these baked seasoned pretzels, you don’t need fancy gadgets. a large mixing bowl and a wooden spoon will do the trick if you don’t have a stand mixer.
But honestly, a dough hook makes kneading super chill.
A big pot for boiling the pretzels in the baking soda bath is a must. trust me, the bath is what gives you that chewy crust—the texture everyone goes nuts for.
Use a slotted spoon or spider strainer to fish the dough out safely.
And don’t forget a pastry brush for that buttery coating and some baking sheets lined with parchment paper . I learned the hard way by not lining my trays once—pretzels stuck and my mood sank!
Freshness and Storage Tips Make All the Difference
When you’re making snacks using pretzels, freshness is king. store the flour and spices in cool dark places. once you’ve baked your baked seasoned pretzels , let them cool completely before packing them away.
Store your pretzels in airtight containers; they’ll stay fresh for 2-3 days, but honestly, best eaten the same day!
And if you want to get fancy with pretzel holiday snacks , make them the day of the party. These babies don’t fake freshness well.
Honestly, those little ingredients and tools details changed my game with all my pretzel flavor recipes . now, i can whip up batches that taste like i spent hours in a bakery kitchen.
Ready to roll your dough and get your hands a little messy? Let’s dive into the step-by-step instructions next, where that magic really starts...

Mastering the Professional Cooking Method for Your Seasoned Pretzel Recipe
Alright, let’s get real for a sec. making soft pretzels at home can seem intimidating. but honestly, once you nail the professional cooking method , it’s pure magic—and a great way to wow your friends with some homemade snacks using pretzels that taste straight out of a fancy bakery.
Essential Prep: Get Your Mise en Place Right
First things first, mise en place is kitchen french for “everything in its place.” this step is a game-changer.
Put all your ingredients out: flour, yeast, salt, garlic powder, butter, and yes, your baking soda bath stuff. having everything ready saves you from scrambling at the last second, especially since things like yeast need a little time to do their thing.
Pro tip: keep your water at about 110° f when you mix in your yeast. too hot and you kill the yeast, too cold and it won’t wake up.
I learned this the hard way when my first attempt fell flat like a pancake. time management is clutch here—set timers for each resting and rising phase.
Trust me, when your dough doubles in size after about 1 hour , you’ll thank yourself for the patience.
Oh, and don’t forget kitchen safety! Using a large pot with boiling baking soda bath means wearing oven mitts and keeping kids outta reach. Cleaning up spills is a pain.
Step-by-Step Process: Precision Is Key
Step 1: Combine warm water, sugar, and yeast—wait for the foam, about 5 minutes .
Step 2: Mix in your flour and salt gradually. Knead until the dough feels elastic—usually about 8- 10 minutes . It’s a good wrist workout!
Step 3: Let the dough rest under a damp towel for 1 hour . It should rise to twice its original size.
Step 4: Roll each piece into a 20-inch rope , twist into a pretzel shape—this part feels fun and oddly satisfying.
Step 5: boil a baking soda bath —yes, you read that right—in 10 cups of water with 2/3 cup baking soda .
Drop your pretzels in for exactly 30 seconds . this step gives that trademark chewy crust.
Step 6: After boiling, carefully brush with melted butter and sprinkle your seasoned blend—garlic powder, parsley, sea salt flakes—maybe even smoked paprika for a smoky hint.
Step 7: bake at a roaring 425° f for 12- 15 minutes until golden and smelling like heaven.
The visual cue? deep golden brown with a slightly crackled crust. perfect timing here is everything. undercook and you’ll get doughy pretzels, overcook and they get too tough.
Expert Techniques: Taking It Up a Notch
Alright, here’s some insider stuff i picked up from my many pretzel trial runs. the baking soda bath? don’t skip.
Seriously. it’s what makes these baked seasoned pretzels stand apart from just regular bread sticks.
Also, don’t skimp on brushing softened butter right out the oven—this locks in flavor and gives you that glossy, indulgent finish.
For quality checkpoints, I always do a small “test” pretzel before the full batch goes in. If the crust is spot on and the seasoning balanced, you’re golden.
Troubleshooting? If your pretzels are turning out dry or tough, maybe your dough was over-kneaded or the oven temperature was off. Play with heat and keep notes, ladies and gents.
Success Tips: Avoid These Rookie Mistakes
One big blunder is ignoring the resting time. you want a dough that’s plump and elastic, not a sad, dense lump.
Also, don’t overdo the salt topping—you can always add more later, but too much upfront can ruin the balance.
If you’re planning pretzel holiday snacks or just making a batch ahead, these pretzels freeze great. just cool completely, wrap 'em tight, and pop into the freezer.
To reheat, toss in the oven at 350° f for 5- 7 minutes until warm.
And speaking of flavor kicks… ever tried salt and vinegar pretzels or pizza flavored pretzels? substituting or adding seasoning is where you can get playful.
It’s like your own little pretzel flavor recipes lab.
Honestly, making this seasoned pretzel recipe was a little journey for me—sometimes frustrating, often messy, but totally worth it every bite.
The way the buttery herbs meld with that salty crust? mm-mm, that’s snack heaven.
Now that you’ve got the tools, steps, and tricks under your belt, you’re set to bake pretzels that’ll impress everyone from your picky kids to your hardcore foodie friends.
Ready for more? Next up, check out some Additional Information on storage tips, creative dips, and clever twists that’ll have you rethinking what snacks can be.
Unlocking the Secrets of a Seriously Awesome Seasoned Pretzel Recipe
Okay, listen—i gotta tell you, making your own seasoned pretzel recipe at home? it's kinda like unlocking a hidden superpower in the kitchen.
I remember the first time i tried it; i thought, "eh, pretzels are snacks you grab at the gas station.
" but man, once i nailed that chewy crust and the perfect sprinkle of garlic and herbs, i was hooked!
Pro Tips & Secrets to Nail That Flavor Every Time
Alright, here’s the deal. the magic is all in the details. first off, don’t skip the baking soda bath. seriously, this step is what turns a doughy blob into those perfectly chewy and golden baked seasoned pretzels everyone swoons over.
I rushed this once—big mistake. the crust ended up meh, and i had to start over. lesson learned.
Use warm water—about 110° f—to wake up the yeast gently. hotter than that, and you’ll kill the little guys before they even start working.
Also, the best tip? after the first butter brush, sprinkle your pretzels with seasoning right away. garlic powder, parsley flakes, and sea salt get that flavor soaking in before the oven’s heat locks it all in.
If you wanna get fancy, try adding smoked paprika or chili flakes—takes it to the next level with minimal effort.
You want to save time? make the dough the night before. let it chill in the fridge overnight. it develops more flavor and means breakfast or snack prep is a breeze the next day.
Oh, and don’t forget to let your pretzels cool fully before storing—they get soggy if you don’t!
Serve It Like You Mean It – Presentation Tips That Impress
Okay, we eat with our eyes first, right? when plating these beauties, think color and contrast. a sprinkle of fresh parsley or a pinch of vibrant paprika on top not only amps up flavor but makes your pretzels pop .
Toss some colorful veggies or a small bowl of honey mustard on the side for dipping and boom—you’ve got a snack platter that screams party time.
Got an occasion? these are perfect for pretzel holiday snacks . imagine a rustic wooden board with these golden soft pretzels, some cheese cubes, and a few dips.
Talk about setting a cozy vibe. and if you want to jazz it up visually, use a fancy brush to give your pretzels a shiny glaze right before serving.
Looks homemade but fancy.
Storage, Make-Ahead Know-How: Keep ‘Em Fresh and Tasty
I’m all about cooking smart so snacks last. once your salty pretzel recipe batch is cool, pop them in an airtight container.
They’ll stay fresh for about 2 days at room temp, but honestly, they’re best if eaten the same day. for longer storage, toss them in the freezer.
When you want a quick snack, just reheat at 350° f for 5- 7 minutes —crispy outside, warm and chewy inside again.
If you've got leftovers (or made extra on purpose—no judgment), here's a pro tip: re-toast lightly in a skillet with a dab of butter. It’s like your pretzels got a second life!
Shake It Up: Creative Twists on Your Seasoned Pretzels
This recipe is a solid base to experiment with. want to try a salt and vinegar pretzels style? add a splash of malt vinegar to your butter brush and swap regular salt for malted salt for that tangy punch.
Or, diving into the savory side, sprinkling grated parmesan or trying a dash of pizza seasoning (yes, pizza flavored pretzels are a thing!) can give your snacks that little something extra.
Dietary tweaks? swap half the flour for whole wheat flour for more fiber and a nuttier taste—plus, it's a bit healthier.
Or go dairy-free and use olive oil instead of butter for brushing.
Seasonal vibes got you? Toss in some pumpkin spice with cinnamon sugar instead of garlic and herbs. Instant fall snack magic!
What’s in It for You? The Nutrition Lowdown
Now, i know we all wanna indulge but still feel good about it. one of these medium-sized snacks using pretzels clocks in around 250 calories with about 7 grams of protein and just 5 grams of fat.
Carbs hit around 42g, which makes sense since it’s bread, but hey—it's homemade and free of weird additives.
These pretzels also have some fiber if you swap in half whole wheat flour. plus, that garlic and herbs? they add antioxidants and a fresh zing.
Keep an eye on the salt, though—moderation is key if you're watching sodium intake.
Portion-wise, sticking to one or two is perfect for a snack fix without overload. Serve alongside some veggies or a protein source, and you've got a balanced, satisfying bite.
Honestly, making this flavor pretzels recipe has been one of those surprisingly fun kitchen projects. it’s kinda therapeutic to roll, boil, and season your way to snack heaven.
Plus, once you get the hang of it, you can customize every batch to your heart’s content.
So don’t hold back! whether you want classic garlic and herbs or wanna try smoked paprika or that zesty pizza twist, these soft pretzels with seasoning will impress everyone.
Give it a shot—you might just become the go-to snack hero among your friends.
I mean, who doesn’t want to say, “Yep, I made these tasty gems from scratch”? Trust me, it feels pretty darn good.
Frequently Asked Questions
What makes this seasoned pretzel recipe different from regular pretzels?
This seasoned pretzel recipe adds a savoury twist by coating the soft, chewy pretzels with a blend of garlic powder, parsley flakes, sea salt, and optional smoky or spicy seasonings like smoked paprika or chili flakes. Unlike plain pretzels, this recipe offers a flavour punch that’s perfect as a tasty snack or party treat.
Can I prepare this seasoned pretzel recipe without a stand mixer?
Absolutely! While a stand mixer with a dough hook makes kneading quicker and easier, you can knead the dough by hand using a wooden spoon and your hands. Just be prepared to spend a little more time (around 8-10 minutes) working the dough until it’s smooth and elastic. It’s a great way to connect with the baking process.
How do I store leftover seasoned pretzels so they stay fresh?
Once the pretzels have completely cooled, store them in an airtight container or resealable bag at room temperature. They’re best enjoyed within 1-2 days. To refresh them, pop them in a preheated oven at 350°F (175°C) for 5-7 minutes to bring back their crispy crust and warm, soft inside.
Are there any good variations or substitutions for this seasoned pretzel recipe?
Definitely! You can swap some of the all-purpose flour for whole wheat to add nuttiness and extra fibre, or use bread flour for a chewier texture. For a dairy-free option, replace melted butter with olive oil when brushing the pretzels. For a fun twist, try a sweet version with cinnamon sugar instead of the savory seasonings.
Is this seasoned pretzel recipe suitable for people watching their sodium intake?
You can reduce sodium by using less sea salt or opting for low-sodium salt alternatives in the topping. However, keep in mind that pretzels traditionally have a salty crust, which is key to their flavour balance. To balance this, enjoy them alongside low-sodium dips or fresh veggies to make a more balanced snack.
What’s the secret to getting the perfect chewy crust on these seasoned pretzels?
The magic lies in the baking soda bath before baking—dropping the shaped dough into boiling water with baking soda briefly gelatinizes the dough’s surface, creating that iconic chewy crust. Don’t skip this step, as it’s what really transforms ordinary dough into a classic soft pretzel texture.
Previous Recipe: Tropical Pineapple Stuffing: My Go-To Sweet & Savory Holiday Side
Next Recipe: Decadent Almond Joy Cookies Recipe: Easy Coconut, Chocolate & Almond Bliss