Ultimate Pumpkin Crunch Bars with Buttery Oat Topping
Warm up with this easy pumpkin crunch recipe featuring a creamy custard and crunchy oat streusel. Perfect fall dessert for Thanksgiving or cozy nights.

- Pumpkin Crunch Recipe: The Ultimate Autumn Treat You Didn’t Know You Needed
- Ultimate Pumpkin Crunch Bars with Buttery Oat Topping Recipe Card
- Essential Ingredients Guide for the Ultimate Pumpkin Crunch Recipe
- Mastering the Art of Professional Cooking: Pumpkin Crunch Bars Edition
- Extra Pumpkin Crunch Recipe Know-How: Pro Tips, Presentation & More
- Frequently Asked Questions
Pumpkin Crunch Recipe: The Ultimate Autumn Treat You Didn’t Know You Needed
Okay, so picture this: it’s a crisp fall evening, you’ve just pulled a tray of golden bars out of the oven, the house smells like cinnamon and nutmeg, and you’re ready to dive into that perfect pumpkin crunch recipe that’s honestly become my all-time fave.
Seriously, i remember the first time i tried what folks call the hawaiian pumpkin dessert – i was skeptical. pumpkin bars with a crunchy topping? come on! but oh man, that buttery oat streusel and creamy pumpkin custard filling blew me away.
If you’ve ever been on the hunt for a cozy autumn pumpkin dessert that brings together the best of spiced pumpkin and a crunchy topping, this one nails it every time.
It’s like a love letter to everything warm and fall-flavored, from the nutmeg and cloves pumpkin spices to the classic vanilla wafer crust that adds a subtle sweetness underneath.
Honestly, no other pumpkin bar recipe i’ve made has that magical combination of soft and crunchy.
Where Did This Pumpkin Dump Cake Come From Anyway?
Here’s a fun bit: this dessert actually has roots in hawaiian kitchens, often called the traditional hawaiian pumpkin crunch . it's a sort of spin on the classic pumpkin pie, but way easier and with a fun twist—the crunchy topping.
Back in the day, island families would bring this out at big gatherings, and it became a thanksgiving and halloween favorite.
Nowadays, this holiday pumpkin dessert bar is popping up everywhere, from food blogs to potlucks around the states, because it’s just perfect for that fall vibe.
What’s cool about the pumpkin dessert layered in this recipe is the texture play—soft, creamy custard meets a crisp pumpkin oat streusel , making it a great alternative to your traditional pumpkin pie.
If you’re over pie, try this instead. you’ll thank me.
Time, Toughness, and Throwing Down in Your Kitchen
Heads up: this recipe isn’t one you whip up in five minutes. prepare for about 20 minutes of active kitchen work.
You’ll be crushing those vanilla wafers for the crust, mixing the silky pumpkin custard filling, and then whipping up that buttery oat topping .
The bake time is close to an hour, and don’t skip the cooling and chilling phase—an overnight chill lets that custard set just right and the flavor really soak in.
Is it complicated? nah, but there’s a bit of finesse to get the custard set and the streusel perfectly crunchy.
Definitely medium difficulty, but worth every second. plus, the 9x13-inch pan means you get a dozen bars to share (or hoard—i won’t judge).
Cost-wise, pumpkin puree, some pantry staples, and a couple bags of vanilla wafers keep this budget-friendly.
Why You Should Seriously Give This Pumpkin Crunch Bars a Whirl
Now, let's talk perks. first off, pumpkin is a nutritional powerhouse packed with vitamin a and fiber. plus, this bars recipe uses spices like cinnamon and ginger that add antioxidants, so it’s not just tasty – it's got tiny health perks too (hey, we all deserve some dessert guilt-free, right?).
Unlike dense pumpkin pies, this dessert feels lighter thanks to the airy custard and the crunchy rolled oats topping .
Another winning point: it’s incredibly versatile. want a gluten free pumpkin crunch ? swap out the flour and wafers. need a dairy free pumpkin dessert ? coconut milk to the rescue! and it’s not just weekends or holidays—though it’s perfect as a thanksgiving pumpkin dessert or a halloween pumpkin treat , i’ll often make it for casual gatherings or rainy day cravings.
Lastly, it’s a star for special occasions because it’s crowd-pleasing with layers of flavors — the nutty crunch from chopped nuts (pecans or walnuts) combined with the luscious pumpkin filling and that crunchy topping is something your guests will be talking about, trust me.
Alright, now that you’re psyched and maybe even drooling over the thought of these spiced pumpkin bars , let’s get to the good stuff—the ingredients.
Time to see what makes this moist pumpkin bars recipe truly special. grab your mixing bowls, and let’s go!
Ultimate Pumpkin Crunch Bars with Buttery Oat Topping Recipe Card
⚖️ Ingredients:
- 3 cups vanilla wafer crumbs
- 1 cup chopped walnuts or pecans (optional)
- 6 tablespoons unsalted butter, melted
- 2 cups canned pure pumpkin puree
- 1 can (12 fl oz) evaporated milk
- 3/4 cup granulated sugar
- 1/2 cup brown sugar, packed
- 3 large eggs
- 2 teaspoons ground cinnamon
- 1/2 teaspoon ground nutmeg
- 1/4 teaspoon ground cloves
- 1/4 teaspoon ground ginger
- 1 teaspoon vanilla extract
- Pinch of salt
- 1 1/2 cups old-fashioned rolled oats
- 1 cup all-purpose flour
- 1 cup light brown sugar, packed
- 1 teaspoon ground cinnamon
- 1/4 teaspoon salt
- 3/4 cup unsalted butter, melted
🥄 Instructions:
- Prepare the base: Crush vanilla wafers, mix with chopped nuts and melted butter, then press the mixture firmly into a greased 9x13-inch baking dish.
- Make the pumpkin custard filling: Whisk together pumpkin puree, evaporated milk, granulated sugar, brown sugar, eggs, spices, vanilla extract, and a pinch of salt until smooth.
- Assemble and prepare the topping: Pour the custard evenly over the wafer base. Combine oats, flour, light brown sugar, cinnamon, and salt; stir in melted butter until coarse crumbs form, then sprinkle evenly over the custard.
- Bake: Place the dish in a preheated 350°F oven and bake for 50-60 minutes until the topping is golden brown and the custard is set with a slight jiggle in the center.
- Cool and chill: Let the dish cool to room temperature, then refrigerate for at least 2 hours (overnight preferred) for optimal texture.
- Serve: Cut into bars and serve chilled or at room temperature.
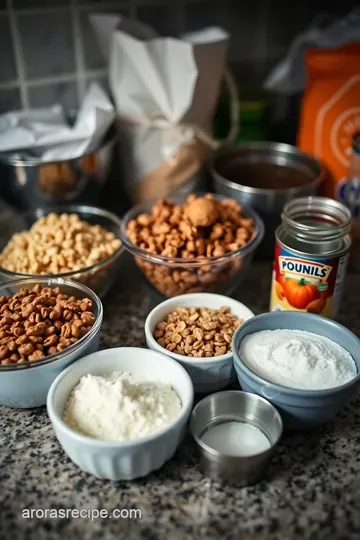
Essential Ingredients Guide for the Ultimate Pumpkin Crunch Recipe
Alright, let's dive into the good stuff—because, honestly, getting your ingredients right is half the battle for making those dreamy pumpkin crunch bars.
You don’t wanna end up with some sad, soggy mess, trust me! i’ve been there. so, here’s the lowdown on what you absolutely need to nail this classic autumn pumpkin dessert .
Premium Core Components
First up, the vanilla wafer crust . you want finely crushed wafers—think about 3 cups (270 g) of crumbs. crushing by hand in a bag with a rolling pin works just fine, but if you’re a foodie gadget-lover (guilty here!), a food processor speeds things up.
Pro tip: pick wafers that aren’t stale or expired—that taste flat and old? no thanks. fresh, crisp wafers give you that light, buttery base that balances perfectly with the pumpkin custard.
For the pumpkin custard filling , canned pure pumpkin puree is your bff. watch out— not pumpkin pie filling! the latter’s packed with sugar and spices, which will mess with your recipe’s balance.
Grab a 2 cup (490 g) can of real puree, preferably organic for that rich, natural flavor. evaporated milk is also key— 12 fl oz (354 ml) —and i always use cold milk straight from the fridge to keep the batter smooth.
When measuring sugars like 3/4 cup granulated and 1/2 cup brown sugar , be sure to pack the brown sugar to get that deep, caramel-y sweetness in your custard.
Oh, and spices? ground cinnamon and nutmeg are the pumpkin’s best friends, but never skip the 1/4 teaspoon cloves and ginger for that authentic nutmeg and cloves pumpkin vibe.
Freshly ground spices make a noticeable difference, but if you’re lazy like me some days, the pre-ground stuff works too.
Last for the crust and topping, that buttery oat streusel topping is everything— 1 1/2 cups rolled oats, 1 cup flour, 1 cup brown sugar, plus melted butter to bring it all together.
I always lean on old-fashioned rolled oats—not instant—because that texture is the real deal for a crunchy pumpkin dessert topping that sticks around after baking.
Signature Seasoning Blend
Here’s where your kitchen turns savvy. the essence of spiced pumpkin bars comes from the right herb and spice combo.
Besides the basics, vanilla extract ( 1 teaspoon ) adds a subtle warmth that brightens the pumpkin custard filling.
Don’t underestimate those little aromatics! a pinch of salt balances out the sweetness and spices, giving your dessert that well-rounded flavor punch.
Regional twists? well, hawaiian pumpkin dessert fans often prefer more ginger or even a sprinkle of crystallized ginger in the streusel for that tropical zing.
So, if you want to shake up your classic pumpkin dessert , try tossing in some extra warmth or nutty undertones with walnuts or pecans in the base.
Smart Substitutions
Life’s messy. sometimes you’re outta eggs, or need a dairy-free pumpkin dessert option—been there on a busy thanksgiving prep night! you can swap the evaporated milk with canned coconut milk for a creamy, dairy-free twist.
Plus, it’s naturally a bit sweeter, which works well if you want to cut back on sugar.
No nuts? no problem. walnuts or pecans are terrific, but if someone’s nut-allergic, just skip or swap in sunflower seeds for crunch.
Brown sugar can be swapped for coconut sugar if you’re watching your glycemic load or want a richer flavor.
If you want a gluten-free pumpkin crunch, grab gluten-free vanilla wafers and a gf flour blend for the topping. honestly, the layers of flavors still shine through.
Or if you’re looking for a quick fix, a pumpkin dump cake variant can give you that layered pumpkin dessert layered effect with fewer steps but almost the same cozy vibes.
Kitchen Equipment Essentials
You don’t need a fancy kitchen for this. a 9x13-inch baking dish is essential to get that perfect bar size.
I’ve tried smaller pans before and ended up with a thicker, slower-to-cook mess. keep it rectangular and roomy.
Crushing wafers? Use a food processor or a simple plastic bag and rolling pin. Like I said, no pressure to splash out on gadgets.
Get yourself a good whisk or a handheld electric mixer to combine custard ingredients evenly. You want that custard silky smooth, not lumpy—and yes, I’ve learned the hard way.
Don’t forget a cooling rack— cooling and chilling are vital steps in the pumpkin dessert cooling tips to firm up the texture before slicing.
Leaving it overnight is not a suggestion, folks, it’s a rule if you want bars that hold together nicely.
Storage tip: Pumpkin crunch bars keep well in an airtight container in the fridge for 3-4 days. They also freeze okay if you want to prep early for Thanksgiving or Halloween pumpkins treats!
Now that your pantry's loaded with the right goodies and gear, you’re all set for that delicious journey of making homemade pumpkin crunch bars.
Next up, i’ll guide you through the step-by-step magic to pull this together perfectly every time. ready to get baking? let’s roll!
Mastering the Art of Professional Cooking: Pumpkin Crunch Bars Edition
Alright, so you want to dive into making that ultimate pumpkin crunch recipe —you know, the one with that gloriously creamy pumpkin custard filling and that buttery oat crunch on top? yeah, that hawaiian pumpkin dessert that’s somehow become a classic autumn pumpkin dessert staple across kitchens everywhere—especially around thanksgiving and halloween.
Let me take you through a professional cooking method that makes these bars come out perfect every single time.
Essential Prep: Mise en Place and Organization
Oh man, honestly, starting with bonne mise en place is a total game-changer. i’m talking about having everything chopped, measured, and ready to go before you turn on the oven.
For a layered dessert like these pumpkin crunch bars —which feature a vanilla wafer crust, pumpkin custard filling, and a thick oat streusel topping—it’s especially crucial.
First, measure out your rolled oats, flour, sugars, and spices. crush those vanilla wafers finely (a food processor rocks here, but a rolling pin and plastic bag can work too).
Have your melted butter ready. i like to keep my chopped pecans or walnuts prepped as well to avoid last-minute scrambling—because, trust me, messing up the base layer is a mood killer.
Tip: Lay out your ingredients in the order you’ll be using them—that saved me SO many headaches in the kitchen, especially when dealing with timing.
Speaking of timing…
Time Management and Safety
You’ll want to allocate about 20 minutes for prep , then bake at 350° f for 50 to 60 minutes .
The crucial part? cooling. don’t skip the chill—your bars need at least 2 hours, preferably overnight in the fridge for the custard to fully set.
Safety-wise, remember that melted butter is hot—don’t just grab the bowl without a mitt. also, the baking dish will come out blazing hot, so use oven mitts and place it on a sturdy surface.
Keep kids and pets at bay during these critical moments; hot butter and oven racks can be unforgiving.
Step-by-Step Process: A Quick Playbook
-
Base layer: mix crushed vanilla wafer crumbs, chopped nuts, and melted butter. press firmly into the 9x13-inch pan. i like to press with the back of a spatula or the bottom of a glass for that even base.
-
Pumpkin Custard Filling: Whisk canned pure pumpkin puree, evaporated milk, granulated and brown sugar, eggs, and spices together. Ah, the scents of cinnamon, nutmeg, and cloves make your kitchen smell like autumn in New England!
-
Oat Streusel Topping: Combine rolled oats, flour, brown sugar, cinnamon, salt, and melted butter until coarse crumbs form.
-
Pour pumpkin custard over base, then sprinkle streusel evenly on top.
-
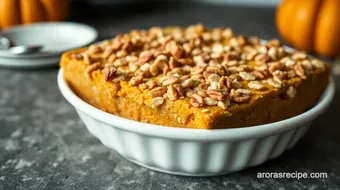
Bake at 350° f for 50- 60 minutes —you want golden-brown topping and a custard that’s set but still slightly jiggly in the center.
Pro tip: insert a toothpick near the center; it should come out mostly clean.
-
Cool completely on a rack, then refrigerate for at least 2 hours to get that perfect creamy pumpkin custard texture.
Expert Techniques to Nail It
One tricky part for me was not overbaking. overdone pumpkin desserts turn rubbery or dry. so, when the streusel topping glistens golden brown but your custard still does a tiny wiggle, you’re golden.
Also, pressing your crust firmly is key—if it’s too crumbly, you’ll have trouble cutting neat bars. Don’t rush this step!
For extra credit (and yes, I do this), chill your evaporated milk before mixing to keep the custard silky and avoid curdling. Room temperature eggs, cold milk—that combo just smooths everything out.
Success Strategies: Avoid These Rookie Mistakes
Don’t swap out pie pumpkin filling for pumpkin puree. I did that once—yikes—it made everything way too sweet and funky with extra cinnamon. Always use unsweetened, pure pumpkin puree.
Another thing: resist the urge to eat the bars right after baking. i know, it’s tempting, but the custard needs to chill to set properly.
I’ve ruined my hands holding warm bars that fell apart—total bummer.
Oh, and if making ahead, these bars are champs! I’ve prepped a batch the night before Thanksgiving and been hailed as a hero the next day. Win-win.
Wrapping It Up
Honestly, this pumpkin crunch recipe has become my go-to autumn pumpkin dessert. whether i’m craving those moist pumpkin bars or that crunchy pumpkin dessert topping, it hits that sweet spot every time.
Plus, the layers of vanilla wafer crust, creamy custard, and crunchy oat streusel just scream fall flavors.
But wait—before you fire up the oven, you might want to check out some additional pumpkin dessert cooling tips and garnish ideas for that perfect final touch… Let’s dive into those next!
Extra Pumpkin Crunch Recipe Know-How: Pro Tips, Presentation & More
Alright, friend, if you’re diving into this pumpkin crunch recipe , you’re in for a treat that’s way more than just a simple dessert.
I’ve made these bars more times than i can count, and honestly, the magic is in the little things. let me spill some secrets so your buttery oat topping and creamy pumpkin custard filling come out rockin’ every time.
Pro Tips & Secrets From the Kitchen Trenches
First up, the crust. crushing those vanilla wafers fineish but not into dust is key. too fine, and your base gets mushy; too chunky, and it won’t stick together.
I like to toss the wafers in a plastic bag and roll over them with a rolling pin — quick and mess-free.
Oh, and if you want a little extra crunch? toss in chopped walnuts or pecans. i swear, those nuts take the pumpkin dessert with nuts vibe up a notch.
Here’s a time-saver: whisk your pumpkin custard filling in one go—canned pumpkin puree, evaporated milk, sugars, and spices—don’t skip the fresh vanilla extract! it helps brighten the flavors.
Using room temp eggs and chilled evaporated milk keeps the custard silky, so it doesn’t curdle. bake it just until the pumpkin custard sets but still jiggles lightly in the middle—that’s your sweet spot.
Overbake and you get a dry pumpkin dump cake ; underbake and... well, that can be messy (been down that road!).
Putting the “Wow” into Your Pumpkin Crunch Bars Presentation
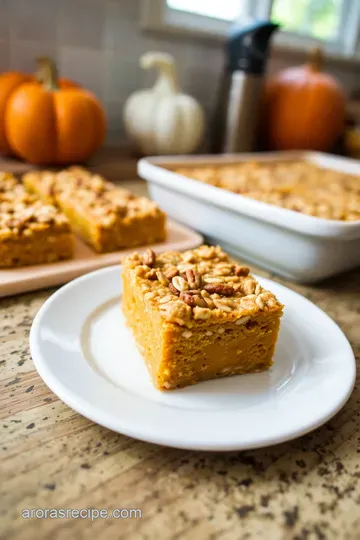
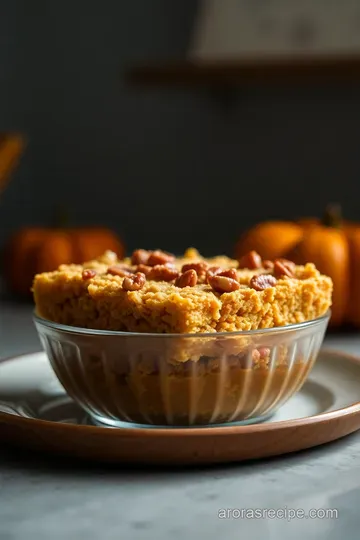
You ever notice how some spiced pumpkin bars look so inviting, you wanna dive right in? that’s no accident. for your plate presentation , cut those bars into neat squares or rectangles—wipe your knife with a warm, damp towel between cuts for clean edges.
Think about garnishes: a sprinkle of chopped toasted nuts or a light dusting of cinnamon and nutmeg over tops adds coziness and killer autumn vibes.
If you’re feeling fancy, a dollop of freshly whipped cream or a drizzle of caramel sauce gives a gorgeous contrast with the buttery oat topping .
Those rolled oats toppings shine when you add a hint of color and texture.
Color-wise, it’s all about warm tones—golden browns, rusty oranges, and cream. serve the bars alongside a mug of pumpkin spice latte or some hot apple cider.
The combo is basically liquid autumn perfection.
Storage & Make-Ahead Tips for Pumpkin Dessert Success
Listen, you can totally make your homemade pumpkin crunch a day ahead—and honestly, it tastes even better! after baking, let it cool completely on a rack (yep, the cooling tips are serious business).
Then pop it in the fridge and chill overnight. the custard fills out and firms up beautifully.
Store leftovers covered tightly in the fridge for up to 4 days. the crust might lose a tad of its crunch over time, but the flavors? oh, they get deeper.
Reheat gently in a low oven or microwave just until warm—don’t overdo it or the custard will separate.
Pro tip for next-level convenience: bake in a disposable foil pan so you can bring your Thanksgiving pumpkin dessert to parties without the drama of hauling heavy dishes around.
Switch It Up! Creative Variations to Try
If you’re craving a twist on the classic pumpkin dessert , try layering in cream cheese under the pumpkin custard for a silky surprise, making it feel like a creamy pumpkin cheesecake bar.
Got dietary needs? swap evaporated milk with canned coconut milk to craft a dairy-free pumpkin dessert that’s lush and tropical—hello, hawaiian pumpkin dessert vibes! use gluten-free rolled oats and flour to make it gluten free pumpkin crunch friendly.
Seasonally, sprinkle crystallized ginger or orange zest into your oat streusel topping. that zing of citrus or bite of spice elevates your holiday pumpkin dessert bars to something special.
For an extra cozy kick, toss in some ground ginger with your cinnamon, nutmeg, and cloves, creating those spiced pumpkin bars with ginger you read about on food blogs.
Know Your Pumpkin Crunch: Nutrition & Portion Wisdom
Alright, so this isn’t exactly a health food per se , but let’s be real: it’s pumpkin —loaded with vitamin a and fiber—plus a good hit of protein from those nuts.
Each bar rings in around 330 calories, with a decent balance of carbs and fat thanks to the oat topping and the butter.
If you’re watching sugar, you can swap brown sugar for coconut sugar or a sugar alternative to tame sweetness without losing that deep molasses flavor.
And here’s my personal fave: pair a small bar with fresh fruit or a cup of herbal tea, and you’ve got a balanced pumpkin dessert with apple cider pairings moment that hits just right.
Wrapping It Up With Pumpkin Crunch Love
Honestly, making a pumpkin bar recipe like this is kind of like catching a little piece of fall magic at home.
It’s cozy, it’s rich, but it never feels heavy or boring. whether you’re serving up a classic pumpkin dessert for halloween, rocking the pumpkin dessert layered style at thanksgiving, or just sneaking a bite with your coffee, these bars nail that perfect pumpkin pie alternative vibe.
Don’t stress the small stuff—embrace a little mess, a few burnt edges, or a slightly off-cut bar. that’s where the memories are! keep your pumpkin crunch recipe fresh, fun, and full of love.
Your friends and family won’t forget it.
So go on, get baking. Fall’s waiting, and your kitchen smells like heaven already. Trust me, once you try that buttery oat topping with creamy pumpkin custard, you’ll be hooked!
Frequently Asked Questions
What makes the pumpkin crunch recipe different from a traditional pumpkin pie?
Pumpkin crunch features a layered texture with a crunchy oat streusel topping and a crumbly vanilla wafer base, unlike the smooth crust and filling you'd find in a traditional pumpkin pie. It’s more like a custard bar with a crispy, buttery crumble on top—giving you a wonderful contrast between creamy and crunchy that’s perfect for autumn gatherings.
Can I make pumpkin crunch bars ahead of time, and how should I store them?
Absolutely! Pumpkin crunch actually tastes better after chilling overnight, which helps the custard set fully and meld the flavours. Store the bars covered in the fridge for up to 4 days. For longer storage, you can freeze them in an airtight container for up to 2 months—just thaw overnight in the fridge before serving.
Are there any easy substitutions for ingredients in the pumpkin crunch recipe?
Definitely. You can swap walnuts for pecans or almonds depending on what you have or allergies. For a dairy-free version, replace evaporated milk with canned coconut milk and use a vegan butter alternative for the topping. You can also opt for gluten-free flour and gluten-free vanilla wafers to make it gluten-free without sacrificing texture.
How do I prevent the pumpkin custard from curdling when baking the pumpkin crunch recipe?
To stop curdling, use room temperature eggs and cold evaporated milk for a smooth custard mix. Bake the bars at 350°F (175°C) and don’t overbake—look for the filling to be just set and a little jiggly in the centre. Remember, it will continue to set as it chills, so take the dessert out of the oven when it’s gently trembling rather than fully firm.
What are some tasty ways to serve pumpkin crunch bars?
Serve pumpkin crunch bars chilled or at room temperature with a dollop of lightly whipped cream or a scoop of vanilla ice cream. They also pair brilliantly with festive drinks like spiced apple cider or a pumpkin spice latte, making for a proper cosy autumn treat. For a bit of zing, add fresh berries or a spoonful of cranberry sauce on the side.
Is pumpkin crunch recipe a healthy dessert option?
While pumpkin crunch is indulgent with butter and sugars, it does contain nutritional benefits from pure pumpkin, which is rich in fiber and vitamins like A and C. You can lighten it up by reducing sugar slightly or substituting brown sugar with coconut sugar for a lower glycemic index. Portion control is key since each bar carries around 330 calories.
Previous Recipe: Bright & Nutty: Easy pesto recipe without pine nuts for home cooks
Next Recipe: Deep Amber Bliss: My Go-To Amber Ale Recipe with Amber Candi Syrup D-45