Wild & Wonderful Elderberry Jelly
Discover my homemade elderberry jelly recipe, bursting with wild berry goodness and bright lemon notes. Perfect for toast or cheese boards—give it a try!

- Getting Cozy with Elderberry Jelly: A Sweet Slice of Homemade Magic
- Wild & Wonderful Elderberry Jelly Recipe Card
- Your Go-To Guide for Essential Elderberry Jelly Ingredients
- Cooking Like a Pro: The Art of Making Wild & Wonderful Elderberry Jelly
- Pro Tips & Secrets for Making the Best Elderberry Jelly Recipe
- Perfect Presentation: Making Your Elderberry Jelly Look as Good as It Tastes
- Storage & Make-Ahead Tips for Elderberry Jelly That Lasts
- Creative Variations to Jazz up Your Elderberry Jelly Recipe
- Complete Nutrition Guide: Why Elderberry Jelly is Worth the Hype
- Frequently Asked Questions
Getting Cozy with Elderberry Jelly: A Sweet Slice of Homemade Magic
Ever stumbled upon wild elderberries during a summer hike and wondered what in the world you could do with those tiny dark purple orbs? i sure did.
One lazy afternoon, i found myself with a handful of these little gems and, after a bit of experimenting, ended up whipping up my very first elderberry jelly recipe .
Honestly, it blew me away how this deep, luscious jelly brought that wild, earthy flavor right into my kitchen. if you’re curious about how to make elderberry jelly from scratch, you’re in the right place.
It’s not just jelly; it’s like capturing a slice of nature’s sweetness in a jar.
A Bit of History and Why It Still Rocks
Did you know that traditional elderberry jelly has roots stretching back to old english and european country kitchens? these cultures treasured elderberries not only for their taste but also for their healing powers.
Back then, folks made wild elderberry jelly not just as a sweet treat but as a natural remedy for colds and flu thanks to those antioxidant-rich elderberries.
Fast forward to today, and this homemade preserve is having a renaissance. it’s showing up on artisan cheese boards, cozy breakfast tables, and even holiday gift jars.
Here’s the thing: the whole process takes just about an hour in total, and while it’s a medium difficulty level because you gotta be careful with safe elderberry preparation (more on that soon), it’s so worth it.
One thing I learned the hard way? Removing elderberry stems is a must — those things can be mildly toxic if not handled right. Trust me, don’t skip that step!
Why Elderberry Jelly Deserves a Spot in Your Pantry
Here's why making homemade elderberry jelly feels like a win every time. first off, elderberries pack a punch of antioxidants, meaning every spoonful is a tiny health boost.
Now, i’m not saying it’s a superfood miracle, but nutritional facts show elderberries support immunity and bring vitamins to the party.
Plus, this elderberry jelly recipe offers a vibrant ruby color and a tangy-sweet flavor profile that’s unique. it’s got that boldness you don’t get from your typical grape or strawberry jellies.
Whether you’re slathering it on toast, stirring it into yogurt, or pairing it with sharp cheddar, it elevates everyday snacks to something kinda fancy.
Oh, and because you control the sugar, you can hit that sweetness balance just right — no overly sugary syrup needed.
It shines on special occasions too. imagine your guests’ faces when you present a homemade elderberry jelly with lemon juice adding a zesty kick during holiday brunch or for that chill autumn picnic.
Plus, with the right jelly bag juice straining and elderberry jelly cooking tips , you get a perfectly clear set jelly that looks just as stunning as it tastes.
Real Talk: Making It at Home Is Easier Than You Think
If you’re worried about the prep or cost, don’t sweat it. a batch yields about 4-5 jars, which easily lasts through months.
And while fresh elderberries are ideal, you can totally experiment with frozen berries— making elderberry jelly with frozen berries turns out pretty well, just expect a slight dip in juice yield.
Don’t forget, getting the set just right means boiling instructions are key — you want a rolling boil lasting a minute or two once you add your powdered fruit pectin.
That’s how you get that classic fruity “spreadable” texture. bonus: if you want to keep your jelly safe longer, a water bath canning step locks it in for up to a year.
That’s right — homemade preserves that can hang with the store-bought jars but without all the weird additives.
Alright, if you’re salivating already and itching to dive in, the next step is all about gathering the elderberry jelly ingredients , prepping those wild berries carefully, and learning the juice extraction secrets.
Ready? let’s get that kettle boiling and those pots simmering. your wild & wonderful elderberry jelly adventure starts right here!
Wild & Wonderful Elderberry Jelly Recipe Card
⚖️ Ingredients:
- 6 cups fresh elderberries (approx. 900 g), stems removed and washed
- 3 cups water (720 ml)
- 4 cups elderberry juice (960 ml)
- 1 package powdered fruit pectin (approximately 1.75 oz / 50 g)
- 5 cups granulated sugar (1 kg)
- 2 tablespoons fresh lemon juice (30 ml)
🥄 Instructions:
- Prepare the elderberries by removing stems and rinsing them thoroughly under cold water.
- Combine elderberries and water in a large saucepan and simmer gently for about 20 minutes to soften berries and release juice. Mash lightly with a spoon.
- Pour the berry mixture through a jelly bag or cheesecloth-lined strainer into a bowl and allow to drip for at least 1 hour without pressing. Measure out 4 cups of juice.
- Pour the elderberry juice into a saucepan. Stir in pectin and lemon juice, bring to a boil over medium-high heat while stirring constantly.
- Add sugar all at once, return to a rolling boil, and boil hard for 1-2 minutes while stirring constantly. Remove from heat and skim off foam if necessary.
- Ladle the hot jelly into sterilized jars, leaving 1/4 inch headspace; wipe rims clean and apply lids and screw bands finger tight.
- For shelf stability, process jars in a boiling water bath for 5 minutes, then remove and cool undisturbed for 12-24 hours. Check seals before storing.
- Store sealed jars in a cool, dark place for up to one year. Refrigerate after opening.
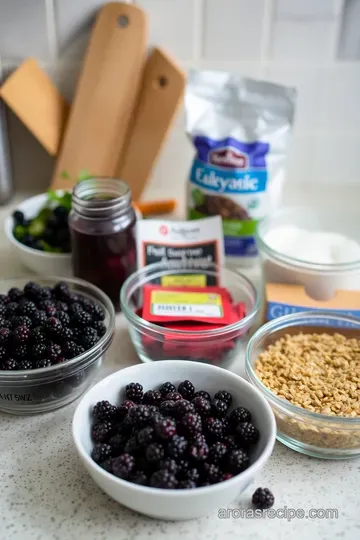
Your Go-To Guide for Essential Elderberry Jelly Ingredients
Alright, let’s dive into the heart of making homemade elderberry jelly —those essential ingredients! honestly, this part's like the backbone of your whole jar.
I remember my first try at how to make elderberry jelly ; i was so nervous about getting the right balance and freshness.
But once you nail the elderberry jelly ingredients , it’s pure magic.
Premium Core Components
Let’s talk quality first. for the best elderberry jelly from scratch , you need about 6 cups (900 g) of fresh elderberries .
No stems or leaves—trust me, those are mildly toxic and will ruin your batch if left in. always pick deep purple, plump berries.
If they look shriveled or dull, skip 'em. freshness here is key.
For juice extraction, you mix those berries with 3 cups (720 ml) of water . use filtered or clean tap water for the cleanest flavor.
The more juice you can squeeze out without pressing the pulp harshly, the clearer your jelly turns out. side note: i once pressed the juice too much—cloudy jelly city, yikes!
Other must-haves:
- 1 package (50 g) powdered fruit pectin , which helps your jelly set perfectly
- Around 5 cups (1 kg) of granulated sugar for sweetness (but, more on alternatives in a bit)
- And don’t forget 2 tablespoons (30 ml) fresh lemon juice —it brightens flavors and helps with the pectin activating. Fresh squeezed beats bottled every time here.
For storage , keep elderberries in the fridge and use within a day or two after picking. jam and jelly swirl best when fruit is fresh but fully ripe.
The elderberry jelly shelf life post-canning? usually about a year stored in a cool, dark place—so yeah, stock up!
Signature Seasoning Blend
Now, i’m all about that classic taste but with a little twist. the traditional elderberry jelly recipe usually sticks to the basics.
But hey, if you want some kick or a holiday vibe, try adding a cinnamon stick or star anise when cooking the berries.
It adds warmth and vibe without overpowering that berry jelly flavor profile .
Many folks swear by mixing in herbs like thyme or rosemary too. i personally love a mild herbal note—it’s like a secret handshake for your taste buds.
Don’t forget, herbs and spices should be removed before you jar up the jelly, or else you risk bits floating in your jelly, which might not be ideal unless you’re aiming for a rustic look.
Also, lemon juice acts like a mild spice enhancer—giving elderberry jelly with lemon juice that classic, tangy pop.
Smart Substitutions
I get it, sometimes you’re missing a thing or two. Maybe life’s thrown you a curve, and fresh elderberries aren’t available, or you’re going sugar-free. Here’s the scoop:
- If frozen elderberries are your only option, no worries. Thaw them well and proceed with juice extraction like usual. The juice yield might drop a bit, but it’s a solid fallback—check out making elderberry jelly with frozen berries .
- Sugar alternatives? Honey or maple syrup can work but remember: pectin for elderberry jelly loves sugar for setting, so expect a looser jelly unless you adjust pectin amount or cooking time.
- Need dairy or animal product-free? Most commercial pectins are vegan, so you’re good. This one’s perfect for a vegan elderberry jelly recipe .
- Emergency fix? Use apple or grape juice to thin or bulk out elderberry juice if you want milder tartness—great for first-timers.
Kitchen Equipment Essentials
One last thing before you jump into the cooking frenzy—your gear! You don’t need fancy stuff, but there are some must-haves to avoid headaches.
- A large heavy-bottomed saucepan is your best friend. Elderberries can scorch if your pan is thin.
- A jelly bag or a fine mesh strainer lined with cheesecloth to get that juice cloudless and pure. No juice pressing! It’s tempting, I know, but not worth the cloudy jelly disaster.
- Canning jars and lids , obviously, preferably half-pints for gift-sized jars.
- A wooden spoon for stirring like a pro.
- Optional but handy: a candy thermometer to keep a feel on your boil temps.
For storage, keep your jars airtight and cool—dark pantries or cupboards are ideal.
Phew! that’s your treasure map to nailing all the elderberry jelly ingredients and gear basics. once you’ve got these pieces down, making elderberry jelly is a breeze.
Next up, i’ll spill all the beans on elderberry juice extraction , cooking jelly to set , and water bath canning so your jelly jars last through winter and beyond.
Stick around!
Cooking Like a Pro: The Art of Making Wild & Wonderful Elderberry Jelly
Alright, let’s dive into the juicy world of making an elderberry jelly recipe that’s truly a labor of love. honestly, when i first tackled homemade elderberry jelly, i was a bit nervous—handling those dark berries felt tricky, especially knowing the stems aren’t something to mess with.
But once i got the hang of the essential preparation steps , the process became smoother than butter on warm toast.
Essential Prep: Setting Up Your Mise en Place and Timing
If you’re new to elderberry jelly from scratch , here’s a golden tip: mise en place isn’t just a fancy chef phrase.
It’s your secret weapon. lay out everything first—the washed elderberries (after safely removing stems and leaves), your pectin, sugar, lemon juice, and all your jelly-making equipment.
Trust me, scrambling to find your jelly bag or clean jars mid-cook? not fun.
Speaking of stems, always remember: removing elderberry stems is crucial because they contain mild toxins. i learned this the hard way when i didn’t pay close attention.
After that, i made it a habit to double-check my berry pile—like a safety net.
Time management is your best friend here. extracting elderberry juice is not a quick dash. simmer those berries with some water for about 20 minutes to soften them up.
Then, don’t rush the juice straining part. let it drip naturally through your jelly bag or cheesecloth for at least an hour .
No pressing! that’s the key to making jelly without cloudiness . impatience will only ruin that crystal-clear finish you want.
Step-by-Step Jelly Joy: Cooking, Boiling, and Setting
Once you have your lovely deep purple juice ready, pour it into a heavy-bottomed saucepan. stir in your fruit pectin and fresh lemon juice—lemon is a must for boosting flavor and helping the jelly set right.
Bring this up to a full boil (we’re talking a rolling boil over medium-high heat ) and keep stirring like your life depends on it.
Then, toss in all that sugar and boil hard for 1 to 2 minutes .
Here’s a little nugget of wisdom: keep an eye on your candy thermometer, if you have one. jelly usually sets around 220° f ( 104° c) .
This ensures the perfect jiggle when cooled. also, watch for visual cues—the mixture should thicken and look glossy. if you see foam, skim it off to get that pure elderberry taste.
Pour your hot jelly into sterilized jars, leaving about a 1/4 inch headspace , wipe the rims, and seal them up.
Then, if you want that long shelf life and safe elderberry preservation, pop your jars in a boiling water bath for 5 minutes .
This step is gold for preventing spoilage and getting that satisfying pop when you open a jar later.
Pro Tips & Tricks: Getting That Jelly Just Right
I’ll be honest—making wild elderberry jelly at home can be fiddly, but here’s where pro methods come into play. first, stirring can’t be skimped on.
Consistent stirring prevents the sugar from burning and keeps the texture silky. also, know that the exact sugar-to-juice ratio matters.
Too little sugar, and your jelly won’t set; too much, and it’s overpoweringly sweet.
If you’re feeling adventurous, you can add a cinnamon stick during the simmering stage for a gentle spicing option, but remove it before boiling the jelly.
I tried that once, and wow, it gave the jelly a nice upgrade without stealing the elderberry spotlight.
Here’s a tricky bit i learned: when using frozen elderberries, the juice yield can be less, so you might want to adjust your batch size or juice concentration.
And of course, always, always use fresh lemon juice—not bottled—to strike the right acidity balance.
Avoiding Pitfalls & Ensuring Perfect Jars
Common mistakes? not straining long enough or pressing the berries too hard—this is jelly-making 101 to avoid cloudy jelly. another is skipping jar sterilization.
That part feels tedious but imagine your amazing homemade elderberry jelly spoiling in storage. big bummer.
For the best shelf life, store your sealed jars in a cool, dark place—your pantry or cellar works great—and consume within a year.
After opening, refrigerate. if you want to prep ahead, you can double the batch, but keep in mind your batch yield so you don’t get overwhelmed.
If you ever get stuck, remember: look for that perfect set. a quick spoon test cooled in the fridge helps.
If it’s still runny, back on the heat for a few minutes more.
Sharing this, i feel like passing along a little secret handed down from my grandma's english countryside kitchen. making wild elderberry jelly isn’t just about cooking; it’s connecting with tradition, nature, and the simple joy of homemade preserves.
Ready to keep going? let’s explore more in the next section with additional information where i’ll dish out cool ideas like elderberry jelly serving combos, storage hacks, and maybe even some wild twists on flavors.
Trust me, you don’t want to miss that!
Pro Tips & Secrets for Making the Best Elderberry Jelly Recipe
Alright, my friend, if you’re diving into how to make elderberry jelly from scratch, you’ve gotta hear some insider tips.
When i first tried this, i almost gave up because the jelly just wouldn’t set right! here’s what i’ve learned since then.
First off, removing elderberry stems is a must —those buggers can be mildly toxic and they’ll ruin your jelly vibe.
I used to think, “eh, no big deal,” but trust me, safe elderberry preparation means no stems. also, don’t press the juice bag when straining your elderberry juice.
I got impatient once and gave it a squeeze, and yeah, my jelly turned all cloudy like a foggy london morning.
Keep it slow and steady.
Oh, and here’s a little gem: use fresh lemon juice, not the bottled stuff . it really brightens the flavor and helps the jelly set properly.
When adding sugar, toss it all in once your elderberry juice is at a rolling boil and keep stirring like crazy to avoid burning or crystallizing your precious batch.
If you’re pressed for time, try making elderberry jelly with frozen berries . i did this one winter, and while the juice yield was a bit lower, the flavor was still spot-on.
Just thaw ‘em fully before cooking.
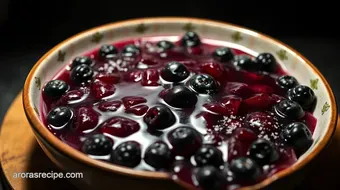
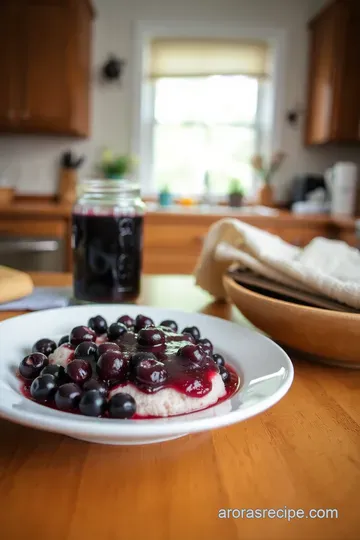
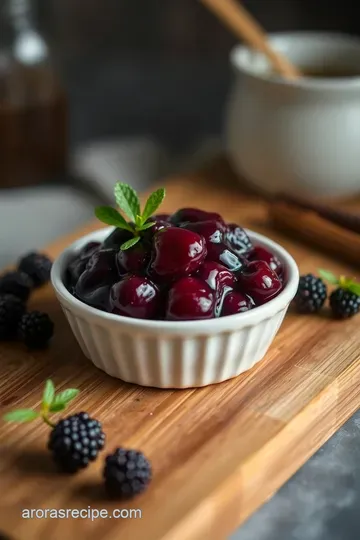
Perfect Presentation: Making Your Elderberry Jelly Look as Good as It Tastes
When you’re done, your homemade elderberry jelly deserves to shine! I always say jelly’s not just about taste — it’s about eye candy, too.
For plating, grab some lovely half-pint jars , fill them up nicely, and slap on a cute label if you’re planning to gift—people loooove that personal touch.
If you want to serve it straight up, try spreading a dollop on buttered toast or onto a smooth slice of brie.
The deep purplish-red color looks stunning next to cheese or cream cheese.
Throwing in a small sprig of fresh mint or a thin lemon twist on top just jazzes up the jar’s lid or plate for serving.
Color-wise, that vibrant jelly works great with honey-yellow toast or pale cheeses — the contrast just pops. honestly, i like to lay out a cheese board with sharp cheddar and goats cheese alongside some warm elderberry jelly; your guests will think you’re a fancy chef.
Storage & Make-Ahead Tips for Elderberry Jelly That Lasts
Here’s the deal: elderberry jelly shelf life is pretty solid if you do it right. after jarring and (optional but recommended) water bath canning for 5 minutes , your jelly should keep sealed for up to a year in a cool, dark spot.
I stash mine in my basement pantry since it stays nice and chilly there.
Once opened, pop your jar in the fridge and use within 3 weeks — it won’t last too long with all that natural fruity goodness.
If you’re making this as a gift or storage batch, labeling jars with the date helps you keep track.
A quick note on reheating: it’s best to gently warm the jelly in a saucepan if you want a looser, spreadable consistency again.
Microwaving can cause uneven heating and weird texture — trust me, been there.
Creative Variations to Jazz up Your Elderberry Jelly Recipe
Feeling adventurous? you can totally play around with this recipe. for instance, adding a pinch of cinnamon or star anise during juice extraction creates a fabulous spiced version — just fish out the sticks before jellying.
Want a twist? mix elderberry juice with apple or grape juice in a 50:50 ratio . it mellows out the tang while adding layers of flavor.
If you prefer a vegan elderberry jelly recipe, stick to plant-based pectin — luckily, most powders out there fit the bill.
For a fresh seasonal spin, toss in a handful of wild blackberries or blueberries to create a wild berry jelly recipe that sings with complexity.
Or try substituting sugar with maple syrup or honey for a natural sweetener alternative (note: this might affect the jelly setting time).
Complete Nutrition Guide: Why Elderberry Jelly is Worth the Hype
I won’t bore you with dry facts but here’s what’s cool about elderberries: these little guys are packed with antioxidants, boosting your immune system, especially in cold season.
So your homemade elderberry jelly isn’t just a sweet treat—it’s a little health booster too.
One tablespoon has about 50 calories and zero fat, making it a guilt-free spread when used sparingly. that said, keep in mind elderberry jelly ingredients include a good chunk of sugar for proper setting and flavor balance, so moderation is key.
Also, elderberry jelly nutritional facts hint at its fiber and vitamin c content, courtesy of the berries themselves, making it a bit more nutrient-rich than your store-bought jelly.
Portion wise, a tablespoon on toast or a cheese board is just right to enjoy the complex flavor without going overboard.
Honestly, making your own wild & wonderful elderberry jelly is such a rewarding experience. It’s like capturing the essence of late summer and bottling it up! Plus, this traditional elderberry jelly recipe connects you to centuries of European and English country preserves — how cool is that?
Once you master these pro tips, nail the presentation, and maybe try a funky variation or two, you’ll be the person friends come running to for gift jars of this ruby treasure.
So grab your berries, get cozy in the kitchen, and let that sweet, tangy elderberry magic fill your home. you got this!
Frequently Asked Questions
Can you walk me through the basics of making elderberry jelly using this elderberry jelly recipe?
Absolutely! This elderberry jelly recipe involves simmering fresh elderberries with water to extract the juice, then combining that juice with pectin, sugar, and fresh lemon juice to create the jelly. Remember to remove all stems and leaves first, as they can be mildly toxic. After boiling the mixture to the right setting, you jar and optionally process the jelly to preserve it. It’s a lovely way to capture the essence of late summer in your pantry.
What’s the best way to store elderberry jelly, and how long will it keep?
Sealed jars of elderberry jelly can be stored in a cool, dark place for up to a year, just like most traditional preserves. Once opened, keep the jar refrigerated and use within a few weeks. To ensure safe long-term storage, processing jars in a boiling water bath is recommended. This keeps your jelly fresh and delicious for months to come.
Can I tweak this elderberry jelly recipe with other flavours or ingredients?
Definitely! Try adding a cinnamon stick or star anise during the juice simmering stage for a subtle spiced depth—just remember to remove the spices before making the jelly. You can also blend elderberry juice with grape or apple juice to mellow tartness and add complexity. For a vegan-friendly version, just ensure your pectin is plant-based, which most are.
Are there any common pitfalls or tips for beginners making elderberry jelly?
One biggie is not to press or squeeze the juice bag after simmering elderberries—that can make your jelly cloudy. Also, never use wild elderberry stems or leaves, as they contain toxins; only the berries are safe once cooked. Stir constantly when adding sugar and boiling to prevent burning or crystallization, and use fresh lemon juice for the best setting results.
Is elderberry jelly healthy, and are there any nutritional benefits I should know about?
Elderberry jelly offers a delightful dose of antioxidants from the berries, but keep in mind it’s high in sugar, with about 12 grams per tablespoon serving. It’s best enjoyed in moderation as a sweet treat rather than a health food. Using fresh, high-quality ingredients and controlling sugar amounts can help balance flavour and nutrition.
Can I use frozen elderberries if I don’t have fresh ones for this elderberry jelly recipe?
You sure can! Frozen elderberries work well; just thaw them fully before cooking. Keep in mind the juice yield might be a bit lower compared to fresh berries, so you may need to use a bit more to get the same amount of juice for your jelly. Otherwise, the flavour and process remain the same.
Previous Recipe: Festive & Easy Cranberry Mule Recipe — My Go-To Holiday Cocktail
Next Recipe: French Onion Meatloaf – Juicy Comfort with a Savoury Twist