Chocolate Lava Cake: Rich and Silky
- Time: Active 10 minutes, Passive 10 minutes, Total 20 minutes
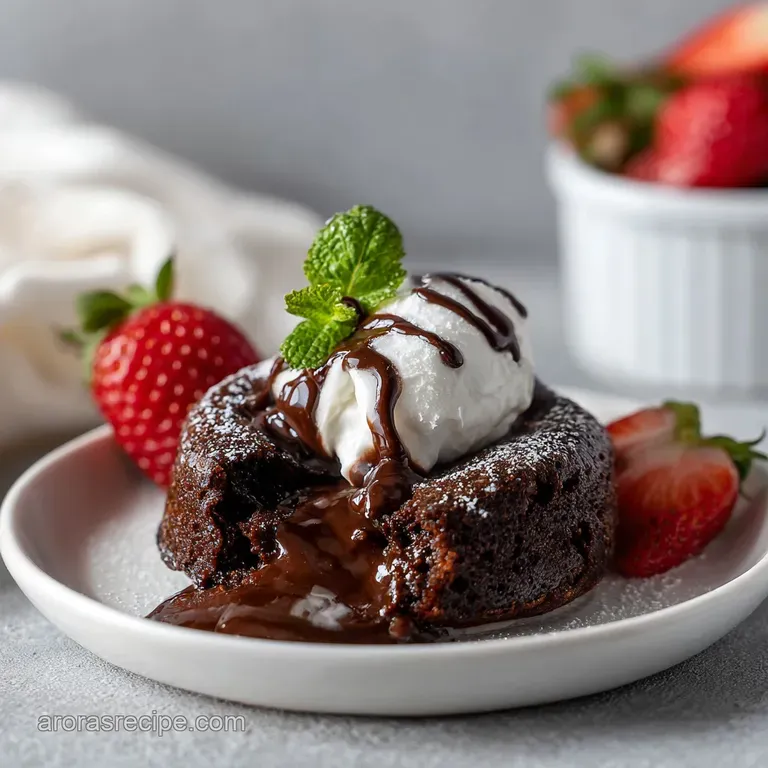
- Flavor/Texture Hook: Fudgy, velvety center with a light, airy outer crumb
- Perfect for: Date night, quick cravings, or a homestyle Sunday dessert
- Create the Best Chocolate Lava Cake Recipe
- Understanding the Vital Recipe Specs
- Components of Your Recipe Deep Dive
- Essentials for Your Ingredient List
- Simple Tools for Success
- Step-by-Step Guide to Success
- Fixing Common Baking Errors Quickly
- Smart Variations and Substitution Tips
- Best Storage and Reheating Methods
- What to Serve With This
- Debunking Common Baking Myths
- Recipe FAQs
- 📝 Recipe Card
Create the Best Chocolate Lava Cake Recipe
Back in the late 1980s, a bit of a kitchen accident in New York City changed the dessert world forever. A famous chef pulled a sponge cake out of the oven too early, and instead of a disaster, he found a velvety pool of liquid gold in the center.
While the French call it "moelleux au chocolat," we in the Midwest just know it as the most comforting, chocolatey hug you can get in under twenty minutes. It’s the kind of dish that looks like you spent hours fussing over it, but honestly, it’s mostly about knowing when to stop the clock.
I remember the first time I tried making this for a small supper party. I was so worried about the "molten" part that I practically sat on the floor in front of the oven, peering through the glass. I’ve learned since then that you don't need to be a scientist to get that liquid center.
You just need to trust the high heat and your own eyes. It’s a hearty, reliable dessert that has become a staple in my house whenever we want something a bit special without the "fancy" price tag or the difficult techniques.
Growing up, we didn't have much call for individual ramekin desserts, but there's something so lovely about having your own little cake to crack into. It’s become a bit of a tradition for us now.
Whether it’s for a birthday or just because it was a long Tuesday, this chocolate lava cake recipe delivers that rich, cocoa hit every single time. It’s simple, it’s fast, and it uses ingredients you probably already have sitting in your pantry right now.
Understanding the Vital Recipe Specs
Aeration Balance: Beating the whole egg and the extra yolk with sugar creates a stable foam that allows the cake to rise quickly and set its outer walls before the heat can reach the very center. This is what keeps the "lava" from solidifying into a standard muffin.
Fat Saturation: Using a high ratio of butter to flour ensures the center remains liquid. Because there is only one tablespoon of flour in the whole recipe, there isn't enough starch to absorb all the moisture and fat, which results in that iconic velvety flow when you cut into it with a spoon.
Thermal Shock: Baking at 425°F is higher than your average cake temperature for a reason. This aggressive heat sears the outside of the cake almost instantly, creating a structural crust, while the interior temperature rises slowly enough to stay under the point where the eggs fully scramble and set.
| Cooking Method | Total Time | Texture Outcome | Best For |
|---|---|---|---|
| Standard Oven | 20 minutes | Crisp exterior, silky flow | Authentic results |
| Air Fryer | 15 minutes | Thick crust, very molten | Quick individual servings |
| Toaster Oven | 22 minutes | Soft edges, gooey middle | Small kitchens |
Choosing the right method depends on how much of a "crust" you like on your cake. The standard oven provides the most even heat, which I prefer because it ensures the bottom of the cake is strong enough to be flipped onto a plate without collapsing into a heap of chocolate.
Components of Your Recipe Deep Dive
| Ingredient | Role in the Bake | Pro Secret |
|---|---|---|
| Baking Chocolate | Provides structure and flavor | Use 60-70% cacao for the best flow and balanced sweetness |
| Large Eggs | Create the lift and the "lava" | Always use room temperature eggs so they whip up into a thick ribbon |
| All Purpose Flour | Bonds the ingredients together | Don't over measure; even a teaspoon too much makes it a brownie |
When you are looking for that deep cocoa flavor, it helps to think about the quality of your base. If you enjoy the richness here, you might also love the way cocoa behaves in a Texas Sheet Cake recipe where it creates a much thinner, fudgy layer that covers a larger crowd.
Essentials for Your Ingredient List
- 4 oz high-quality baking chocolate (60-70% cacao): Finely chopped. Why this? It melts smoothly and provides the intense chocolate flavor that defines the dish.
- Substitute: 2/3 cup high-quality chocolate chips (ghirardelli or similar). Note: These have stabilizers, so the center might be slightly thicker.
- 0.25 cup unsalted butter: Plus extra for the ramekins. Why this? Adds the necessary fat for a velvety mouthfeel and helps the cake release.
- Substitute: Salted butter (just skip the extra pinch of salt in the batter).
- 1 large egg + 1 large egg yolk: Room temperature. Why this? The extra yolk adds richness and ensures the center stays liquid longer.
- Substitute: For a lighter version, use 2 whole eggs, though it will be less "lava like."
- 2 tbsp granulated sugar: Simple sweetener. Why this? It helps the eggs whip into a stable foam for structure.
- Substitute: Brown sugar for a slight molasses undertone and a fudgier edge.
- 1 pinch fine sea salt: Flavor balancer. Why this? It cuts through the richness and makes the chocolate taste more "chocolatey."
- Substitute: Table salt (use a tiny bit less).
- 1 tbsp all purpose flour: The binder. Why this? Just enough to hold the cake together without making it bread like.
- Substitute: 1:1 gluten-free flour blend (works perfectly here).
- 1 tbsp unsweetened cocoa powder: For the ramekins. Why this? Prevents sticking while keeping the outside of the cake dark and beautiful.
- Substitute: Granulated sugar for a crunchy, sparkly exterior.
Simple Tools for Success
You don't need a pantry full of gadgets for this, but two 6 oz ceramic ramekins are pretty essential. They hold the heat well and are the perfect size for one serving. If you don't have those, a standard muffin tin works, but you'll need to watch the time like a hawk since they are smaller and will bake much faster.
A hand mixer is also a lifesaver here. You want to beat those eggs until they are pale and thick, which takes about three minutes of solid whisking. Doing that by hand is a workout I usually try to avoid!
A small microwave safe bowl for melting your chocolate and a rubber spatula for folding everything together will round out your kit. Keeping it stress free is the goal, so don't worry about having "professional" gear.
step-by-step Guide to Success

- Preheat your oven to 425°F (218°C). This high heat is non negotiable for getting the right contrast between the shell and the core.
- Generously butter two 6 oz ramekins, making sure to hit every nook and cranny. Sift cocoa powder into each, rotate to coat the internal surfaces completely, and tap out the excess until no white ceramic shows through. Note: This creates a "non stick" barrier that looks better than white flour on a dark cake.
- Combine the 4 oz finely chopped chocolate and 1/4 cup butter in a microwave safe bowl. Heat in 30 second increments, stirring until the mixture is glossy and smooth. Set this aside to cool slightly so it doesn't scramble your eggs later.
- In a separate medium bowl, use a hand mixer to beat the whole egg, egg yolk, 2 tbsp sugar, and salt at high speed for 2–3 minutes. Wait until the mixture is pale, thick, and falls in ribbons when you lift the beaters.
- Gently fold the melted chocolate mixture into the eggs using a spatula. Do this slowly so you don't knock out all the air you just worked so hard to put in.
- Sift the 1 tbsp flour over the batter and fold it in until just combined and no white streaks remain. Over mixing at this stage will make the cake tough.
- Divide the batter evenly between the prepared ramekins. Place them on a sturdy baking sheet to make them easier to move in and out of the oven.
- Bake for 8–12 minutes. You are looking for the sides to be firm while the center remains soft and slightly jiggling when you give the tray a gentle nudge.
- Let the cakes rest for exactly 1 minute. This allows the structure to firm up just enough to survive the flip.
- Carefully run a thin knife around the edges, place a dessert plate on top of the ramekin, and invert. Lift the ramekin slowly until the cake slides out and releases its steam.
Fixing Common Baking Errors Quickly
Why Your Cake Is Solid
If you cut into your cake and it looks like a regular muffin, it’s usually down to one of two things: the oven was too cool or you left it in for ninety seconds too long. Every oven has its own personality, and some run hotter than others.
If your "lava" turned into "cake," try reducing the bake time by two minutes next time. Also, make sure you aren't using "cold" eggs, as they take longer to heat up in the middle.
Why the Cake Collapsed
A cake that falls apart the moment you unmold it usually hasn't had enough time to form its "crust." The sides need to be opaque and firm to the touch. If they look wet or shiny, they aren't ready. Another culprit is skipping the 1 minute rest time.
That sixty seconds is vital for the starches to settle just enough to hold the weight of the molten center.
| Problem | Root Cause | Solution |
|---|---|---|
| Cake sticks to ramekin | Not enough butter/cocoa | Use a heavy hand when greasing; use cocoa, not flour |
| Center is cold | Chocolate wasn't warm enough | Ensure your chocolate/butter mix is still slightly warm when folding |
| Batter is grainy | Sugar didn't dissolve | Beat eggs and sugar longer until the mixture is very pale and smooth |
If you ever find yourself struggling with the delicate nature of these individual cakes, you might enjoy a more "set" chocolate experience like a Red Velvet recipe, which uses cocoa and acid to create a velvety but fully baked crumb that is much sturdier for decorating.
Common Mistakes Checklist
- ✓ Don't skip the extra egg yolk; it’s the secret to the richness.
- ✓ Use a kitchen scale for the chocolate if you can; "4 oz" is hard to eyeball with a bar.
- ✓ Ensure the oven is fully preheated before the cakes go in.
- ✓ Never use low quality chocolate chips; they won't melt into a smooth liquid.
- ✓ Use cocoa powder for dusting, not flour, to avoid white streaks on your beautiful cake.
Smart Variations and Substitution Tips
If you want to change things up, this chocolate lava cake recipe is surprisingly flexible. You can add a half teaspoon of instant espresso powder to the melted chocolate to make the flavor even deeper.
For a festive twist, try putting a single frozen raspberry or a small square of white chocolate into the center of the batter before baking. It won't change the cook time, but it adds a nice surprise when you break the crust.
For those watching their budget, you don't need the most expensive French chocolate bar in the world. A standard baking bar from the grocery store works perfectly well. Just avoid the "candy" bars with fillings or nuts, as those won't melt correctly.
If you're out of ramekins, I've seen people use small oven safe glass bowls or even sturdy tea cups, though you have to be very careful with the heat.
| Servings | Ramekin Size | Flour Amount | Bake Time |
|---|---|---|---|
| 2 people | 6 oz | 1 tbsp | 8-12 mins |
| 4 people | 6 oz | 2 tbsp | 10-14 mins |
| 6 people | 6 oz | 3 tbsp | 12-16 mins |
When scaling up, remember that the "jiggle" test is more reliable than the timer. More cakes in the oven can sometimes drop the temperature slightly, so you might need an extra minute or two. Just keep a close eye on them!
Best Storage and Reheating Methods
Storage: These are definitely best eaten fresh, but you can keep leftovers in the fridge for up to 3 days. Wrap the ramekin tightly with plastic wrap once it has cooled completely. When you’re ready for round two, don't use the microwave for more than 15 seconds, or you’ll lose the molten center.
A toaster oven at 350°F for about 5 minutes is a much better way to bring it back to life without overcooking the core.
Freezing: You can actually freeze the raw batter in the ramekins! Wrap them tightly and store for up to a month. When you want a treat, bake them directly from frozen, adding about 4–5 minutes to the total bake time.
It’s a great way to have a stress free dessert ready whenever the craving hits.
Zero Waste: If you happen to have a cake that just won't unmold or breaks apart, don't throw it out! Scoop the mess into a bowl, top it with a big scoop of vanilla ice cream, and call it "Chocolate Trifle." The flavor is still incredible even if the presentation isn't perfect.
You can also crumble leftover (fully baked) edges over morning oatmeal or yogurt for a hearty treat.
What to Serve With This
The beauty of a molten cake is the contrast. Since the cake is very warm and intensely rich, something cold and creamy is the perfect partner. A simple scoop of high-quality vanilla bean ice cream is the classic choice. As it melts against the warm chocolate, it creates a sort of sauce that balances the sweetness.
If you want to cut through the richness, fresh berries are your best friend. Raspberries or sliced strawberries add a bit of acidity that wakes up your palate. A light dusting of powdered sugar across the top of the cake also adds a nice visual "shatter" and a tiny bit of extra sweetness without being overwhelming.
Personally, I love a small dollop of lightly sweetened whipped cream with a tiny bit of orange zest folded in for a bright, citrusy finish.
Debunking Common Baking Myths
There is a common fear that the center of a lava cake is just raw egg. While it’s true the center isn't fully "baked" in the traditional sense, the temperature reaches a point where it is safe to eat, especially since the eggs are beaten with sugar which raises their coagulation temperature.
If you use fresh, high-quality eggs, there is very little to worry about. It’s a technique used in many French desserts to achieve that silky, unctuous texture.
Another myth is that you need a "molten" insert like a frozen truffle to get the liquid center. While some recipes use that shortcut, a true chocolate lava cake recipe relies entirely on the ratio of fat to flour and the timing of the oven.
You don't need any extra steps or special ingredients to get that flow; you just need to trust the science of the bake. It’s much simpler than people make it out to be, and once you’ve done it once, you’ll see how stress free it actually is.

Recipe FAQs
What is the secret to a good lava cake?
Precision baking is the ultimate secret. Maintaining a high temperature of 425°F ensures the exterior sets quickly while leaving the center molten, a technique that requires practice much like perfecting the consistency of our creamy dark cocoa drink.
What chocolate is best for lava cake?
Use high-quality baking chocolate containing 60-70% cacao. Avoid standard chocolate chips because they contain stabilizers that prevent them from melting into the smooth, silky liquid necessary for the signature lava center.
Is lava cake the same as molten cake?
Yes, they are the same dessert. Both terms refer to an individual cake with a firm, baked outer shell and a warm, liquid chocolate center.
Is molten lava cake just uncooked cake?
No, this is a common misconception. The center is not raw batter; it is an emulsion of chocolate, butter, and egg that has reached a safe temperature while maintaining a liquid state due to its high fat-to-flour ratio.
How to ensure the cake releases from the ramekin?
Butter the ramekins thoroughly and coat them with sifted cocoa powder. Rotate the ramekins to ensure every surface is covered, then tap out all excess powder before adding the batter to create a non-stick barrier.
How to tell when the cakes are done baking?
Observe the sides and the center. The edges of the cake should look firm and set, while the middle should still have a slight, visible jiggle when the baking sheet is gently moved.
How to achieve the perfect cake texture?
Beat the eggs, yolk, and sugar for the full 2 3 minutes until pale and thick. This aeration creates the necessary structure so the cake remains light and delicate rather than dense or rubbery.
Chocolate Lava Cake Recipe

Ingredients:
Instructions:
Nutrition Facts:
| Calories | 676 kcal |
|---|---|
| Protein | 9 g |
| Fat | 54 g |
| Carbs | 42 g |
| Fiber | 5 g |
| Sugar | 30 g |
| Sodium | 105 mg |
