Crispy Paua Fritters: a Step-By-Step Guide to the Tender Kiwi Classic
- Mastering the Classic: Achieving Crispy Paua Fritters
- The Science of Texture: Why This Paua Recipe Works
- Essential Components for Your Paua Fritters: Ingredients and Notes
- Step-by-Step: Crafting Your Crispy Paua Fritters
- Fritter Troubleshooting: Chef’s Tips and Common Mistakes
- Storage, Freezing, and Reheating Guide
- Presentation and Pairing: Serving Suggestions
- Recipe FAQs
- 📝 Recipe Card
Mastering the Classic: Achieving Crispy Paua Fritters
Can we just talk about that moment? That incredible, glorious sound when you bite into a perfect fritter, hearing that satisfying CRUNCH before you hit the tender, ocean sweet filling.
This recipe, my friend, captures the very essence of the Pacific and delivers maximum crispy satisfaction every single time. It should smell like the sea and citrus, not just frying oil, and that's the level we’re aiming for.
Paua (for my international friends, that's New Zealand Abalone) is an absolute luxury ingredient, so you absolutely cannot afford to mess this up by making them chewy. But don’t stress, this technique is fast, easy once you know the secret steps, and ensures you get the most tender meat wrapped in the crispiest coating imaginable.
It turns an expensive ingredient into an affordable, shareable coastal snack.
I’ve made every terrible mistake in the Paua playbook overmixing the batter, frying too cold, and definitely over processing the meat into a gray paste. Trust me, we’ve learned from the school of hard knocks, and now I’m handing you the guaranteed crispy blueprint.
Let’s make the best darn fritters you’ve ever tasted.
The Science of Texture: Why This Paua Recipe Works
The Paua Difference: Why Quality and Sourcing Matters
Paua is naturally dense and can be incredibly tough if you just toss it into a batter whole. The reason this recipe shines is because we respect the muscle fibers of the paua first, treating it gently to ensure tenderness before it ever hits the hot oil.
Good quality paua means good flavour , so sourcing matters hugely; don’t cheap out on this ingredient.
A Taste of the Pacific: Cultural Significance of Abalone
For generations, paua has been a staple seafood in Māori cooking and culture, deeply rooted in the coastal regions. It’s more than just a fritter; it’s a celebration of the ocean harvest.
When you are preparing this dish, you are honoring a traditional flavour profile that deserves respect and careful preparation.
The Secret to Non-Chewy Abalone Preparation
Chewiness happens when the muscle proteins seize up, which is what often happens when you cook abalone quickly without tenderizing. Our secret? We pound it lightly before mincing it finely, ensuring the fibers are broken down just enough to relax.
Minced paua distributes evenly through the batter, cooking quickly and staying beautifully tender inside that crispy shell.
Balancing the Batter for Maximum Crunch
This isn’t just plain flour and egg! We use a combination of all-purpose flour and cornflour (corn starch) which inhibits gluten development, leading to a much lighter structure.
That mandatory 30 minute rest in the fridge is the true hero, allowing the starch molecules to fully hydrate and guaranteeing a superior, non-greasy crispness when frying.
The Perfect Mince: Preparation for Tenderness
Use your food processor sparingly here. You want a coarse, identifiable mince, not a grey seafood puree. If you process it too long, it loses texture, becomes gluey, and that chewiness comes rushing back. If you don't have a processor, just pound it and dice it finely by hand; it’s worth the effort.
Temperature Control for Golden Perfection
Frying oil must be consistent. 175°C (350° F) is your magic number. If the oil is too cool, the batter immediately absorbs the fat and becomes heavy and soggy. Too hot, and the outside burns while the dense paua center stays raw.
Get a thermometer; seriously, it’s non-negotiable for high-quality fritters.
Essential Components for Your Paua Fritters: Ingredients and Notes
Detailed List: Paua and Supporting Ingredients
We are keeping the aromatics simple and fresh, allowing the distinct maritime flavour of the paua to truly shine through. Don't drown the meat in heavy spices. Fresh ginger, chili, and spring onions are all you need to lift the whole dish.
Prepping the Paua: Grinding vs. Mincing for Texture
As mentioned, a fine mince is best. Avoid traditional grinding, which can be too aggressive. I prefer using a very sharp knife to dice the pounded paua into pieces no larger than 3mm. Consistency matters, as it ensures all the filling cooks evenly inside the fritter shell.
Ingredient Swaps and Allergy Notes
We need binding agents, a protein, and lift. If you're missing an ingredient, don't worry, there are simple swaps that won't ruin the experience.
| Original Ingredient | Viable Substitute | Notes |
|---|---|---|
| Paua (Abalone) | Finely diced Scallops or high-quality Crab Meat | Flavour changes substantially, but texture is somewhat retained. |
| All-Purpose Flour | 1:1 gluten-free Blend (add 1/2 tsp Xanthan Gum) | The blend may absorb liquid differently; watch the batter consistency. |
| Milk | Chilled Soda Water (Carbonated) | Soda water actually makes the fritters even lighter and lacier. |
| Spring Onions | Finely diced Chives or Shallots | Use chives for a milder flavour, shallots for a sharper bite. |
Selecting the Best Binding Agents
We use a whole egg and a touch of milk to bind the mixture, preventing the fritters from disintegrating in the oil. The baking powder works alongside the cornflour to guarantee that airy, crispy lift. These bindings are crucial; they are the glue that holds your little masterpiece together!
step-by-step: Crafting Your Crispy Paua Fritters
Phase 1: Preparing the Paua Mixture and Seasoning
- Tenderize the Paua: Clean your paua and pound it firmly but gently with a mallet until slightly flattened. Dice it extremely finely aim for coarse mincemeat texture.
- Aromatic Prep: Finely grate the ginger and mince the chili (if using). Slice the spring onions thinly.
- Seasoning: In a bowl, toss the minced paua with the aromatics, lemon zest, salt, and pepper. Use your hands to make sure everything is evenly distributed.
Phase 2: Combining the Wet and Dry Ingredients
- Dry Mix: Whisk the flour, cornflour, baking powder, and salt together in a large mixing bowl. Sifting isn't strictly necessary, but it helps integrate the ingredients better.
- Wet Mix: In a separate small bowl, whisk the milk and the egg until fully combined and slightly frothy.
- Combine & Fold: Pour the wet mixture into the dry ingredients. Whisk quickly until just combined. Stop immediately when the lumps are mostly gone. Now gently fold in the seasoned paua mixture.
- Chill Time: Cover the batter and place it in the fridge for 30 minutes. Don't skip this faff. This rest is vital for maximum crispness.
Phase 3: Frying Techniques for Optimal Crispness
- Heat Oil: Heat 1cm (1/3 inch) of neutral oil in a heavy bottomed pan to precisely 175°C (350° F) . Maintain this temperature.
- Scoop and Drop: Using two spoons, scoop about 1.5 tablespoons of batter per fritter and gently slide it into the hot oil. Do not overcrowd the pan; fry only 3 4 at a time to keep the oil temperature stable.
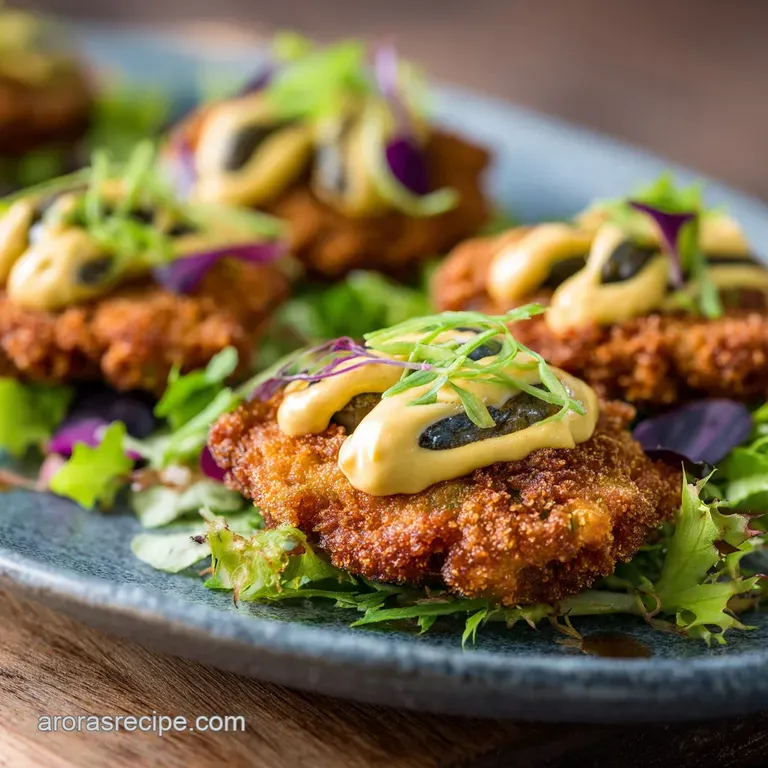
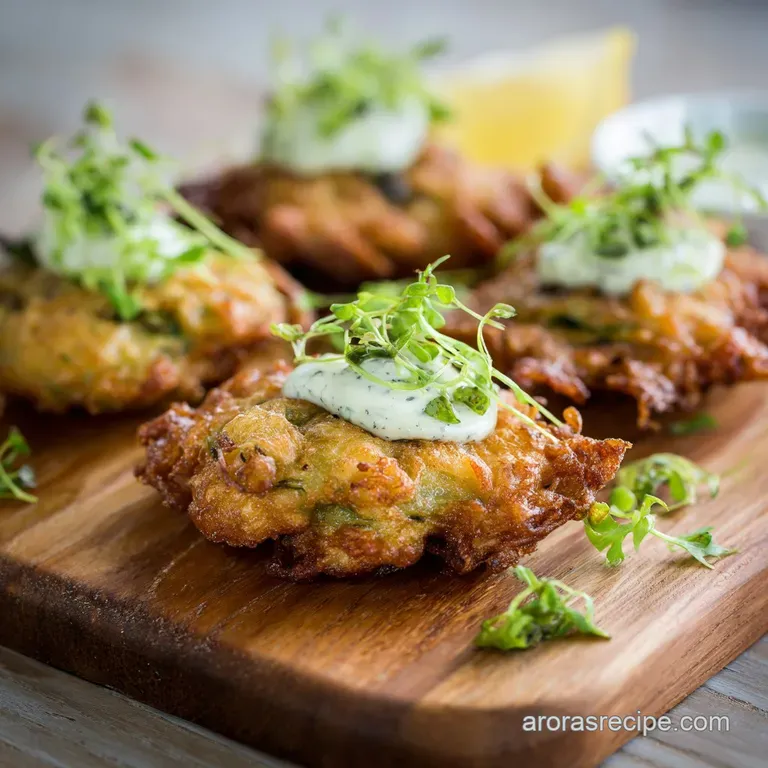
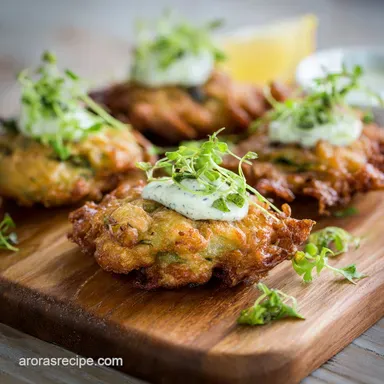
- Golden Turn: Fry for 3– 4 minutes until the edges are dark golden brown, then flip carefully. Cook the second side for another 3– 4 minutes until beautifully golden and crisp all over.
Draining and Resting the Fritters Properly
Remove the crispy paua fritters using a slotted spoon and immediately transfer them to a wire rack placed over paper towels. Do not put them directly on the paper towels! This steam trap will make them soggy. Sprinkle them lightly with fine sea salt right now while they are steaming hot.
Chef's Note: If you want a deeper flavour profile, try frying these fritters in clarified butter instead of neutral oil. It takes the richness factor to a whole new, delicious level.
Fritter Troubleshooting: Chef’s Tips and Common Mistakes
Preventing the Fritters from Falling Apart in the Oil
If your fritters are exploding or dissolving, your batter is too thin or you didn't rest it long enough. If they start spreading too much, fold in one extra tablespoon of cornflour and let it rest for another ten minutes. The proper structure comes from that gluten resting.
The Ideal Oil Temperature for Non-Greasy Results
Mistake: Using oil that is too cold. This leads to greasy, heavy fritters that taste only of oil. Fix: Always use a thermometer and aim for that 175°C (350°F) sweet spot.
If the temperature drops after adding the batter, wait 30 seconds between batches for it to recover.
Adjusting Seasoning Before the Final Fry
Mistake: Not tasting the batter before frying. Since the main ingredient is seafood, you must ensure the salt is right. Fix: Take a tiny teaspoon of the mixed raw batter, fry it quickly in a tablespoon of oil until cooked, and taste it.
Adjust the salt and pepper in the remaining raw batch based on your tasting.
Storage, Freezing, and Reheating Guide
How to Safely Store Raw Paua Mixture
If you prepare the batter ahead of time, it can be kept covered in an airtight container in the refrigerator for up to 24 hours. The texture might stiffen slightly, which is fine, but beyond that, the fresh aromatics lose their punch. Give it a gentle stir before frying.
Freezing Fully Cooked Crispy Paua Fritters
Yes, these freeze brilliantly! After frying, let the fritters cool completely on the wire rack. Place them in a single layer on a baking sheet and flash freeze for an hour. Then, transfer them to a freezer safe bag or container, separating layers with parchment paper. They are good for up to 3 months.
Reheating Methods to Restore the Crispness
Never microwave a fritter, I beg you. The microwave is the enemy of crispness. To bring back that glorious texture, reheat frozen fritters on a baking sheet at 180°C (350°F) for about 10– 12 minutes until sizzling hot. They emerge almost as good as fresh!
Presentation and Pairing: Serving Suggestions
The immediate answer is the Zesty Lime Aioli the acid cuts through the richness of the fried seafood perfectly. But if you’re turning this into a proper meal, you need some hearty pairings to fill out the plate.
I love serving these alongside a fresh, crunchy side salad dressed with a bright vinaigrette. If you are going for a serious, comfort food feast, these fritters actually pair beautifully with a robust and slightly tangy side dish. Think something earthy and delicious, maybe even my incredible Sourdough Stuffing Recipe: Tangy, Crispy Herb Stuffing for Turkey for an unexpected texture contrast.
If you’re feeling extra indulgent, these are fantastic as a dinner plate alongside a baked side that uses creamy textures. You could easily serve three of these bad boys next to a small portion of my decadent Broccoli Cheese Casserole With Stuffing: Ultra Creamy Crispy Topping for maximum cozy vibes. For a party setting, pile them high with the aioli, garnish with fresh chives, and serve them alongside some of my fantastic Grandma Dots Stuffing Balls: Ultimate Crispy Sausage Stuffing Recipe for a seriously memorable buffet spread. Go wild!

Recipe FAQs
Why are my Paua fritters tough or rubbery?
Toughness is usually caused by overcooking the paua, which has very little internal fat. Ensure you mince the paua very finely or process it briefly in a food processor to help tenderize the muscle fibers before mixing. Cook them quickly over medium high heat until just golden brown, removing them immediately.
How do I ensure maximum crispiness when frying?
Achieving a shatteringly crisp exterior requires two things: high heat and avoiding overcrowding the pan. Maintain an oil temperature of 375°F (190°C) and fry in small batches so the oil temperature doesn't drop. For added crispness, you can substitute 25% of the standard flour with rice flour or cornstarch.
Can I prepare the Paua fritter batter ahead of time?
It is generally best to cook the fritters immediately after mixing the wet and dry ingredients. Allowing the batter to rest can cause the flour to develop gluten, leading to a denser texture, and the salt may begin drawing moisture out of the paua.
However, you can mix the dry ingredients and mince the paua separately up to 12 hours in advance.
My fritters are falling apart in the oil. What went wrong?
Fritters that disintegrate usually indicate a batter that is too wet or not enough binder. Ensure you drain and pat the minced paua completely dry before adding it to the batter to avoid excess moisture. If the batter seems loose, add an extra tablespoon of flour until it holds its shape when scooped.
How should I store leftover fritters, and can I reheat them successfully?
Store fully cooled leftover fritters in an airtight container in the refrigerator for up to two days. To restore the crisp texture, reheat them in a toaster oven or air fryer at 350°F (175°C) for five to eight minutes. Avoid using a microwave, which will cause them to become soft and soggy.
Can I use frozen Paua for this recipe?
Yes, frozen paua can be used, but proper thawing is crucial to maintain texture and flavor. Thaw it slowly overnight in the refrigerator, and make sure you thoroughly drain and pat the paua pieces dry before mincing. Excess moisture will negatively impact the consistency of the batter.
How can I make these Paua fritters gluten-free?
You can easily substitute the standard wheat flour with a high-quality 1:1 gluten-free baking blend that contains xanthan gum for binding. For an exceptionally light and crisp result, a combination of rice flour and tapioca starch works very well.
Keep the liquid quantities the same initially and adjust the flour slightly if the batter seems too thin.
Crispy Paua Fritters Recipe 2
Ingredients:
Instructions:
Nutrition Facts:
| Calories | 858 kcal |
|---|---|
| Protein | 12.1 g |
| Fat | 79.9 g |
| Carbs | 22.0 g |
