Banana Syrup: Rich, Ripe Ready Drizzle
- Golden Hour Banana Syrup: Why Homemade Beats the Bottle
- The Essential Pantry: Ingredients and Smart Substitutions
- Simmering Success: A Step-by-Step Guide to the Syrup Method
- The Science Behind That Deeply Caramelized Flavor
- Troubleshooting and Expert Chef's Techniques
- Keeping It Fresh: Shelf Life, Storage, and Freezing
- Beyond Pancakes: Creative Uses for Your Golden Drizzle
- Recipe FAQs
- 📝 Recipe Card
Golden Hour Banana Syrup: Why Homemade Beats the Bottle
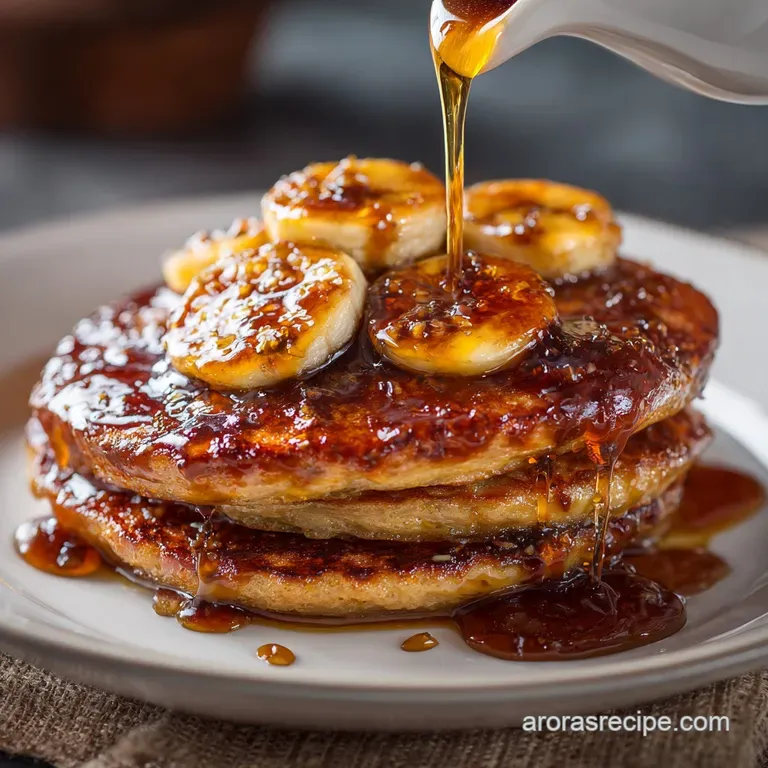
When you start simmering this, the whole kitchen transforms. Seriously, it smells like the world’s best caramel shop just merged with a tropical resort. This rich, deeply flavored, homemade Banana Syrup is the secret weapon every breakfast enthusiast needs in their pantry, trust me.
We all have those forgotten bananas turning brown on the counter, right? Instead of defaulting to yet another loaf of quick bread, turning those spotty beauties into liquid gold is a much faster, easier, and frankly, more elegant solution.
It costs pennies to make and tastes a thousand times better than the artificial, thin stuff from the store.
I’m going to show you exactly how to capture that pure, ripe banana flavor and concentrate it into a viscous, stunning syrup. It’s a low-fuss recipe, but the little tricks we use like the strategic addition of acid are what make this Banana Syrup truly spectacular.
Let’s crack on.
What Makes Our Recipe 'Liquid Gold'?
The brilliance of this recipe lies in the gentle maceration and reduction process. We aren't just making banana flavored simple syrup; we are slowly coaxing the flavor compounds out of the fruit.
This specific technique prevents the starches in the banana from making the final Banana Syrup thick and slimy, which is a common failure point I learned the hard way.
By mashing the fruit after it has softened in the hot simple syrup, we get maximum flavor release without overcooking the delicate sugars. It’s all about controlled heat and patience. This method results in a clear, brilliantly flavorful syrup that pours like molasses but tastes like sunshine.
The Essential Equipment Checklist
You don't need fancy tools here, but there are two non-negotiables. First, a heavy bottomed saucepan prevents scorching the sugars. Second, you absolutely must have a fine mesh sieve.
If you skip the sieve, you are basically making a banana puree, not a clear syrup, and while banana puree is fine, it’s not the goal here. If you happen to have a little cheesecloth lying around, that’s just extra credit for a perfectly clarified finish.
A Quick Note on Ripe Bananas
Listen, this is the most important step before we even turn on the stove. Your bananas must be RIPE not just yellow, but speckled, almost aggressively speckled with brown spots.
My very first attempt at making this Banana Syrup tasted metallic and thin because I used slightly green fruit. Lesson learned! Ripe fruit equals maximum sugar conversion, which means deeper, richer caramelization and better texture.
The Essential Pantry: Ingredients and Smart Substitutions
We only need five ingredients to create this rich homemade Banana Syrup . Each one plays a critical role, so try not to skip them unless you are using a viable substitution.
| Ingredient | Role in Recipe | Substitution Suggestions |
|---|---|---|
| Very Ripe Bananas | Flavor, natural sweetness, and pectin for body. | None this is Banana Syrup! |
| Granulated Sugar | Sweetener, preservative, and structure. | Cane sugar or 50% light brown sugar for depth. |
| Filtered Water | Dissolves sugar to create the initial simple syrup base. | Standard tap water is fine, but filtered tastes better. |
| Fresh Lemon Juice | Essential acidity, prevents browning, stabilizes sugars. | Fresh lime juice or ½ tsp white wine vinegar. |
| Vanilla Extract | Aromatics and complexity. | Vanilla bean paste for intense flavor. |
Selecting the Perfect Ripe Fruit
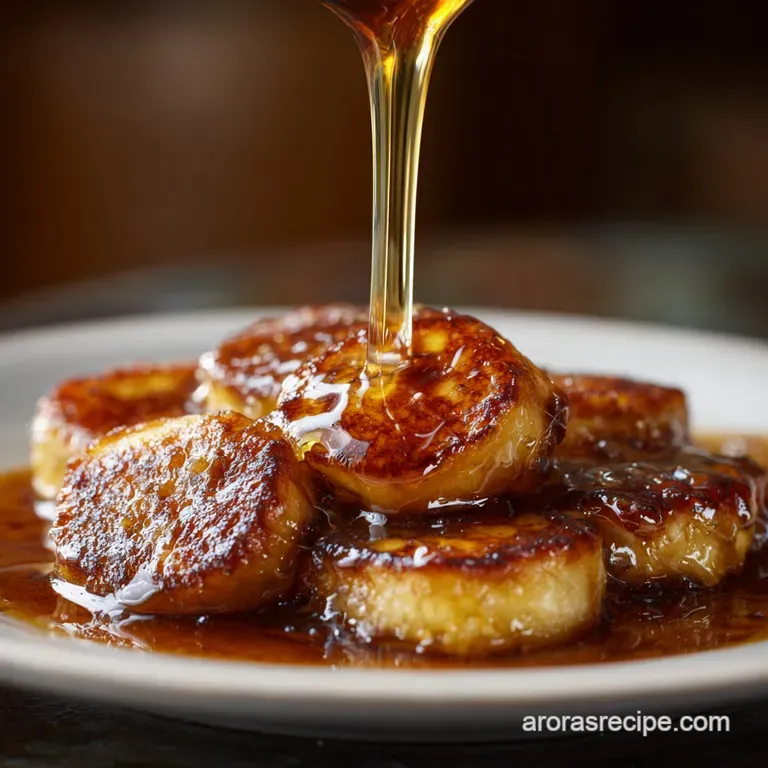
I cannot overstate this: the riper the better. Those deep brown specks mean the starches have converted fully into natural sugars. If you use firm bananas, your resulting Banana Syrup will be less sweet and slightly starchy, even after straining.
You are looking for bananas you might otherwise use for Banana Bread with Lemon Juice: The Best, Moist Loaf Recipe . Don't be shy; embrace the brown!
Sugar Choices: Granulated vs. Brown
I use standard white granulated sugar in the main recipe because it creates a crystal clear, bright gold syrup that really lets the banana flavor shine. However, if you want a richer, fudgier flavor, substituting half the white sugar with brown sugar works wonders.
That molasses note really deepens the complexity of the finished Banana Syrup . It just won't look quite as clear.
Elevating the Flavor: Adding a Pinch of Salt or Spice
I always add a tiny pinch of fine sea salt to every syrup I make, and you should too. It won't taste salty, I promise. That tiny bit of salt is a trick used by professional confectioners; it actually dampens the overly sweet edge and makes the banana flavor pop right off the spoon.
For a winter version, try adding a cinnamon stick during the simmer.
Adjusting Thickness Without Cornstarch
We don't use cornstarch here because it gives a cloudy, slightly artificial texture that doesn't belong in a rich Banana Syrup . If you want a thicker syrup, the answer is simple: cook it longer.
The longer the gentle simmer, the more water evaporates, concentrating the sugars and the natural pectin from the fruit. Just be careful not to boil it aggressively, or the sugar will burn.
Simmering Success: A step-by-step Guide to the Syrup Method
Get your pan ready; this is where the magic happens. You’ll be shocked at how easy it is to create this incredible flavor profile. Making homemade Banana Syrup is truly a rewarding weekend project.
Preparation: Slicing and Macerating the Fruit
First, start your simple syrup base. Combine the water, sugar, and salt in your saucepan and stir gently over medium heat until the sugar crystals have completely dissolved. Don't let it boil before the sugar is dissolved, or you risk crystallization later. Once dissolved, bring it up to a gentle simmer.
Now, add your sliced, ripe bananas and the crucial teaspoon of lemon juice.
The Simmer and Reduction Phase
Reduce the heat slightly so the mixture is just bubbling gently, and let it simmer for about 10– 12 minutes. The banana slices will soften dramatically and start to look mushy around the edges. This slow simmer is extracting all the ripe flavor compounds.
Next, take the pan off the heat and grab your potato masher. Gently mash the bananas right in the syrup base. You don’t want a smoothie, just a coarse mash to fully break down the fruit cells.
Return the pan to the lowest heat for a final 3– 5 minutes, stirring occasionally, allowing the mash to fully infuse the liquid and slightly thicken.
Straining and Clarifying Your Homemade Drizzle
This is the patience step. Remove the pan from the heat and stir in the vanilla extract. Carefully pour the entire mixture solids and all through a fine mesh sieve set over a clean bowl.
Crucial Chef’s Note: Do not, under any circumstances, press down on the banana solids with your spoon or spatula. Let gravity do the work for 15 to 20 minutes.
Pressing the solids forces starchy, cloudy pulp into your syrup, destroying the beautiful clarity of your finished Banana Syrup .
Once the liquid has dripped through, discard the solids they have given their all!
Cooling to the Desired Consistency
The syrup will look quite thin when it is hot, but don't panic and put it back on the stove. Syrups gain significant body and viscosity as they cool. Let your rich Banana Syrup cool completely to room temperature before transferring it to storage jars.
You will notice a major difference in the thickness once it's fully chilled.
The Science Behind That Deeply Caramelized Flavor
How do sweet bananas turn into something so complex and rich? It’s all about controlling the heat and the acids. The combination of high heat and the natural fruit acids in the banana causes the sugars to caramelize slowly without burning. The lemon juice plays a critical role here, too.
It acts as an invert sugar agent, preventing the syrup from tasting sickly sweet while also stabilizing the final product. That perfect deep, round banana flavor is a result of that long, slow conversation between the fruit, the water, and the heat.
Troubleshooting and Expert Chef's Techniques
Everyone struggles with syrups at first. Here are the common pitfalls I encountered and how you can avoid ruining your lovely Banana Syrup .
The Role of Slow Simmering in Texture
If you try to rush the process by turning the heat up high, you risk two things: burning the sugar, which tastes bitter, and evaporating too much water too quickly. A violent, rolling boil can actually encourage crystallization.
A gentle simmer is essential for controlled evaporation, ensuring the texture of your homemade Banana Syrup is perfect.
Balancing Sweetness and Acidity
The 1 teaspoon of lemon juice is a must have. Without it, the flavor of the ripened fruit in the syrup can taste heavy and monotone. The acid provides that necessary brightness, cutting through the sweetness and preventing the fruit from oxidizing and turning brown during the cooking process.
Preventing Crystallization (A Common Syrup Mistake)
If you find crystals forming on the sides of your jar, it means the sugar has reverted to its solid state. This often happens if you stir the syrup vigorously while it’s cooling or if you let undissolved sugar splash onto the sides of the pan during the initial boil. My trick?
Once it starts boiling, stop stirring! The acid in the lemon juice also helps chemically stabilize the sugars, making crystallization much less likely in this rich Banana Syrup .
How to Fix a Syrup That’s Too Thin
This is the easiest fix in the book. If you cool the finished syrup and realize it’s still too watery, just pour it back into the clean saucepan. Bring it back to a gentle simmer and let it reduce for an additional 5 to 8 minutes.
Remember: it will thicken up again significantly once it cools, so don't over reduce it. A slightly thin Banana Syrup is better than thick, caramelized tar.
Dealing with Banana Solids: To Blend or Not to Blend
If you prioritize a thick, opaque, and highly rustic texture (perfect for coating pancakes), feel free to skip the straining step entirely and blend the entire mixture until smooth.
However, if you want that beautiful, glistening, clear liquid suitable for cocktails, coffee, or delicate desserts, then straining is essential for your rich Banana Syrup . I usually strain mine for versatility.
Keeping It Fresh: Shelf Life, Storage, and Freezing
This rich Banana Syrup is surprisingly resilient, mostly thanks to its high sugar content acting as a natural preservative. Proper storage is key to making it last.
Refrigeration Timeline: How Long Does Banana Syrup Last?
Always transfer the fully cooled Banana Syrup to a clean, sterilised, airtight glass jar. Stored correctly in the refrigerator, this homemade drizzle will last beautifully for up to 3 weeks .
If you see any signs of cloudiness, mold, or smell anything off, discard it immediately, but because we use high heat, it usually keeps very well.
If you made a massive batch, yes, you can freeze it! Pour the cooled syrup into freezer safe containers, leaving about half an inch of headspace because liquids expand. Freeze for up to 6 months.
To reheat, thaw overnight in the fridge and then gently warm it on the stovetop or even just zap it in the microwave before serving.
Beyond Pancakes: Creative Uses for Your Golden Drizzle
While this homemade Banana Syrup is the perfect partner for a mountain of fluffy pancakes, it deserves a spot in your bar cart and dessert repertoire as well.
This syrup makes a phenomenal base for homemade tropical sodas when mixed with sparkling water. It’s also incredibly delicious stirred into iced coffee or added to a rich glass of chocolate milk.
I often use it as a finishing touch instead of plain simple syrup in my cocktails, like a banana Daiquiri or an Old Fashioned twist.
If you find yourself with an abundance of ripe fruit, you could also use this Banana Syrup to inject deep flavor into the finishing touch for a baked good. Try using it to replace the maple syrup base in a recipe like my quick Banana Bread Glaze The Brown Butter Rum Finishing Touch for an extra layer of decadence.
Whether you're pouring it over waffles, folding it into Greek yogurt, or using it to brighten up your morning matcha, this rich, deeply flavorful Banana Syrup is a total game changer. It transforms everyday ingredients into something truly special. Go make some!

Recipe FAQs
How long will the Golden Hour Banana Syrup last, and how should I store it?
Stored in an airtight, sterilised container in the refrigerator, this syrup typically lasts for 2 to 3 weeks. Always ensure the jar or bottle is completely clean before filling to prevent premature spoilage, and discard immediately if you notice any mould or fermentation bubbles.
My finished syrup seems too thin/runny. How can I fix the consistency?
If the syrup is too runny, return it to the saucepan and simmer gently for an additional 5 to 10 minutes on low heat to allow more water to evaporate and concentrate the sugars. Alternatively, for quick thickening, you can whisk in a very small amount of cornstarch slurry (1 tsp starch mixed with 1 tsp cold water) while simmering.
What kind of bananas are best for this recipe, and can I use underripe ones?
Overly ripe bananas those with significant brown spotting are essential for the best flavour and sweetness, as their starches have fully converted to sugar. Underripe bananas will yield a less flavourful, slightly starchy syrup that lacks the desired deep "Golden Hour" caramel richness.
Are there any flavour variations or additions I can make to the syrup?
For a warmer, spiced syrup, try simmering the mixture with a cinnamon stick, a few cloves, or a dash of nutmeg. You can also add 1 teaspoon of pure vanilla extract or a splash of dark rum right after removing the syrup from the heat to deepen the complex, caramelised notes.
Why is my finished syrup cloudy instead of clear?
Cloudiness usually occurs if you excessively stir the syrup while it’s simmering or if you mash the bananas too vigorously before the straining step. For the clearest result, strain the finished syrup slowly through a fine mesh sieve lined with cheesecloth without forcing the solids through.
Besides pancakes, what are the best culinary uses for this banana syrup?
Beyond standard breakfast applications, this rich syrup is fantastic as a tropical mix-in for milkshakes, smoothies, or classic cocktails like an Old Fashioned. It also makes an excellent topping for simple vanilla ice cream, plain Greek yogurt, or a cheesecake dessert.
Golden Hour Banana Syrup Recipe
Ingredients:
Instructions:
Nutrition Facts:
| Calories | 137 kcal |
|---|---|
| Protein | 0.5 g |
| Fat | 0.2 g |
| Carbs | 35.0 g |
