Sweet Corn Casserole: Rich and Buttery

- Time: Active 10 minutes, Passive 45 minutes, Total 55 minutes
- Flavor/Texture Hook: Sweet, buttery, and incredibly velvety with a golden brown crust.
- Perfect for: Stress free holiday gatherings, Midwestern potlucks, or an easy weeknight side.
- Master the Ultimate Sweet Corn Casserole for Your Next Potluck
- Important Details Regarding Your Cook Time and Serving Sizes
- Selecting the Highest Quality Components for a Golden Result
- The Essential Tools Required for a Perfectly Baked Side Dish
- Following the Step-by-Step Path to a Flawless Golden Finish
- Pro Tips for Preventing Sogginess and Ensuring a Perfect Set
- Adapting the Recipe for Different Dietary Needs and Palates
- Storing Your Leftovers and Reducing Waste in the Kitchen
- Perfect Main Dishes and Sides to Complete Your Hearty Meal
- Recipe FAQs
- 📝 Recipe Card
Master the Ultimate Sweet Corn Casserole for Your Next Potluck
The kitchen is quiet except for the rhythmic sound of a whisk hitting a ceramic bowl and the soft sizzle of butter melting in the microwave. There is a specific, nostalgic aroma that fills a Midwestern home when corn, sugar, and dairy hit a hot oven it is the smell of comfort and a Sunday afternoon well spent.
I remember the first time I pulled a pan of this out of the oven for a neighborhood barbecue; the edges were just beginning to pull away from the sides, and the center had that signature, gentle wobble that tells you it is going to be perfectly moist.
This isn't just a side dish; it is a heart warming staple that bridges the gap between a savory vegetable and a sweet pudding. We have all seen those dry, crumbly versions that feel like a chore to eat, but this recipe is different.
By balancing the acidity of sour cream with the sweetness of cream style corn, we create a texture that is light yet substantial. It is the kind of dish that makes people ask for the recipe before they have even finished their first serving, and honestly, that is the best compliment a home cook can get.
We are going for a result that is plush and velvety, not dense or cakey. Whether you are a seasoned pro or someone who usually avoids the kitchen, this method is designed to be stress free and reliable.
We are going to walk through why these specific ingredients work together so you can feel confident every time you preheat that oven. Let's get into the details of what makes this particular version the one your friends will be begging you to bring to every single party from now on.
Important Details Regarding Your Cook Time and Serving Sizes
When you are planning a big meal, timing is everything. This dish is a hero because the prep is lightning fast just 10 minutes of active work while the oven does the heavy lifting for 45 minutes.
It gives you plenty of time to focus on your main course or finally get those dishes out of the sink. I have found that sticking to these exact times ensures the center sets without the edges becoming overly scorched or dry.
Structural Integrity: The combination of eggs and cornmeal creates a protein and starch mesh that holds the moisture of the corn without collapsing.
Thermal Regulation: Using a ceramic or glass dish allows for even heat distribution, which is why we bake at 350°F to ensure the middle cooks at the same rate as the exterior.
Moisture Equilibrium: The cream style corn acts as a continuous liquid phase that prevents the Jiffy mix from absorbing all the moisture, keeping the casserole silky.
Fat Saturation: Melted butter and full fat sour cream coat the cornmeal particles, which limits gluten development and results in a tender, melt in-your mouth crumb.
| Servings | Ingredient Adjustments | Pan Size | Cook Time |
|---|---|---|---|
| 5 people | Use half of all ingredients (1 egg) | 8x4 Loaf Pan | 35-40 minutes |
| 10 people | Standard recipe (see below) | 9x9 Square | 45 minutes |
| 20 people | Double all ingredients | 9x13 Casserole | 55-60 minutes |
When you double the recipe for a larger crowd, the depth of the batter in a 9x13 pan is thicker than it is in a 9x9 square. Because of this extra volume, you will need to add about 10 to 15 minutes to the clock.
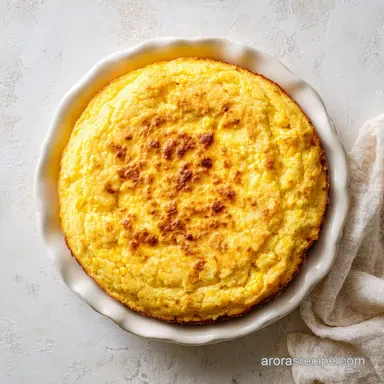
Always look for that golden brown color on top and a center that doesn't slosh when you give the pan a light nudge.
Selecting the Highest Quality Components for a Golden Result
Choosing your ingredients wisely is the difference between a "good" dish and one that people talk about for weeks. For this recipe, we are leaning on some budget friendly classics that provide massive flavor.
While you might be tempted to go for low-fat options, trust me on this: the full fat sour cream and real butter are non negotiable for that signature homestyle mouthfeel.
| Component | Science Role | Pro Secret |
|---|---|---|
| Large Eggs | Provides structure and lift | Whisk until frothy to incorporate air before adding other ingredients |
| Sour Cream | Adds moisture and tang | Use room temperature cream to prevent the melted butter from seizing up |
| Jiffy Mix | The starch and leavening base | Don't overmix; leaving a few small lumps helps maintain a light texture |
The corn itself is the star, and using both whole kernel and cream style corn provides a beautiful contrast in textures. The whole kernels give you a little pop of sweetness, while the cream style corn provides the luscious, saucy base that binds everything together. If you find yourself out of the boxed mix, you can always look into a homemade cornbread recipe to understand the ratios of cornmeal to flour that provide that perfect crumb.
The Essential Tools Required for a Perfectly Baked Side Dish
You don't need a professional kitchen to pull this off, but a few specific items make the process much smoother. I always reach for a large glass mixing bowl because it lets me see if I have missed any pockets of dry mix at the bottom.
A sturdy whisk is also a must have for getting those eggs nice and frothy, which is the secret step many people skip.
For the baking dish, a 9x9 inch square is the sweet spot. If you use a dish that is too large, the casserole will be thin and prone to drying out. If it is too small, the center will stay soupy while the edges burn.
I prefer ceramic because it retains heat beautifully and looks great on the table, but a standard Pyrex glass dish works perfectly well too. Just make sure you grease it generously with butter so you don't lose those delicious crispy edges.
The Corn Components
- 15.25 oz whole kernel corn, drained: This provides the bite. Why this? Canned corn is consistent in moisture, making it more reliable than fresh for this bake.
- 14.75 oz cream style corn: This is our liquid gold. Why this? The starches in the creamed corn help thicken the custard naturally.
The Dairy & Binders
- 0.5 cup unsalted butter, melted: For that rich, Midwestern flavor. Why this? Melting the butter ensures it incorporates evenly without leaving oily pockets.
- 1 cup full fat sour cream: Our moisture powerhouse. Why this? The acidity helps tenderize the cornmeal for a softer finish.
- 2 large eggs, room temperature: The structural glue. Why this? Room temp eggs emulsify better with the fat, creating a smoother batter.
The Starch Base (Choose One)
- 8.5 oz Jiffy Corn Muffin Mix: The classic shortcut. Why this? It contains the perfect ratio of flour, cornmeal, and leavening for a quick rise.
- 1.5 cups shredded sharp cheddar cheese: For a savory kick. Why this? Sharp cheddar stands up to the sweetness of the corn better than mild cheese.
| Original Ingredient | Substitute | Why It Works |
|---|---|---|
| Sour Cream | Plain Greek Yogurt | Similar acidity and fat content. Note: Slightly tangier flavor profile. |
| Sharp Cheddar | Pepper Jack | Same melting point. Note: Adds a noticeable spicy kick to the dish. |
| Melted Butter | Coconut Oil (refined) | Provides the necessary fat. Note: Use refined oil to avoid a coconut taste. |
Following the step-by-step Path to a Flawless Golden Finish

- Preheat your oven to 350°F (175°C). Note: A fully preheated oven is crucial for the leavening in the muffin mix to activate immediately.
- Grease a 9x9 inch baking dish or a 2 quart casserole dish generously with butter.
- In a large mixing bowl, whisk the 2 large eggs until they are frothy and light yellow.
- Stir in the melted butter and 1 cup of sour cream. Note: Mix until no white streaks remain and the texture looks like a smooth pale custard.
- Fold in the drained whole kernel corn and the cream style corn using a spatula.
- Incorporate the shredded sharp cheddar cheese and the corn muffin mix.
- Stir the mixture gently until just combined and the dry streaks disappear. Note: Over stirring will lead to a tough, rubbery texture.
- Pour the batter into your prepared dish and smooth the top with the back of a spoon.
- Bake for 45 minutes until the center is set and the top is a deep golden brown.
- Remove from the oven and let it rest for at least 5 minutes. Note: This allows the starches to firm up for easier serving.
Pro Tips for Preventing Sogginess and Ensuring a Perfect Set
The most common hurdle with any corn based bake is the dreaded "soupy center." This usually happens when there is too much moisture or the oven temperature fluctuates. I have made the mistake of not draining the kernel corn well enough before, and trust me, that extra tablespoon of liquid can ruin the whole vibe.
You want a dish that you can scoop out with a spoon and have it hold its shape, not run across the plate.
To Prevent a Soupy Center
If your casserole looks wet in the middle after the 45 minute mark, don't panic. Sometimes the moisture content in canned corn varies slightly. You can give it another 5 to 8 minutes in the oven.
If the top is already brown enough, simply tent a piece of foil over the dish to protect the crust while the inside finishes firming up.
To Stop a Grainy Texture
A grainy texture usually comes from the cornmeal in the muffin mix not hydrating properly. This is why room temperature eggs and sour cream are so helpful; they don't shock the melted butter, allowing the liquids to penetrate the dry mix more effectively.
If you have time, let the mixed batter sit in the bowl for 5 minutes before pouring it into the pan to give those grains a head start.
| Problem | Root Cause | Solution |
|---|---|---|
| Too Runny | Corn wasn't drained well | Ensure you shake the colander vigorously to remove all liquid. |
| Dry and Crumbly | Overbaked or low-fat dairy | Use full fat ingredients and check for doneness 5 mins early. |
| Burnt Edges | Oven was too hot | Use an oven thermometer to verify temperature is exactly 350°F. |
- ✓ Always pat your drained corn kernels with a paper towel for the best results.
- ✓ Whisk the eggs separately first to ensure they are fully incorporated without over working the batter.
- ✓ Use a light colored baking dish if possible, as dark pans can cause the bottom to brown too quickly.
- ✓ Resist the urge to peek; opening the oven door repeatedly drops the temperature and slows the setting process.
- ✓ Let the dish rest for at least 5 to 10 minutes after baking; the carryover heat finishes the setting process.
Adapting the Recipe for Different Dietary Needs and Palates
One of the reasons this dish is such a staple in my house is how easy it is to change the flavor profile. If you are serving this alongside something spicy, like a Keto Southwest Breakfast Casserole, you might want to lean into those flavors by adding diced jalapeños or a dash of cumin. The base is forgiving, so feel free to get a little creative with what you have in the pantry.
For a Zesty Southwestern Kick
Add a small can of diced green chilies (drained) and swap the cheddar for pepper jack cheese. A teaspoon of smoked paprika or chili powder added to the dry mix will give it a beautiful sunset hue and a hint of heat that cuts through the richness of the butter and sour cream.
It turns a simple side into a bold accompaniment for grilled steaks or tacos.
To Make Sweet Corn Casserole Without Jiffy
If you can't find the boxed mix, you can create your own blend. Combine 1/2 cup of yellow cornmeal, 1/2 cup of all purpose flour, 1/4 cup of sugar, 2 teaspoons of baking powder, and a pinch of salt. This provides the same volume and lift as the 8.5 oz box but allows you to control the sweetness.
Honestly, sometimes I prefer this version because I can use a higher quality cornmeal for a more pronounced corn flavor.
For a Crispy Topping
While the classic version is smooth on top, some people love a bit of crunch. You can crush up a handful of Ritz crackers or cornflakes, mix them with a tablespoon of melted butter, and sprinkle them over the casserole during the last 15 minutes of baking.
It adds a wonderful textural contrast that makes the velvety interior feel even more decadent.
Storing Your Leftovers and Reducing Waste in the Kitchen
This casserole is actually one of those rare dishes that tastes just as good, if not better, the next day. The flavors have a chance to meld, and the sweetness of the corn becomes more pronounced. If you find yourself with a few scoops left over, don't let them go to waste.
You can store them in an airtight container in the fridge for up to 4 days.
For longer storage, this dish freezes surprisingly well. I recommend cutting it into individual squares once it is completely cold, wrapping them tightly in plastic wrap, and then placing them in a freezer bag. They will stay fresh for up to 3 months.
When you are ready to eat, let a square thaw in the fridge overnight and then pop it in the microwave for 45 seconds or back in a 350°F oven for 10 minutes to bring back that freshly baked texture.
To reduce waste, think about those corn cans. The liquid from the whole kernel corn (the "corn liquor") is packed with flavor. Instead of pouring it down the drain, add it to a vegetable stock or use it as the liquid base for a corn chowder.
Even the leftover crumbs at the bottom of the pan can be stirred into a morning scramble for a sweet and savory breakfast treat.
Perfect Main Dishes and Sides to Complete Your Hearty Meal
Serving this casserole is all about balance. Because it is quite rich and sweet, it pairs beautifully with salty or smoky main courses. In the Midwest, you will almost always see this sitting next to a honey glazed ham or a pile of slow cooked pulled pork.
The sweetness of the corn acts as a natural foil to the saltiness of cured meats.
If you are planning a holiday spread, this dish is a fantastic companion to a Sweet Potato Casserole with pecans. While both are on the sweeter side for vegetables, their textures are different enough to coexist on a plate. The corn casserole provides a savory cornmeal backbone that prevents the meal from feeling like it is entirely made of dessert.
For a simple weeknight dinner, try serving it alongside roasted chicken and a crisp green salad with a tart vinaigrette. The acidity of the salad dressing will cleanse your palate between bites of the buttery corn. It's a stress free way to make a basic meal feel like a special occasion.
No matter what you pair it with, just remember to let the casserole be the star it has enough personality to carry the whole meal.
One final myth to bust: many people think you have to use fresh corn for a "real" casserole. Honestly, in this specific recipe, canned or frozen corn often performs better because the moisture content is standardized.
Searing the corn beforehand doesn't "seal in juices" here either; the magic happens during the slow bake where the starches and fats emulsify into that perfect, spoonable consistency. Just stick to the plan, trust the Jiffy, and you'll have a winner every time.

Recipe FAQs
What are the core ingredients in this corn casserole?
This recipe relies on seven essentials. You will need 15.25 oz of drained whole kernel corn, 14.75 oz of cream style corn, 0.5 cup of melted unsalted butter, 1 cup of full fat sour cream, 2 room temperature large eggs, 1.5 cups of shredded sharp cheddar cheese, and an 8.5 oz box of corn muffin mix.
Is this the famous Jackie Kennedy corn casserole recipe?
No, this is a different variation. While many corn casseroles share similar bases, this specific version focuses on the combination of muffin mix, sour cream, and both types of corn to achieve a distinctively moist, pudding like texture.
Does this match the ingredients in Paula Deen's version?
It is very similar, but measurements may vary. This version utilizes 1 cup of sour cream and sharp cheddar cheese to build a rich flavor profile that mirrors traditional southern comfort style sides.
How do you make this corn casserole quick and easy?
Whisk your eggs until frothy before incorporating the other wet ingredients. By ensuring your butter is fully melted and your eggs are at room temperature, you can stir the mixture together in under ten minutes before baking at 350°F for 45 minutes.
Can I freeze the leftovers?
Yes, it freezes surprisingly well. Once completely cold, cut the casserole into individual squares, wrap them tightly in plastic wrap, and store them in the freezer to enjoy later.
Why is my casserole still wobbly in the center after 45 minutes?
The center should be set but have a slight jiggle. If it is truly liquid, continue baking in 5-minute increments, but keep in mind that the residual heat will firm up the texture significantly as it rests after leaving the oven.
How can I achieve a perfect golden crust every time?
Ensure you grease your baking dish generously with butter before adding the mixture. If you enjoyed mastering the crust development here, you can apply similar heat management principles to our crispy sage onion stuffing to perfect your golden finishes.
Homestyle Sweet Corn Casserole
Ingredients:
Instructions:
Nutrition Facts:
| Calories | 348 kcal |
|---|---|
| Protein | 9.8 g |
| Fat | 22.4 g |
| Carbs | 31.2 g |
| Fiber | 1.9 g |
| Sugar | 8.4 g |
| Sodium | 582 mg |
