Oven Baked Chicken and Rice: Crispy and Fluffy
- Time: Active 15 minutes, Passive 45 minutes, Total 1 hour
- Flavor/Texture Hook: Shatter crisp skin over velvety, broth soaked rice grains
- Perfect for: Weeknight comfort, budget-friendly family dinners, or beginner meal prep
- Mastering The Gold Standard Oven Baked Chicken And Rice
- Time And Temperature Specs For Results
- Selecting Pantry Staples For Deepest Flavor
- Essential Tools For This Comfort Dish
- Transforming Simple Elements Into A Feast
- Solutions For Common Cooking Hiccups
- Customizing Your Comfort Food Casserole
- Storage Tips And Smart Kitchen Hacks
- Plating For The Ultimate Family Supper
- Recipe FAQs
- 📝 Recipe Card
Mastering The Gold Standard Oven Baked Chicken And Rice
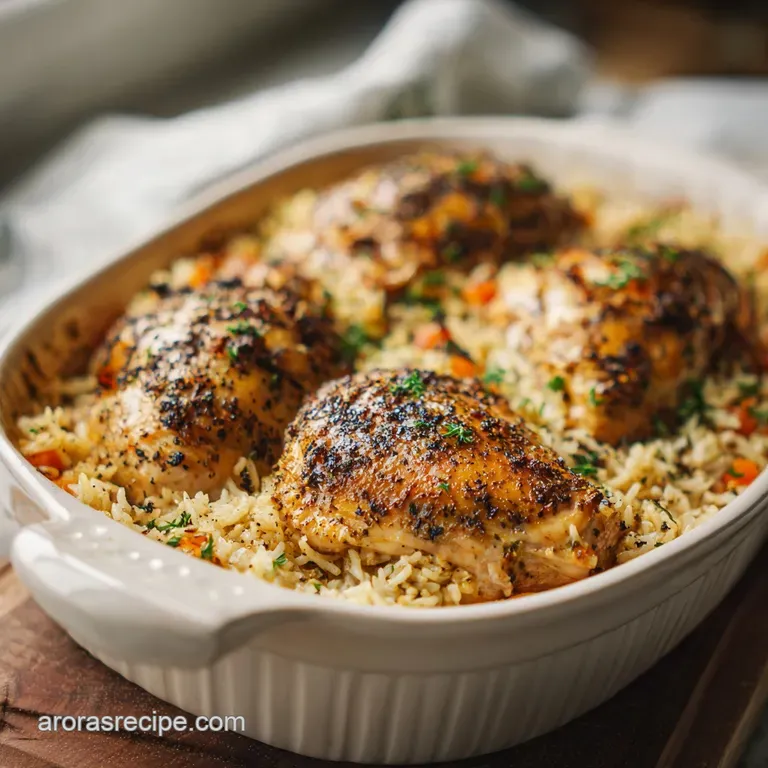
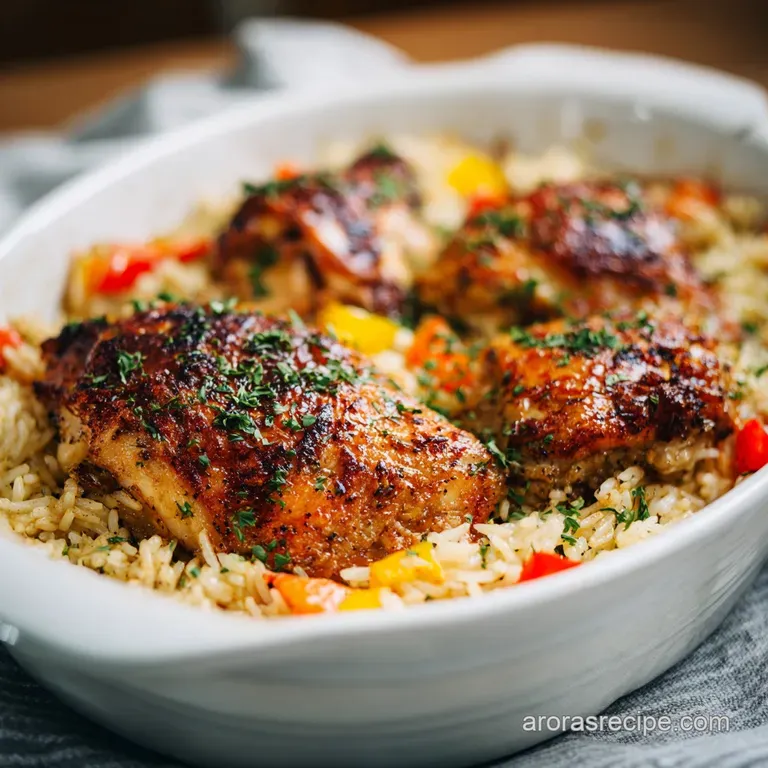
There is a specific sound that happens in a quiet kitchen when you tap the back of a spoon against a perfectly seared chicken thigh. It’s a hollow, metallic "tink tink" that tells you the skin has transformed from limp poultry into a savory, amber colored parchment.
I remember the first time I heard that sound after years of serving my family what I can only describe as "gray chicken." You know the kind the skin is rubbery, the rice is a singular, gelatinous block, and the whole thing looks like it belongs in a Victorian era hospital.
But then, I learned the secret of the sear and the toast, and everything changed.
Whenever I pull this deep skillet out of the oven, the aroma of smoked paprika and toasted garlic hits the back of my throat before I even open the foil. It smells like home, but a version of home where someone actually knows what they’re doing with a spice cabinet.
The rice at the very edges of the pan gets those little crispy bits the Socarrat, if we’re being fancy while the grains nestled directly under the chicken are plump with rendered fat and chicken stock.
It’s the kind of meal that makes you want to scrape the bottom of the pan with a wooden spoon just to get every last savory morsel.
We’ve all been there with the "easy" casseroles that promise a lot and deliver a soggy mess. I’m telling you right now, we’re skipping the "cream of whatever" soup and building real flavor from the ground up.
This isn’t just about putting food on the table; it’s about that moment when you take the first bite and the rice actually individualizes on your tongue instead of sticking to the roof of your mouth.
It’s budget friendly, sure, but it tastes like you spent a lot more than fifteen minutes of active work on it. Let's get into how we make this magic happen without breaking the bank or your spirit.
Time And Temperature Specs For Results
Getting the timing right is the difference between a succulent meal and a dried out disappointment. Since we are using bone in thighs, we have a bit of a safety net they are much more forgiving than breasts but we still want to hit those precision checkpoints.
The goal is to let the rice absorb the liquid at the exact same moment the chicken reaches its safe internal temperature. If the rice is done but the chicken is raw, you're in trouble. If the chicken is dry but the rice is crunchy, nobody wins.
The following table breaks down how to manage your expectations and your oven time based on what you have on hand. Whether you're trying to save a few pennies or you're cooking for a hungry crowd, these metrics will keep you on the right track.
| Feature | Target Metric | Visual/Sensory Cue |
|---|---|---|
| Searing Time | 5–6 minutes | Skin releases easily from the pan and looks like polished mahogany |
| Bake Time (Covered) | 30 minutes | Liquid is mostly gone but the rice still looks glossy and wet |
| Bake Time (Uncovered) | 10–15 minutes | The skin regains its crunch and the broth is fully absorbed |
| Internal Temp | 165°F (74°C) | Juices run clear when the thickest part of the thigh is pierced |
When you are working with a budget smart mindset, it’s tempting to rush the searing process. Don't. That five minute window in the hot oil is where the flavor lives. If you pull the chicken too early, you lose the "fond" those beautiful brown bits on the bottom of the skillet that season the rice.
Trust the process and let that skin get properly dark.
Selecting Pantry Staples For Deepest Flavor
The magic of this oven baked chicken and rice lies in how we treat the starch. Most people just boil rice, but we are going to treat it like a premium ingredient. By understanding the components we're working with, we can make a $10 meal taste like a $40 bistro plate.
- The Starch Shield: Toasting the rice in butter and rendered chicken fat coats each grain in a thin layer of lipids. This prevents the starches from bursting too early, which is exactly how you avoid that dreaded mushy texture.
- Vapor Pressure Management: Using heavy duty foil creates a pressurized environment. This forces the steam back down into the rice, cooking it evenly from the top and bottom while the chicken acts as a flavor dripping lid.
- Acidity and Brightness: A tiny splash of lemon juice at the end might seem trivial, but it cuts through the heavy fats. It acts as a highlighter for the smoked paprika, making the whole dish feel lighter than a traditional casserole.
- Carryover Wisdom: Letting the pan rest for five minutes after the final uncovered bake allows the rice to finish absorbing the microscopic amounts of steam left in the pan, resulting in a fluffier grain.
| Ingredient Component | Role in the Dish | Pro Secret for Success |
|---|---|---|
| Bone in Thighs | Primary protein and fat source | Pat them dry until the paper towel stops sticking for the best sear. |
| Long grain Rice | The structural foundation | Rinse it under cold water until the cloudy starch disappears to keep grains separate. |
| Smoked Paprika | The "Nashville" soul | Use a fresh tin; if it doesn't smell like a campfire, it won't add any depth. |
| Chicken Broth | The hydration and umami | Use low sodium so you can control the salt levels with your sea salt. |
While we are focusing on the rice, it's worth noting that this technique of toasting grains is similar to how you'd start a risotto. However, unlike a risotto where you want the starch to create a sauce, here we want the starch to stay inside the grain. If you’re looking for a more "saucy" vibe with a different profile, you might want to check out this creamy casserole recipe which uses a different hydration method altogether.
Essential Tools For This Comfort Dish
You don't need a kitchen full of gadgets, but a few specific pieces of equipment will make your life significantly easier. The star of the show is the oven safe skillet. If you have a cast iron pan, now is its time to shine.
The thick walls of cast iron hold heat better than thin stainless steel, which helps maintain a steady simmer once you slide the pan into the oven.
If you don't have a large skillet that can go into the oven, you can sear the chicken in a regular pan and then transfer everything to a 9x13 baking dish. Just be sure to scrape every bit of that flavored oil and the sautéed onions into the baking dish with the rice.
You don't want to leave any of that "liquid gold" behind.
- 12 inch Skillet: Needs to be deep enough to hold 3 cups of broth plus the chicken. A high sided sauté pan is perfect.
- Fine mesh Strainer: Essential for rinsing the rice. If you skip rinsing, the excess surface starch will turn your dinner into a rice pudding texture.
- Instant read Thermometer: This is the only way to be 100% sure your chicken is safe without cutting into it and letting all the juices run out.
- Heavy duty Foil: Cheap foil tears easily and lets steam escape. Use the thick stuff so you can get a tight seal around the edges of your pan.
Transforming Simple Elements Into A Feast
Right then, let's get cooking. This process is all about the layers. We aren't just tossing things in a bowl; we are building a foundation of flavor that gets stronger with every step. Follow these steps exactly, and you'll have a meal that smells like a dream.
- Preheat and Prep: Crank your oven to 375°F (190°C). Grab those 2 lbs of chicken thighs and a stack of paper towels. Pat the skin side until it feels like dry parchment. > Note: Any moisture on the skin will turn to steam in the pan, preventing that beautiful golden crust we’re after.
- Season Heavily: Mix your 1 tbsp smoked paprika, 1 tsp garlic powder, 1 tsp onion powder, 1.5 tsp sea salt, and 0.5 tsp black pepper. Coat the chicken thoroughly. Don't be shy; this rub is what seasons the rice later too.
- The Great Sear: Heat 2 tbsp olive oil in your skillet over medium high. Lay the chicken skin side down. Cook 5–6 minutes until it’s deep golden and releases easily. Flip it for just 1 minute to seal the bottom, then move the chicken to a plate.
- Aromatic Base: Toss out the excess oil, leaving about 2 tbsp in the pan. Drop in 2 tbsp butter, your diced onion, and the 3 cloves of minced garlic. Sauté 3-4 minutes until the onions are soft and see through.
- Toast the Starch: Add your 1.5 cups of rinsed rice. Stir it around so every grain is glistening with butter and chicken fat. Toast for 2 minutes until the edges of the rice look translucent.
- Deglaze and Simmer: Pour in 3 cups of chicken broth and 1 tsp lemon juice. Use a wooden spoon to scrape the bottom of the pan get all those brown bits! Bring it to a bubbling simmer.
- The Assembly: Nestle the chicken thighs back into the rice, skin side up. Make sure the skin stays above the liquid line. Drop in those 2 sprigs of fresh thyme.
- The First Bake: Cover the pan tightly with foil. Bake for 30 minutes until the rice has absorbed most of the liquid.
- The Final Crunch: Strip the foil off. Bake another 10–15 minutes until the skin is crackling and the chicken hits 165°F.
- Resting Period: Take it out and let it sit for 5 minutes. This is the hardest part, but it's vital for the fluffiest rice.
Solutions For Common Cooking Hiccups
Even the best of us hit a snag sometimes. Maybe the rice is still a bit crunchy in the middle, or the chicken skin didn't get as crispy as you wanted. It’s usually a small fix involving heat management or moisture control.
Why Your Rice Is Still Crunchy
If you pull the foil off and find that the rice is still hard, it usually means your seal wasn't tight enough and too much steam escaped. Or, perhaps the broth wasn't hot when you added it, which delayed the cooking process. Don't panic.
Just add 1/4 cup of hot water or broth, put the foil back on, and give it another 5-7 minutes in the oven. The residual heat usually does the trick.
Fixing a Soggy Surface
If the rice is done but there is still a thin layer of liquid on top, your oven might be running a little cool. The fix is simple: increase the heat to 400°F for the final uncovered 10 minutes.
This will evaporate the excess moisture and give the chicken skin that final blast of heat it needs to shatter when you bite into it.
| Problem | Root Cause | Solution |
|---|---|---|
| Bland Rice | Lack of fond or under seasoning | Ensure you scrape the bottom of the pan thoroughly during step 6. |
| Tough Chicken | Overcooking past 175°F | Use a thermometer and pull the pan as soon as it hits 165°F. |
| Gummy Rice | Excess surface starch | Rinse the rice 3-4 times in a bowl until the water runs clear. |
Common Mistakes Checklist:
- ✓ Forgot to pat the chicken dry (results in pale, rubbery skin).
- ✓ Skipping the rice toasting (leads to a mushy, porridge like texture).
- ✓ Adding cold broth to a hot pan (stops the cooking momentum and can crack a glass pan).
- ✓ Opening the oven door too often (drops the temp and ruins the steam cycle).
- ✓ Crowding the pan during the sear (steams the meat instead of browning it).
Customizing Your Comfort Food Casserole
While the classic version is hard to beat, you can easily swap things out based on what’s in your pantry. If you’re trying to keep things even more budget friendly, you can use bone in drumsticks instead of thighs.
They usually cost about half as much and have a similar fat content that keeps the meat moist during the long bake.
If you are looking for something with a bit more of a kick, you can swap the smoked paprika for a taco seasoning blend and use beef broth instead of chicken. This creates a completely different vibe that pairs perfectly with a dollop of sour cream and some pickled jalapeños. I’ve even done a version with a bit of diced kielbasa thrown in with the onions, much like a savory skillet pasta I make during the week when I'm short on time.
| Original Ingredient | Substitute | Why It Works |
|---|---|---|
| Chicken Thighs | Chicken Drumsticks | Similar fat content and cook time. Note: Slightly less meat per pound. |
| Chicken Broth | Vegetable Broth | Provides the necessary liquid and salt. Note: Lacks the deep savory fat of chicken. |
| White Rice | Jasmine Rice | Similar cooking time with a floral aroma. Note: Slightly stickier than long grain. |
Scaling for a Crowd
If you are doubling this recipe for a big family gathering, you'll need two skillets or one very large roasting pan. When you double the rice and liquid, be careful with the spices. I usually only go 1.5x on the salt and pepper initially, then adjust at the very end.
For the baking time, you’ll likely need an extra 10 minutes since the mass of the food is greater. If you’re baking two pans at once, swap their positions (top rack to bottom rack) halfway through to ensure even browning.
Storage Tips And Smart Kitchen Hacks
Leftover oven baked chicken and rice is actually one of my favorite lunches. The flavors have more time to meld, and the rice absorbs even more of that savory goodness overnight. However, rice is a sensitive ingredient when it comes to food safety, so you want to get it into the fridge as soon as it has cooled down.
- Fridge Life: Store in an airtight container for up to 4 days. When reheating, add a teaspoon of water and cover with a damp paper towel to keep the rice from drying out in the microwave.
- Freezer Instructions: You can freeze this for up to 3 months. I recommend freezing the chicken and rice in individual portions. Thaw in the fridge overnight before reheating.
- Zero Waste Tip: Don't throw away those thyme sprigs or the chicken bones! I keep a bag in my freezer for "scrap stock." Toss the bones and the herb stems in there, and when the bag is full, simmer it all with some water for a free batch of homemade broth.
- The Onion Peel Trick: If you want a deeper golden color in your rice, you can actually throw a clean piece of onion peel into the broth while it simmers (just fish it out before serving). It acts as a natural dye!
Plating For The Ultimate Family Supper
We eat with our eyes first, right? Even a "brown" meal like chicken and rice can look stunning with a few little touches. When you take the pan out of the oven, the first thing I do is discard the wilted thyme sprigs and replace them with a few fresh leaves.
The pop of green against the deep orange of the smoked paprika makes a huge difference.
I like to serve this family style, right out of the skillet. There's something so communal about everyone digging into the same pan. If you want to brighten things up, serve it alongside a crisp green salad with a sharp vinaigrette. The acidity of the salad cleanses your palate between bites of the rich, savory rice.
One final trick: before you bring the pan to the table, give the rice a very gentle fluff with a fork around the edges of the chicken. This releases a final burst of steam and makes the whole dish look light and airy rather than packed down.
It’s the little things that turn a budget friendly weeknight meal into something everyone remembers. Enjoy the crunch, enjoy the comfort, and most importantly, enjoy the fact that you only have one pan to wash!

Recipe FAQs
Can you cook raw chicken and rice at the same time in the oven?
Yes, this is the ideal method for this recipe. By searing the chicken first and then baking it atop the rice, the chicken juices flavor the grains as they steam together in the broth.
How do you bake chicken and rice in the oven?
Preheat your oven to 375°F and sear the seasoned chicken thighs in a skillet until golden brown. Sauté your onion and garlic in the same pan, toast the rice, stir in the broth and lemon juice, then nestle the chicken back on top to finish in the oven.
How long to bake chicken and rice in the oven at 375 degrees?
Bake for a total of 40 to 45 minutes. Keep the pan covered for the first 30 minutes, then remove the foil for the final 10 to 15 minutes to allow the liquid to fully absorb and the chicken skin to crisp.
When cooking chicken and rice in the oven, do you cover it?
Yes, you must cover the skillet with heavy duty foil for the initial 30 minutes. This traps the steam required to cook the rice through evenly before you uncover it to brown the chicken skin.
Is it necessary to toast the rice before adding the liquid?
Yes, toasting the rice in butter and aromatics for two minutes ensures a nutty flavor and better grain separation. If you enjoyed mastering this sautéing technique here, see how the same principle works to build deep flavor foundations in our other savory soups.
Can I store leftovers if there is chicken and rice together?
Yes, store the mixture in an airtight container in the refrigerator for up to 4 days. Rice is sensitive to food safety, so ensure it is cooled and refrigerated promptly after your meal.
How do I prevent the rice from drying out when reheating?
Add a teaspoon of water and cover the container with a damp paper towel before microwaving. This added moisture prevents the rice grains from becoming hard or brittle during the reheating process.
Oven Baked Chicken And Rice

Ingredients:
Instructions:
Nutrition Facts:
| Calories | 592 kcal |
|---|---|
| Protein | 31 g |
| Fat | 26 g |
| Carbs | 39 g |
| Fiber | 1 g |
| Sugar | 1 g |
| Sodium | 680 mg |
