Salmon Tataki the Essential Quick Sear Asian Appetizer
- Mastering the Art of Salmon Tataki
- What Exactly Is the Tataki Technique?
- Sourcing the Essential Elements for Perfect Salmon Tataki
- Step-by-Step Guide: Achieving the Ideal Sear and Slice
- Expert Tips and Troubleshooting for Your Tataki
- Storage, Safety, and Pairing Suggestions
- Recipe FAQs
- 📝 Recipe Card
Mastering the Art of Salmon Tataki
I used to think that the whole Salmon Tataki thing was reserved for those hushed, moody Japanese restaurants where the chefs wear incredibly starched uniforms. It felt impossibly sophisticated, unattainable for a regular home cook like me. Boy, was I wrong.
The first time I tried this Quick Sear Salmon Recipe , I realized the entire process minus the necessary chilling time takes less than two minutes. It is brilliant.
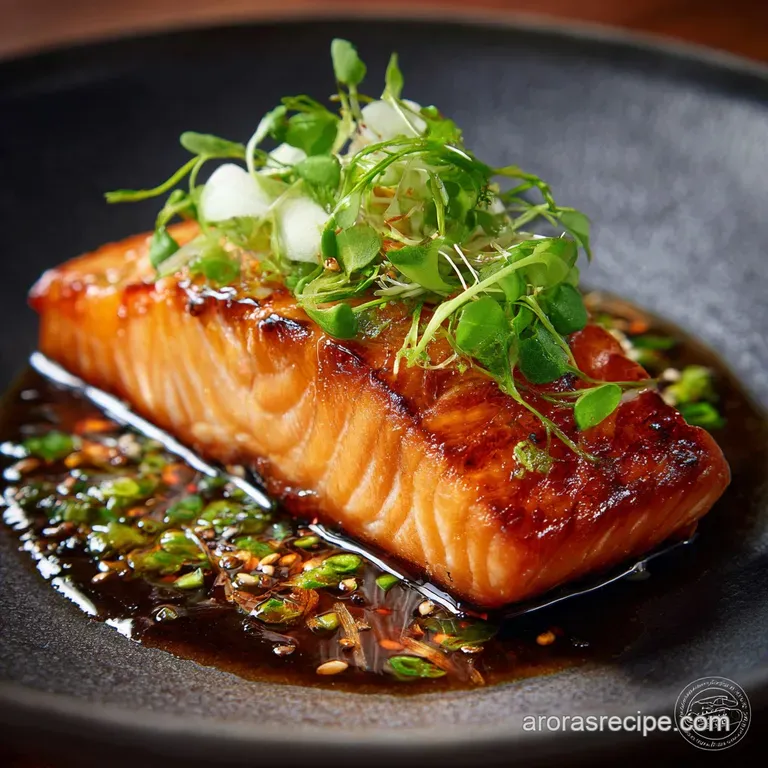
We’re aiming for a breathtaking contrast here: a buttery, cool, almost translucent raw center, protected by a smoky, crunchy, paper thin crust of blackened sesame seeds. When you slice it thin and drench it in that vibrant, homemade Ponzu, you have an appetizer that makes guests gasp. Trust me on this.
If you’ve ever wanted to look like a culinary genius with minimal effort, this is your recipe.
What Exactly Is the Tataki Technique?
The word "tataki" literally means "pounded" or "piled up." Historically, especially when dealing with bonito (skipjack tuna), the technique involved wrapping the fish in herbs like shiso or ginger and then lightly pounding it before serving.
Today, however, when you hear tataki in a restaurant, it specifically refers to the method of quick searing, usually over high heat or flame, followed by an aggressive chilling process.
The difference between a great piece of Tataki and a mediocre one isn't about the fish (though sourcing matters, and we will get to that); it’s all about the temperature shock.
Why the Flash Sear Creates Perfect Texture
We’re essentially creating a barrier. High heat immediately caramelizes the sesame crust and the protein on the very surface of the fish. That thin, dark crust does two amazing things: one, it seals in the moisture of the raw interior, and two, it provides that smoky, intense flavour that you can only achieve with aggressive heat.
If the pan isn't screaming hot, you lose control. You end up cooking into the fish instead of just on the surface. We only want a few millimeters of cooked fish. The vast majority of the loin needs to remain raw, glistening, and cold.
Elevating Your Appetizer Game
If you are hosting, this dish is your secret weapon. It looks stunningly impressive, and you can (and should) sear the salmon hours before your guests arrive. The chilling time is mandatory, meaning you aren't stuck searing things right before showtime.
This works perfectly as a sophisticated starter, or you can plate it over a little pile of dressed greens for a stunningly fresh salmon tataki salad —just make sure you dress the salad very lightly so the Ponzu remains the star dressing on the fish itself.
It’s light, high in healthy fats, and hits every flavour note imaginable: salty, sour, umami, and a little nutty from the sesame.
The Difference Between Sashimi, Carpaccio, and Tataki
People often mix up these raw fish preparations. They’re all fantastic, but the preparation dramatically changes the texture and flavour delivery. It’s helpful to know the difference, especially when you’re ordering or talking to your fishmonger.
| Style | Preparation | Key Feature |
|---|---|---|
| Sashimi | Completely raw, never cooked | Served with minimal seasoning or sauce on the side. |
| Carpaccio | Thinly sliced raw fish/meat | Usually dressed heavily with olive oil, lemon, or vinegar before serving. |
| Tataki | Flash seared exterior, raw interior | The texture contrast is the star; dressed with ponzu after slicing. |
Sourcing the Essential Elements for Perfect Salmon Tataki
Right then, let's talk ingredients. This is one of the rare recipes where you absolutely cannot substitute quality for price. Because we are eating the interior raw, the quality and safety protocols of the fish are non-negotiable.
Selecting True Sushi Grade Salmon Loin
If you are making any raw fish dish, you must use fish specifically labeled “sashimi grade” or “sushi grade.” This isn't just a fancy marketing term; it means the fish has been handled under strict guidelines and, most importantly, flash frozen to temperatures low enough (-35°C) to eliminate
parasites.
CRITICAL NOTE: If your fishmonger simply hands you "fresh Atlantic salmon," walk away. Ask them specifically if the fish has been processed and handled for raw consumption. If they hesitate, it’s not worth the risk.
A centre cut loin works best because the uniform thickness ensures even searing.
Crafting the Zesty Citrus Ponzu Dressing
The fish is rich and fatty (thank you, Omega-3s!). The sauce needs to be sharp and bright to balance that. This homemade Ponzu is the secret to that Citrus Zing Appetizer flavour. Don't even bother buying the pre-bottled stuff. It always lacks the punch of fresh ginger and lemon.
We’re relying on three types of acid: the salty umami acid from the rice wine vinegar, the mellow acid from the orange, and the sharp acid from the lemon. The little bit of Mirin is optional, but I highly recommend it; it adds just a touch of necessary sweetness to round out the sharpness.
The Must Have Kitchen Tools for a Clean Sear
You need heat, and you need to keep that heat. A non-stick pan is the enemy here; the heat transfer just isn't fast or aggressive enough. You absolutely must use a cast iron skillet or a very heavy bottomed stainless steel pan. These retain and distribute the ferocious heat we need for the 30-second sear.
And please, for the love of clean cuts, use a truly sharp knife. A dull knife will rip and tear the beautiful contrast of the seared crust and the soft interior. This ruins the presentation and the texture.
Substitutions and Flavor Alternatives for the Ponzu
If you want to lean into the truly authentic Japanese flavour profile, substitute the fresh lemon and orange juices with Yuzu juice . Yuzu is a Japanese citrus with a flavour profile that sits somewhere between grapefruit and mandarin, and it is phenomenal. It just screams sophistication.
Other quick swaps:
- If you don't have Mirin, a tiny pinch of white sugar dissolved in the sauce will mimic that touch of necessary sweetness.
- Need this gluten-free? Swap the soy sauce for Tamari, which is usually GF and provides a similar depth.
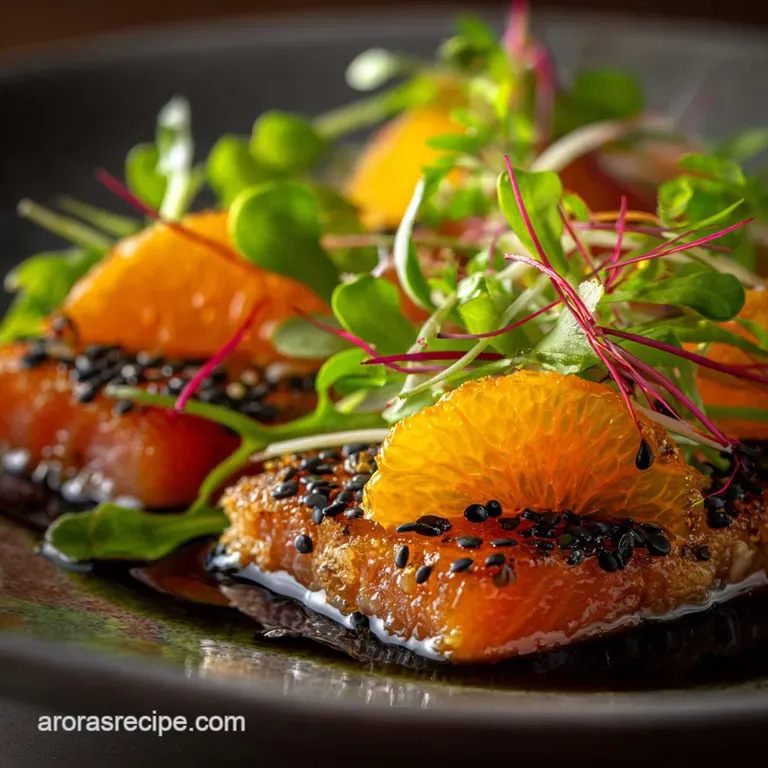
Garnishes That Complete the Presentation
We need colour and we need crunch. The fish is soft and the sauce is liquid, so we rely on the garnishes to provide that essential texture contrast.
- Thinly sliced fresh red radish adds a wonderful, peppery bite and a beautiful pop of colour.
- Spring onions (scallions), thinly sliced both green and white parts, are traditional.
- For an extra layer of brightness, sprinkle a few finely snipped chives over the top just before serving.
step-by-step Guide: Achieving the Ideal Sear and Slice
Preparing and Seasoning the Salmon Loin
Before anything else, pat that salmon loin dry. I mean aggressively dry, using several layers of paper towel. Moisture is the enemy of a clean sear. If the fish is wet, the moisture hits the hot oil, cools the pan, and you end up steaming the outside instead of crisping it.
It’s an easy mistake I learned the hard way.
Once dry, season lightly with salt, then roll the four long sides firmly into your sesame crust mixture. Make sure it sticks well and is evenly coated.
The 30-Second Sear: Technique for a Crisp Crust
This is the moment of truth. Put your cast iron pan on high heat until it just begins to smoke (about 4 minutes). Add your high smoke-point oil (like canola or grapeseed), and swirl it around.
Using tongs, gently place the salmon in the pan. Sear for 20 to 30 seconds per side. No more. The crust should look dark and crisp. Remove it immediately and transfer it to a plate. Don’t let it sit in the hot pan after the heat is off.
The Importance of Chilling Before Slicing
Once seared, the heat is still creeping inward. We need to stop that immediately. Wrap the salmon tightly in plastic wrap (this helps it keep its shape) and place it straight into the refrigerator for at least 30 minutes.
If you skip this step, the warm, soft interior will stick to your knife when you try to cut it. A cold, firm loin slices perfectly.
Executing the Perfect Thin Cuts
This is where the magic happens. Unwrap the chilled salmon and place it on a stable cutting board. Hold your sharp slicing knife steady, and slice the loin against the grain into pieces that are about 1/8 inch (3 mm) thick.
The key to restaurant quality cuts is slicing in one smooth, long motion. Do not saw back and forth. Glide the blade through the fish to keep the seared crust intact and the slice clean.
Expert Tips and Troubleshooting for Your Tataki
Here are the hard won lessons I’ve learned making this Asian Cooking favourite over the years:
- The Pan Isn't Hot Enough: If your pan isn't screaming hot, the sesame seeds will fall off and burn before the fish gets a proper crust. If you hear a gentle sizzle, remove the fish and wait until you hear an aggressive crackle.
- The Slicing is Messy: This always means one of two things: either your knife is dull, or the fish wasn't chilled long enough. If the middle is mushy or sticking, back in the fridge it goes.
- Spice up the Sear: You can mix a tiny bit of cayenne pepper or shichimi togarashi into the sesame crust before searing. This adds a beautiful, subtle heat layer to your Quick Sear Salmon Recipe .
- Don't Over Dress: Arrange the slices beautifully, then spoon the Ponzu over them. Don't let the fish sit in the sauce for a long time, or it will start to "cook" in the acid (like ceviche) and lose its texture.
Storage, Safety, and Pairing Suggestions
Common Mistakes and How to Avoid Them
The biggest error people make with salmon tataki is pan temperature control. Low heat means steam, which gives you rubbery, fully cooked fish. High heat means a perfect crust.
Another common mistake is salting the salmon too early. Salt draws moisture out. If you salt the loin more than 5 minutes before you sear it, you are guaranteeing a damp, sad surface. Keep the salt step right before the sesame coating.
How Long Can I Safely Store Leftover Tataki?
Because this fish is largely raw, safety is paramount. You should prepare this to be eaten the same day. While technically you could store very well chilled, properly prepared raw salmon for one day, I strongly advise against storing the leftovers .
Once the fish has been sliced and dressed, the acid from the Ponzu starts to break down the protein. Make only as much as you plan to eat immediately.
Serving Suggestions: Wine, Sides, and Presentation
This dish screams for something light and slightly acidic to complement the Ponzu.
- Wine Pairing: Look for a crisp, high acidity white wine like a Sancerre, a dry Riesling, or an un-oaked Sauvignon Blanc.
- Sake: A chilled, clean Junmai Sake is the classic pairing.
- Sides: Serve alongside a bowl of chilled, lightly salted edamame, or a simple Japanese style clear broth soup to cleanse the palate. For presentation, arrange the slices in a tight circular fan, focusing the garnishes right in the middle.
Understanding the Nutritional Profile
Salmon is nutritional powerhouse, and consuming it in this raw, lightly seared form retains all of its amazing benefits. It’s loaded with protein and is one of the best sources of healthy Omega-3 fatty acids (EPA and DHA), which are excellent for brain and heart health.
Since we use very little oil for the quick sear, the vast majority of the fat content comes from the salmon itself.

Recipe FAQs
Crikey, do I really need 'sashimi grade' salmon for this Salmon Tataki? That sounds a bit posh!
Absolutely essential! For safety and texture when eating raw fish, ensure your salmon has been correctly flash frozen or handled by a reputable fishmonger it’s the gold standard, no compromising here.
My sear always ends up too thick. How do I achieve that perfect thin crust without cooking the centre?
The secret is having your cast iron pan absolutely screaming hot and only searing each of the four sides for 20-30 seconds max; if the heat is too low or the time too long, the heat travels right through, turning it into standard cooked salmon.
I'm hosting a do; can I prep the Ponzu dressing or the whole Salmon Tataki dish ahead of time?
The Ponzu dressing actually loves a bit of time to meld, so mixing it up a day ahead is spot on; however, for the freshest texture, the salmon should be sliced and plated right after chilling.
I haven't got any Mirin or Yuzu juice lurking in the cupboard. Are there any easy swaps for the sauce?
If you're missing Mirin, a tiny dash of sugar or honey will balance the acidity just fine; and the bright citrus zing from the lemon and orange juices detailed in the main recipe is a perfectly suitable substitute for elusive Yuzu.
Why does the recipe insist I chill the salmon for 30 minutes after searing? Can’t I just slice it straight away?
Chilling firms up the beautifully soft, raw interior, meaning you can achieve those thin, elegant, restaurant standard slices without tearing or squishing the fish it's a crucial step for presentation.
Quick Sear Salmon Tataki Recipe

Ingredients:
Instructions:
Nutrition Facts:
| Calories | 302 kcal |
|---|---|
| Protein | 8.3 g |
| Fat | 4.1 g |
| Carbs | 7.6 g |
| Fiber | 0.4 g |
| Sodium | 9 mg |
