The Ultimate Dry Rub for Chicken: 5-Minute Flavor
- The Ultimate 5 Minute Chicken Dry Rub: Forget Bland Chicken Skin Forever
- The Flavor Science: Why This Chicken Dry Rub Recipe Works
- Essential Ingredients and Flavor Profile Adjustments for Your Homemade Dry Rub
- Step-by-Step Instructions for Making and Applying the Seasoning Blend
- Application Tips and Common Dry Rub Mistakes to Avoid
- Proper Storage and Shelf Life for Homemade Spices
- Best Serving Suggestions for BBQ Chicken Seasoned with Dry Rub
- Recipe FAQs
- 📝 Recipe Card
The Ultimate 5 Minute Chicken Dry Rub: Forget Bland Chicken Skin Forever
Listen, we’ve all been there: promising a killer BBQ night only to serve up poultry with skin that looks sad and tastes like... absolutely nothing. The secret to that shatteringly crispy exterior and deeply flavored meat isn't some complicated overnight brine.
It’s a killer dry rub for chicken that only takes five minutes to mix. Seriously.
This isn’t just a simple seasoning blend; it’s the cornerstone of next level flavor. We’re building layers here sweetness for caramelization, salt for deep penetration, and a balanced heat that makes every bite sing.
Whether you’re grilling over high flame or smoking low and slow, this homemade dry rub for chicken gives your meat a gorgeous mahogany ‘bark’ that locks in the juices. Stop reaching for those dusty store-bought shakers.
This dry rub for chicken recipe is fast, potent, and totally customizable.
The Flavor Science: Why This Chicken Dry Rub Recipe Works
I never just tell you what to do; I tell you why it works. Understanding the science behind this Chicken Dry Rub Seasoning is the difference between good chicken and famous chicken.
This method proves why a proper dry rub for chicken is superior to many wet preparations.
Defining the Perfect Flavor Balance (Sweet, Heat, Smoke)
A great rub for chicken needs four key elements: Salt (for flavor extraction), Sugar (for color and crust), Spice (for warmth/heat), and Aromatics (for depth, like onion and garlic). The balance here is crucial.
We use more paprika (smoke/color) and less sugar than a typical pork rub, preventing a fast burn but still guaranteeing beautiful caramelization. The strength of this dry rub for chicken lies in that balance.
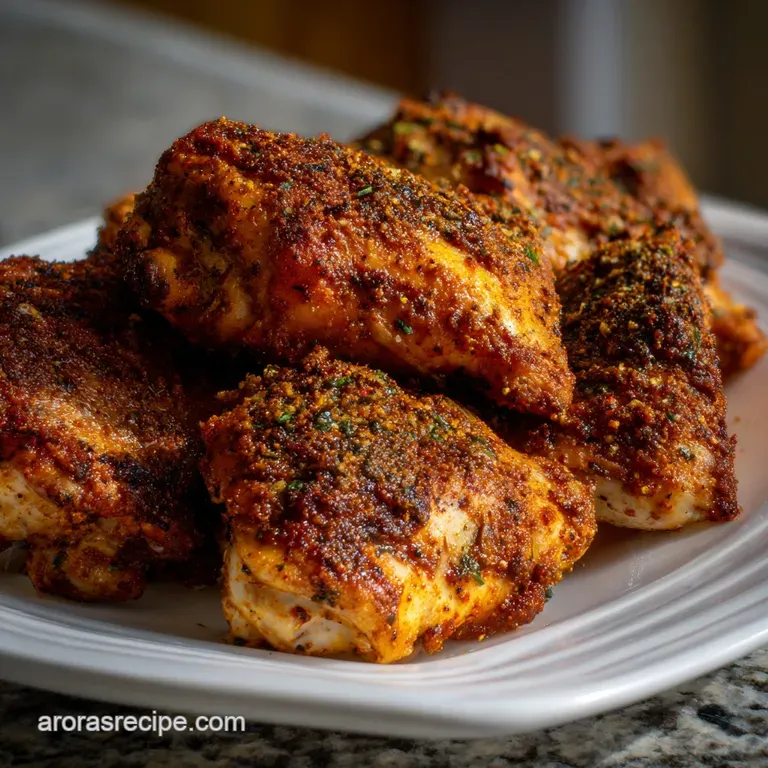
How a Dry Rub Creates the Ultimate Crispy Skin and Bark
This is the genius part. When you apply the Chicken Dry Rub , the salt immediately begins drawing moisture out of the skin via osmosis. As the chicken sits (even for just 30 minutes), the surface becomes slightly tacky.
When exposed to heat, the sugars and proteins on the skin undergo the Maillard reaction a complex chemical process that creates hundreds of new flavor compounds and that gorgeous brown crust (the "bark"). It seals the juices inside while giving you that addictive crunch on the outside.
Applying a good dry rub for chicken is the first step to crispy skin.
Dry Rub vs. Marinade: Choosing the Right Technique for Poultry
When you want maximum crispiness, always choose a dry rub. Marinades introduce moisture, which delays the Maillard reaction and often leads to steamed or rubbery skin before it finally browns. A homemade dry rub minimizes surface moisture, ensuring that satisfying crackle when you bite in.
Mastering the application of your dry rub for chicken ensures superior texture.
Essential Ingredients and Flavor Profile Adjustments for Your Homemade Dry Rub
This recipe yields a generous amount (about 1.5 cups, or 12 large servings), perfect for mixing in bulk and keeping on hand. Remember, this recipe focuses on flavor concentration, so a little goes a long way!
| Ingredient | Amount | Scientific Function |
|---|---|---|
| Brown Sugar (packed) | 1/4 cup | Sweetness; promotes rapid caramelization/bark formation |
| Paprika (smoked preferred) | 1/4 cup | Color, depth, smokiness (without adding actual smoke) |
| Fine Sea Salt | 2 Tbsp | Flavor enhancer; moisture extraction (essential for crisp skin) |
| Garlic Powder | 2 Tbsp | Pungency and aromatic depth |
| Onion Powder | 1 Tbsp | Savory, balancing aromatic |
| Chili Powder | 1 Tbsp | Earthy flavor and mild heat base |
| Black Pepper (freshly ground) | 1 Tbsp | Pungency and essential sharpness |
| Dried Thyme | 1 tsp | Herbal, savory undertone |
| Ground Mustard | 1 tsp | Adds acidic complexity; emulsifying agent |
| Cayenne Pepper | 1 tsp (or less) | Customizable heat factor |
Salt and Sugar Substitutions for Dietary Needs
Making a killer dry rub for chicken doesn't mean you can't customize for diet. But be warned: every swap has a trade off!
| Original Ingredient | Best Substitute | Why It Works |
|---|---|---|
| Brown Sugar | Coconut Sugar (1:1 ratio) | Provides necessary bulk and sweetness, contributing to caramelization. Honest Disclosure: Tends to burn slightly faster at high heat (above 400°F). |
| Fine Sea Salt | Potassium Chloride (Salt Substitute) | Provides salinity perception without sodium. Honest Disclosure: Can impart a slightly metallic or bitter aftertaste if used in excess. Use 75% of the original amount. |
| Paprika (Smoked) | Standard Paprika + 1 tsp Cumin | Maintains color and earthiness. Trade Off: You lose the rich, intense smoke note; consider adding liquid smoke to your chicken binder instead. |
| Garlic Powder | Granulated Garlic (or skip) | Provides concentrated allium flavor. Trade Off: Granulated garlic is coarser and may not mix as uniformly into the fine Homemade Dry Rub . |
Customizing the Heat Level in Your Dry Rub for Chicken
If you love the burn, you have two options: increase the cayenne, or swap out the chili powder for an ancho or chipotle blend. If you want smoky without heat, reduce the cayenne to 1/4 tsp and double the amount of smoked paprika. If you’re looking for a completely different flavor profile, sometimes you just need to start fresh, like with my Baked Lemon Chicken: Juicy Easy Mediterranean Recipe . Experimentation is key when developing your favorite dry rub for chicken .
step-by-step Instructions for Making and Applying the Seasoning Blend
This whole process should take exactly 5 minutes. The goal is uniformity.
Prep Time: 5 Minutes Total Time: 5 Minutes Yield: 12 servings (1.5 cups)
- Prep Your Workspace: Lay out a clean piece of parchment paper or grab a medium bowl. This makes cleanup (and pouring the final rub) so much easier.
- Measure All Ingredients: Measure out all 10 12 ingredients exactly as listed above. Precision is key when mixing spices in bulk.
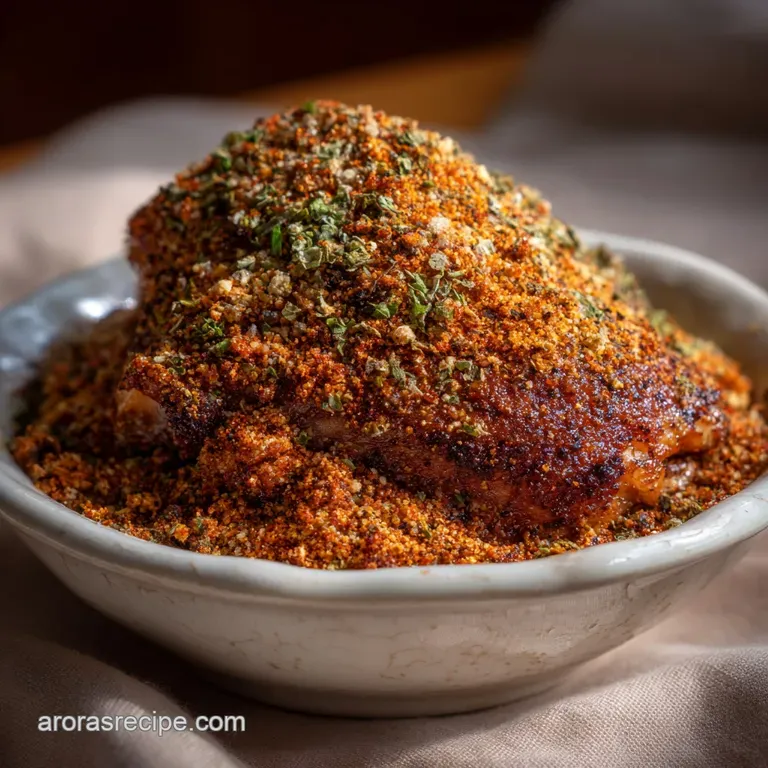
- The Whisk Technique: Dump all the spices into the bowl. Using a small wire whisk, mix vigorously for 60 seconds until the color is completely uniform. You shouldn't see any pockets of white salt or dark paprika it should all blend into a deep, rich reddish brown tone. This ensures every pinch of your Chicken Dry Rub Seasoning delivers the same flavor bomb.
- Sifting (Optional but Recommended): For the absolute best results, run the finished Chicken Dry Rub through a fine mesh sieve or sifter. This breaks up any little clumps of brown sugar or onion powder, ensuring the BBQ Chicken Dry Rub goes on silky smooth.
- Store Immediately: Transfer the Homemade Dry Rub into an airtight container (like a mason jar) and label it with the date. This recipe for dry rub for chicken keeps exceptionally well.
Application Tips and Common Dry Rub Mistakes to Avoid
How to Apply the Dry Rub to Different Chicken Cuts (Wings, Breast, Whole)
Before applying the rub for chicken , lightly coat the meat in a binder. I swear by cheap yellow mustard (it evaporates and adds depth without tasting like mustard) or a light brush of olive oil.
- Whole Chicken: Use your hands to massage the rub deeply into the cavity and under the skin of the breast and thighs. Use about 1 Tbsp per pound of chicken.
- Bone-In Pieces (Thighs/Legs): Use about 1 tsp per piece. Ensure the Chicken Dry Rub hits all the nooks and crannies.
- Boneless Breast: This needs the lightest coating. Pat the meat dry, apply your binder, and sprinkle/press the rub firmly on all sides.
How Long to Leave Dry Rub on Chicken for Maximum Flavor
For bone-in pieces and whole chickens, I recommend at least 2 hours in the fridge, uncovered, up to 12 hours. This gives the salt time to work its magic and helps dry out the skin for that perfect bark.
For boneless, skinless breasts, 30 minutes at room temperature is plenty you don't want the salt to over tenderize the meat. This resting period is crucial when using a dry rub for chicken .
Mistake Alert: Preventing Burned Sugar on the Grill or Smoker
The most common mistake with any sweet dry rub for chicken is scorching the sugar. If you find your rub is going black before the chicken is cooked through, it’s a heat management problem.
| Common Mistake | Why It Happens | The Fix |
|---|---|---|
| Rub Burns Instantly (Black Crust) | The sugar content is exposed to direct, extremely high heat (usually above 400°F). | Use two heat zones. Start the chicken indirect (away from the coals/flame) until the internal temp hits 155°F, then finish quickly over high heat for the final crisp. |
| Clumpy or Hardened Rub | Moisture got into the container or the brown sugar wasn't sifted properly. | Always use an airtight container and store in a cool, dark place. If it clumps, break it up with a fork, or add 1/2 tsp of cornstarch or rice powder to prevent future clumping. |
| Skin is Flavorful, Meat is Bland | Not enough time for the salt to penetrate deeply (less than 30 minutes). | Apply the Best Dry Rub Recipe at least two hours ahead of time, or inject brine into thicker cuts like the breast and thigh for instant flavor penetration. |
Proper Storage and Shelf Life for Homemade Spices
You spent 5 minutes making the best dry rub for chicken ever, so don’t let it go stale!
Ideal Containers for Storing Bulk Rub Mixes
Use mason jars, glass spice jars, or airtight plastic containers with a tight seal. Glass is best because it doesn't absorb the intense oils and smells from the paprika and garlic powder.
Maximizing Shelf Life: Keeping Your Seasoning Potent and Fresh
The biggest enemies of a Homemade Dry Rub are light, heat, and oxygen. Store your mixture in a dark pantry, away from the stove or oven. While the spices won't technically "go bad," they start losing potency after about 6 months.
For the strongest flavor, try to use your batch within 3 4 months.
If you’re looking to stock up on different flavor profiles, you might love my variation, which is even smokier and sweeter: Chicken Rub: The Ultimate Sweet Smoky BBQ Seasoning .
Best Serving Suggestions for BBQ Chicken Seasoned with Dry Rub
This BBQ Chicken Dry Rub is built for hearty, classic American sides.
Pairing Suggestions: Best Sides for Dry Rub Chicken
This Chicken Dry Rub for Grilling pairs perfectly with crunchy, cool slaws, creamy potato salad, or a sweet and tangy vinegar based BBQ sauce on the side. When planning your whole meal, remember to mix textures the crunch of the chicken skin should be complemented by something soft and cool.
Saucing Your Dry Rub Chicken: When and How to Glaze
If you plan to finish your dry rub for chicken with a sticky BBQ glaze, timing is everything! Glazes containing ketchup or high fructose corn syrup should only be applied in the last 10– 15 minutes of cooking.
If you put it on too soon, the high sugar content will scorch and ruin the beautiful bark created by the Chicken Dry Rub Seasoning . Wait until the meat is almost done, brush lightly, and let it tack up over the heat.

Recipe FAQs
What is the purpose of using a dry rub instead of a marinade?
A dry rub focuses on building an intensely flavorful crust directly on the surface of the chicken during cooking, which is excellent for achieving crispy skin. Unlike a marinade, which penetrates slightly but can sometimes steam the exterior, a rub ensures maximum flavor concentration where it matters most.
How far in advance should I apply the dry rub to the chicken?
For optimal results, apply the dry rub at least 30 minutes before cooking to allow the salt to begin drawing out moisture and then reabsorbing flavor. However, for deep penetration, you can safely apply it up to 12 hours in advance, provided the chicken is refrigerated.
Can I use this dry rub on other types of poultry like turkey or duck?
Yes, this type of balanced savory and slightly sweet dry rub works wonderfully on almost any poultry, including turkey and whole roasting chickens. You may want to slightly increase the amount of rub used for larger birds like a whole turkey to ensure even coverage.
How should I store leftover dry rub mixture?
Store any unused dry rub in an airtight container away from heat and direct light, such as a spice drawer or pantry shelf. Properly stored, the rub will maintain its peak flavor for up to six months, though it is best used within three months.
What if I prefer a spicier flavor profile?
To increase the heat, substitute some of the paprika with a hotter chili powder like cayenne or chipotle powder. A little goes a long way, so start by adding an extra teaspoon and tasting the blend before applying it liberally to your chicken.
Can I grill the chicken immediately after applying the rub?
While immediate application works, letting the rubbed chicken rest in the refrigerator for 15-30 minutes helps the spices adhere better and start the flavor process. If you are short on time, patting the chicken very dry first will ensure the rub sticks well even when going straight onto the grill.
Ultimate 5 Minute Chicken Dry Rub
Ingredients:
Instructions:
Nutrition Facts:
| Calories | 35 cal |
|---|---|
| Protein | 0.9 g |
| Fat | 0.6 g |
| Carbs | 7.9 g |
| Fiber | 1.5 g |
| Sugar | 4.5 g |
| Sodium | 1126 mg |
