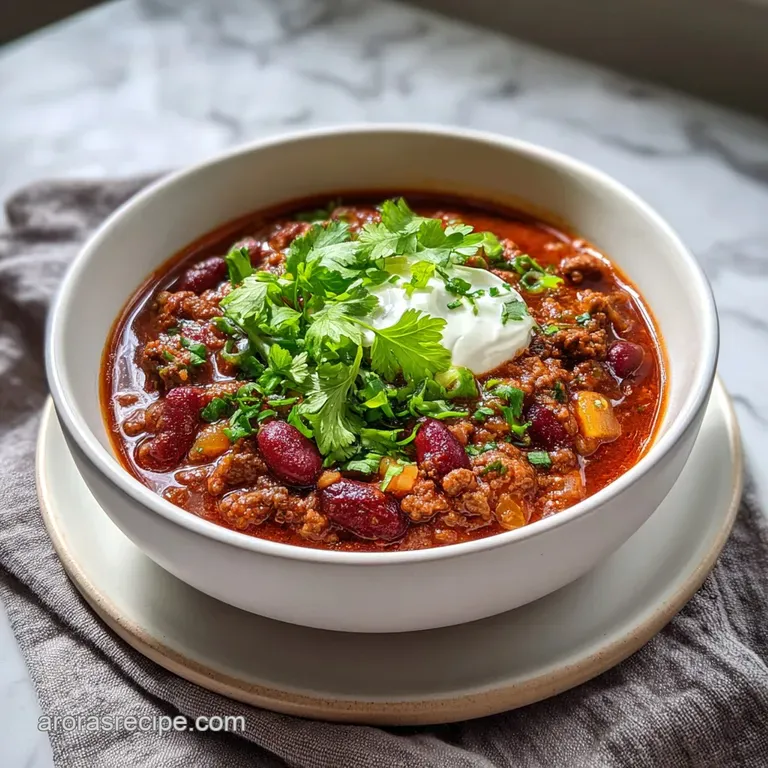
Classic Beef Chili: Velvety Stovetop Finish
- Time: Active 20 minutes, Passive 1 hours, Total 1 hours 20 mins
- Flavor/Texture Hook: Deeply savory with a velvety, thick finish
- Perfect for: Cold Sunday afternoons or low stress family game nights
- Master the Ultimate Comfort of Classic Beef Chili
- The Science of Achieving Deep Savory Flavor
- Essential Timing and Serving Metrics for Success
- Selecting the Best Proteins and Aromatic Bases
- The Right Tools for a Perfect Simmer
- Step by Step Guide to a Thick Stew
- Fixing Texture and Flavor Balance in Chili
- Adapting This Recipe for Every Single Occasion
- Maintaining Freshness and Reheating Your Chili Leftovers
- Perfect Side Dishes to Complete Your Meal
- Common Myths About Classic Beef Chili
- Recipe FAQs
- 📝 Recipe Card
Master the Ultimate Comfort of Classic Beef Chili
The air in my kitchen changes the second that dark chili powder hits the sizzling beef fat. It is a warm, earthy aroma that smells exactly like Sunday afternoons at my grandma’s house in Ohio. You know that specific sizzle when the meat hits the heavy pot? It is the sound of a stress free evening ahead.
I remember watching her carefully dice the beef into tiny cubes instead of just dumping in a package of ground meat, and honestly, that little trick changed everything for me. It is the difference between a basic meal and a homestyle classic that feels like a hug in a bowl.
We are going for a texture that is substantial and thick. I have made the mistake of rushing the simmer before, ending up with something more like a soup than a proper chili. But we have learned better.
This version uses a blend of ground beef for that classic mouthfeel and hand diced chuck for little "flavor nuggets" that stay tender during the hour long simmer. It is hearty, filling, and uses ingredients you likely already have in your Midwestern pantry.
You can expect a bowl that is rich, deep red, and perfectly balanced. We are not looking for blow your head off heat; we want a complex warmth that builds with every spoonful. Whether you are feeding a crowd for the big game or just looking for a reliable weeknight win, this recipe delivers that nostalgic, velvety finish every single time.
Let’s get that pot on the stove and make something real.
The Science of Achieving Deep Savory Flavor
The Maillard Reaction: Searing the beef chuck at high heat creates hundreds of flavor compounds through the reaction of amino acids and reducing sugars, providing the foundational "beefy" depth.
Lipid Soluble Flavor Release: Blooming the chili powder and cumin in the rendered beef fat (rather than the liquid) dissolves the aromatic compounds that are not water soluble, intensifying the overall spice profile.
Starch Gelatinization: Adding masa harina at the end allows its starches to hydrate and swell, creating a stable emulsion that binds the fat and liquid into a velvety, thick sauce.
| Beef Cut | Texture | Cook Time | Doneness Cue |
|---|---|---|---|
| 80/20 Ground Beef | Soft/Granular | 8 minutes | No pink remains and fat is rendered |
| 1/2 inch Chuck Cubes | Tender/Chunky | 60 minutes | Easily pierced with a fork but holds shape |
| Lean Ground Beef | Firm/Dry | 6 minutes | Browned throughout; needs extra fat added |
Choosing the right cut of meat is the biggest decision you will make for your Classic Beef Chili. While ground beef provides that familiar base, the hand diced chuck adds a level of sophistication and "chew" that makes the dish feel truly homemade.
If you are in a rush, you could go all ground beef, but you will lose that incredible textural contrast that defines a premium bowl.
Essential Timing and Serving Metrics for Success
This recipe is designed to scale effortlessly, whether you are cooking for a quiet household of two or the entire neighborhood block party. I usually find that people go back for seconds, so always lean toward the "generous" side when planning your portions.
| Servings | Beef Quantity | Pot Size | Total Simmer Time |
|---|---|---|---|
| 4 People | 1 lb total | 4 Quart | 45 minutes |
| 8 People | 2 lbs total | 6-7 Quart | 1 hours |
| 16 People | 4 lbs total | 12 Quart | 1 hours 30 mins |
When you are doubling the recipe for a crowd, remember that the liquid doesn't evaporate quite as fast in a massive pot. You might need to simmer it for an extra 15 minutes without the lid to get that signature thickness we all love.
It is all about watching the "shatter" of the bubbles on the surface; you want them slow and lazy, not a frantic boil.
Selecting the Best Proteins and Aromatic Bases
The secret to a successful Beef Chili lies in the quality of your aromatics and the fat content of your meat. I always reach for 80/20 ground beef because that fat carries the flavor of the spices. If you go too lean, the chili ends up tasting flat and a bit like cardboard.
- 1 lb lean ground beef (80/20): Provides the classic base texture. Why this? The fat renders out to help bloom your spices and build a rich sauce.
- 1 lb beef chuck, hand diced: Cut into 1/2 inch (1.27 cm) cubes. Why this? Adds a premium, chunky texture that doesn't disappear during the long simmer.
- 1 large yellow onion: Finely diced for sweetness. Why this? They melt into the sauce, providing a natural sugary balance to the heat.
- 28 oz fire roasted crushed tomatoes: Use a high-quality brand like Muir Glen. Why this? Fire roasting adds a subtle smoky depth that regular tomatoes lack.
- 1 tbsp masa harina: Corn flour for thickening. Why this? It adds a faint corn tortilla flavor and creates a velvety, non greasy texture.
| Component Analysis | Science Role | Pro Secret |
|---|---|---|
| Dark Chili Powder | Flavor Base | Use "Dark" powder for a fermented, raisiny depth without extra heat. |
| Apple Cider Vinegar | Acid Balance | Added at the end, it "wakes up" the heavy fats and brightens the earthiness. |
| Bone Broth | Gelatin Body | Provides a silky mouthfeel that plain water or standard stock cannot replicate. |
Chef Note: If you can't find masa harina, you can finely crush a handful of corn tortilla chips. It sounds wild, but the corn starch and lime treatment in the chips act as a perfect thickener and flavor booster.
The Right Tools for a Perfect Simmer
You don't need fancy gadgets, but a heavy bottomed pot is non negotiable here. I prefer a large enameled cast iron Dutch oven (like a Lodge or Le Creuset) because it holds heat so evenly.
Thin stainless steel pots often have "hot spots" that will scorch your tomatoes and beans at the bottom during the long simmer, which is a total heartbreak to clean up.
You will also want a sturdy wooden spoon to scrape up all those browned bits (the "fond") from the bottom of the pot. That is where the soul of the flavor lives. A sharp chef's knife is also key for those 1/2 inch beef chuck cubes; trying to dice meat with a dull blade is frustrating and potentially dangerous.
If the meat is too slippery, pop it in the freezer for 15 minutes to firm it up before dicing.
step-by-step Guide to a Thick Stew
- Sear the chuck cubes. Heat your pot over medium high heat with a splash of oil and brown the diced beef in batches until a dark brown crust forms. Note: Don't crowd the pan or the meat will steam instead of searing.
- Brown the ground beef. Add the ground beef to the same pot and cook until no pink remains and the meat begins to sizzle.
- Sauté the aromatics. Stir in the diced onion and bell pepper, cooking for about 5 minutes until the onions are translucent and soft.
- Add garlic and paste. Toss in the minced garlic and tomato paste, stirring constantly for 2 minutes until the paste turns a deep brick red.
- Bloom the spices. Pour in the chili powder, cumin, smoked paprika, oregano, cayenne, salt, and pepper. Stir for 1 minute until the aroma fills the entire room.
- Deglaze the pot. Pour in the beef bone broth and use your spoon to scrape every single browned bit off the bottom.
- Combine liquids and tomatoes. Stir in the fire roasted crushed tomatoes and bring the mixture to a very gentle bubble.
- The long simmer. Reduce heat to low, cover partially, and let it cook for 45 minutes until the beef chuck is tender to the bite.
- Incorporate the beans. Add the drained kidney and black beans, simmering for another 15 minutes until the beans are heated through.
- The finishing touch. Whisk the masa harina with a splash of water and stir it into the pot along with the apple cider vinegar. Cook for 5 more minutes until the sauce is thick and velvety.
If you find yourself wanting a different texture, this process is very similar to how you would build the base for a Beef Bourguignon recipe, where browning the meat and deglazing the pan are the keys to success.
Fixing Texture and Flavor Balance in Chili
Sometimes things go sideways. Maybe the heat was too high, or your spices were a bit old. Don't panic; almost every chili "fail" can be rescued with a few Midwestern pantry staples.
Why is my chili thin and watery?
This usually happens if the lid was kept on too tight or the masa harina was skipped. If you find yourself with a soup instead of a stew, simply remove the lid and turn the heat up to a medium simmer for 10-15 minutes. The evaporation will concentrate the flavors.
You can also mash a half cup of the beans against the side of the pot; the released starches act as a natural thickener.
Why does my chili taste bitter?
Bitterness often comes from scorching the spices or using too much tomato paste without enough cook time. To fix this, add a teaspoon of brown sugar or honey. The sweetness won't make the chili "sweet," but it will neutralize the bitter edge and round out the savory notes.
| Problem | Root Cause | Solution |
|---|---|---|
| Meat is tough | Simmer time was too short | Add 1/2 cup broth and simmer covered for 20 more minutes. |
| Flavor is flat | Lack of acidity or salt | Add a pinch more salt and another splash of apple cider vinegar. |
| Too much grease | Fat didn't emulsify | Skim the top with a wide spoon or stir in more masa harina. |
Common Mistakes Checklist
- ✓ Never skip browning the meat; that "grey" boiled meat look has zero flavor.
- ✓ Don't drain the fat after browning unless there is more than 3 tablespoons; you need it to bloom the spices.
- ✓ Avoid using "chili seasoning packets" which are mostly salt and cornstarch; use the individual spices listed for real depth.
- ✓ Always rinse your canned beans to remove the metallic tasting liquid they are packed in.
- ✓ Let the chili rest for 10 minutes before serving to let the sauce thicken and stabilize.
Adapting This Recipe for Every Single Occasion
While I love this cozy classic beef chili exactly as written, I know life happens. Maybe someone forgot the beans at the store, or you want to save a few calories. Here are my favorite stress free swaps.
| Original Ingredient | Substitute | Why It Works |
|---|---|---|
| Beef Bone Broth | Strong Black Coffee | Adds a dark, roasted complexity. Note: Does not taste like coffee in the final dish. |
| Kidney Beans | Pinto Beans | Softer texture and creamier mouthfeel; very traditional in the Midwest. |
| Masa Harina | Ground Cornmeal | Provides similar thickening power but with a slightly grittier texture. |
Decision Shortcut If you want a Texas style bowl, simply omit all beans and increase the beef chuck by another 1/2 lb. If you want a Healthy beef chili slow cooker recipe, brown the meat and onions first, then dump everything (except the masa) into a crockpot on low for 6-8 hours.
If you want a Spicier kick, add a chopped chipotle pepper in adobo sauce along with the garlic.
If you enjoy the flavor profile of beef and spices wrapped in a rich sauce, you might also love my Beef Enchiladas Baked recipe, which uses many of these same earthy seasonings.
Maintaining Freshness and Reheating Your Chili Leftovers
Chili is the king of leftovers. In fact, most people in my family argue it is better on day two. The flavors have time to penetrate the meat, and the starches in the beans and masa fully set.
- Storage: Keep it in an airtight container in the fridge for up to 4 days.
- Freezing: This recipe freezes beautifully. Use heavy duty freezer bags and lay them flat to save space. It stays good for up to 3 months.
- Reheating: Thaw overnight in the fridge. Reheat on the stovetop over medium low heat, adding a splash of water or broth if it has thickened too much in the cold.
- Zero Waste: If you have just a little bit left, use it as a topper for baked potatoes, or toss it with elbow macaroni for a quick "Chili Mac."
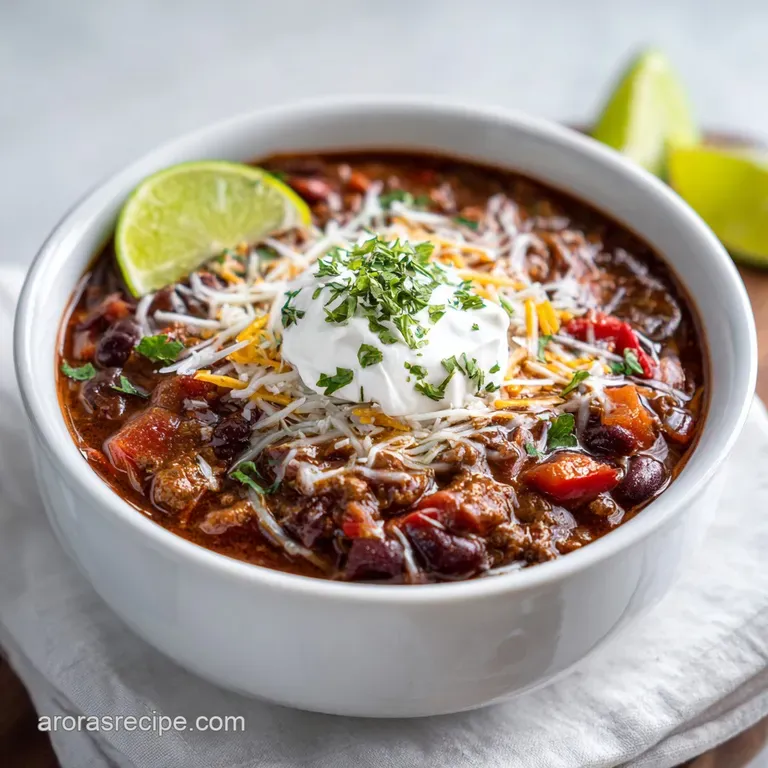
Perfect Side Dishes to Complete Your Meal
In the Midwest, we don't just eat a bowl of chili by itself. We need something to scoop up that velvety sauce! My absolute favorite pairing is a thick slice of honey cornbread with a side of sharp cheddar cheese. The sweetness of the corn balances the smoky paprika and cumin perfectly.
If you are looking for something a bit lighter, a crisp green salad with a zesty lime vinaigrette provides a nice acidic contrast to the heavy, hearty beef. And don't forget the toppings! A dollop of sour cream, some pickled jalapeños, and plenty of fresh cilantro can turn a simple weeknight meal into a restaurant quality experience. If you are feeling extra fancy, serve it alongside some Steak and Mushrooms for a truly protein packed feast.
Common Myths About Classic Beef Chili
Myth 1: Real chili never contains beans. This is a regional debate, mostly fueled by Texas tradition. While "chili con carne" in its oldest form was just meat and peppers, the addition of beans became a practical, homestyle way to stretch a meal during lean times.
In most of the country, beans are a beloved staple for texture and fiber.
Myth 2: You have to simmer chili all day for it to be good. While a long simmer helps, there is a point of diminishing returns. After about 90 minutes, the beans can start to turn to mush and the spices can lose their bright, top note aromatics.
One hour is usually the "sweet spot" for perfect meat texture and flavor integration.
Myth 3: Chili powder is just ground chili peppers. Actually, most "chili powder" is a blend of ground chilies, cumin, oregano, and sometimes garlic or salt. This is why it is so important to bloom it in fat; you are waking up an entire spice cabinet's worth of flavors all at once.

Recipe FAQs
Can I use only ground beef instead of mixing in diced chuck?
Yes, but the texture suffers. Sticking only to ground beef results in a uniform, softer texture; the diced chuck provides crucial "flavor nuggets" and chew.
How to achieve that thick, velvety consistency without a gummy texture?
Whisk in masa harina at the very end. This corn flour contains starches that gelatinize quickly, binding the sauce into a velvety finish without needing hours of reduction.
Should I add the spices at the beginning with the onions or later?
Bloom them directly in the rendered beef fat. Stirring the dry spices into the hot fat for one minute dissolves their oil-soluble compounds, dramatically intensifying their flavor profile before adding liquid.
Is it true that chili is always better the next day?
Yes, the flavor melds significantly overnight. Allowing it to cool lets the fat solidify around the spice compounds, leading to a deeper, more cohesive flavor profile when reheated.
How long should the chili simmer for the chuck beef to become tender?
Simmer for a minimum of 45 minutes. You want the beef to be easily pierced with a fork while still holding its shape; this low and slow heat breaks down the connective tissues.
How to stop the chili from tasting flat if my spices seem old?
Add a touch of acid at the very end. A teaspoon of apple cider vinegar or a squeeze of fresh lime will brighten the earthy flavors, similar to how acid is used to balance the richness in our Tataki Sauce Recipe.
What is the ideal pot for making a large batch of chili?
Use a heavy, enameled cast iron Dutch oven. This material ensures extremely even heat distribution, preventing the bottom layer from scorching during the long simmer time.
Classic Beef Chili Stovetop
Ingredients:
Instructions:
Nutrition Facts:
| Calories | 438 kcal |
|---|---|
| Protein | 36.5 g |
| Fat | 19.4 g |
| Carbs | 28.2 g |
| Fiber | 7.8 g |
| Sugar | 6.4 g |
| Sodium | 615 mg |
