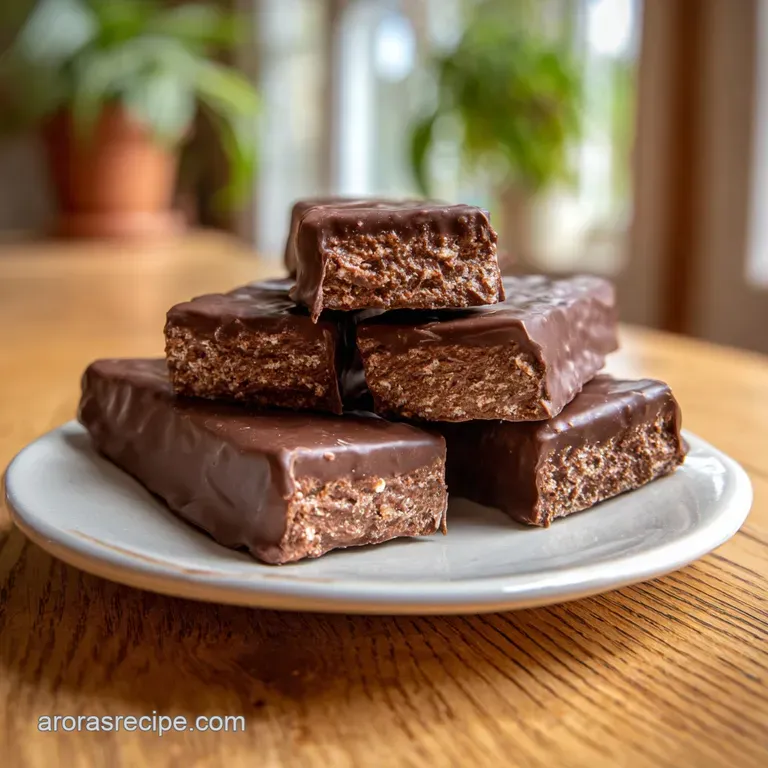
Copycat Kitkat Bars: No Bake Recipe
- Time: Active 5 minutes, Passive 1 hour 20 mins, Total 1 hour 25 mins
- Flavor/Texture Hook: A velvety chocolate shell that gives way to a light, airy wafer shatter.
- Perfect for: School lunch treats, holiday dessert platters, or beginner friendly kitchen projects.
- Mastering These Simple Copycat KitKat Bars
- Why This Homestyle Recipe Works
- Decoding the Chocolate Component Science
- Selecting Your Pantry Essentials
- Necessary Kitchen Equipment List
- Simple Steps for Chocolate Success
- Handling Common Chocolate Coating Hurdles
- Adjusting the Recipe Size
- Debunking Common Chocolate Myths
- Storage Guidelines and Zero Waste Tips
- Perfect Flavor Pairings
- Recipe FAQs
- 📝 Recipe Card
Mastering These Simple Copycat KitKat Bars
I remember sitting on my porch back in Ohio, peeling back that crinkly red wrapper and trying to snap the bars perfectly down the middle. It was a childhood ritual. But let's be honest, those store-bought ones sometimes sit on the shelf too long and lose that signature crispness.
I spent an entire weekend in my kitchen trying to figure out how to get that exact "shatter" without needing a commercial wafer oven.
The solution was staring me right at the eye level in the cookie aisle. By using vanilla wafers as the structural bones, you get that same airy, tiered crunch without the stress of baking delicate layers from scratch.
This version is heartier and feels much more like a homestyle treat you'd find at a Midwestern potluck. It’s about as stress free as chocolate work gets, and the result is honestly better than the original because you control the quality of the cocoa.
We've all been there where a recipe looks easy but ends up being a sticky, melted mess. Trust me, I’ve had my fair share of seized chocolate and soggy wafers. This method avoids all that. You’re going to love how the coconut oil creates a professional grade snap that rivals the big brands.
It’s a fun little kitchen win that makes you feel like a chocolatier without the fancy degree.
Why This Homestyle Recipe Works
- Fat Stabilization: The addition of 15ml coconut oil thins the chocolate just enough to create a thin, uniform coating that snaps rather than crumbles.
- Moisture Barrier: Chilling the cookies before dipping ensures the chocolate sets instantly, preventing the wafers from soaking up liquid and becoming soft.
- Flavor Depth: Using 60g dark chocolate chips (70% cacao) cuts through the sweetness of the wafers, providing a balanced, mahogany rich finish.
- Texture Engineering: Stacking the vanilla wafers creates air gaps between the layers, mimicking the classic industrial wafer press.
| Method | Time | Texture | Best For |
|---|---|---|---|
| Quick Fridge Set | 1 hour 25 mins | Firm snap, cold center | Last minute cravings |
| Room Temp Set | 4 hours | Softer bite, velvety | Cookie exchange platters |
| Freezer Flash | 30 minutes | Brittle, extra shatter | High humidity kitchens |
Giving the chocolate enough time to properly crystallize is the difference between a bar that melts in your hand and one that holds its shape. If you’re looking for more simple snacks to fill out a gift box, these bars sit beautifully next to a batch of my Copycat Boxed Stuffing Mix recipe which uses a similar "better than store-bought" philosophy for savory cravings.
Decoding the Chocolate Component Science
| Ingredient | Science Role | Pro Secret |
|---|---|---|
| Semi sweet Dark Chocolate | Provides structural "snap" | Chop it finely for a faster, more even melt. |
| Coconut Oil | Lowers viscosity | Use refined oil to avoid a tropical flavor profile. |
| Butterscotch Extract | Enhances toasted notes | A tiny drop mimics the "malty" flavor of the original. |
| Sea Salt Flakes | Brightens sugar perception | Sprinkle only on the bottom for a hidden flavor burst. |
The butterscotch extract is my secret weapon here. It provides a back note of caramelized sugar that standard chocolate bars lack. It's the same kind of flavor layering I use when I’m making a Steak Egg and recipe where a little bit of onion sweetness changes the whole profile.
Selecting Your Pantry Essentials
- 200g Vanilla Wafer Cookies: These are the heart of the bar. Look for the rectangular ones if you can find them, but the round ones work just as well for "KitKat bites."
- 60g Dark Chocolate Chips (70% cacao): Why this? Adds bitterness to balance the sugar.
- 340g Semi sweet Dark Chocolate: Why this? This is the primary coating for a smooth finish.
- 15ml Coconut Oil: Why this? Creates the characteristic "snap" when bitten.
- 0.5 tsp Sea Salt Flakes: Why this? Cuts the richness of the cocoa.
- 0.25 tsp Butterscotch Extract: Why this? Adds a nostalgic, toasted sugar aroma.
Chef's Tip: Freeze your wafers for 15 minutes before you start. This "cold core" helps the chocolate adhere and set much faster, preventing the layers from sliding apart.
Necessary Kitchen Equipment List
You won't need anything fancy for this. A simple microwave safe glass bowl is usually better than a double boiler for this specific recipe because it keeps the heat more consistent for a smaller batch. Grab a fork or a dipping tool to handle the cookies; this keeps your fingerprints off the velvety finish.
I also recommend using a parchment lined baking sheet. Foil can sometimes stick to the chocolate if it’s not high-quality, but parchment allows the bars to slide right off once they’re firm.
If you have a wire rack, that's even better for letting the excess chocolate drip away, leaving you with those clean, professional edges we all want.
Simple Steps for Chocolate Success
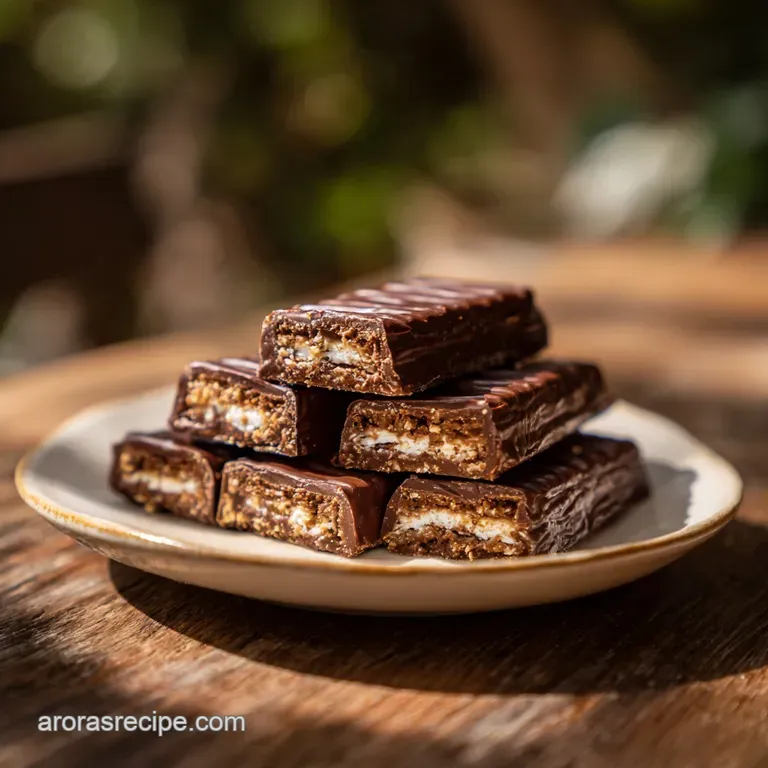
- Prepare the Wafers. Lay out your 200g vanilla wafers in pairs. Note: This ensures you have an even count for stacking.
- Melt the Base. Combine the 340g chopped dark chocolate and 15ml coconut oil in a glass bowl.
- Heat Gently. Microwave in 30 second intervals until the mixture is glossy and smooth.
- Add Flavor. Stir in the 0.25 tsp butterscotch extract and 60g dark chocolate chips. Note: The residual heat will melt the chips slowly.
- Sandwich the Cookies. Spread a thin layer of chocolate between two wafers and press together.
- Flash Chill. Place the sandwiched wafers in the freezer for 10 minutes until they are fused and sturdy.
- Enrobe the Bars. Dip each sandwich into the melted chocolate using a fork, tapping off the excess.
- Final Set. Place on parchment and sprinkle with 0.5 tsp sea salt flakes.
- Chill Time. Refrigerate for at least 1 hour 20 mins until the chocolate is matte and firm.
Handling Common Chocolate Coating Hurdles
Fixing Streaky Gray Chocolate
If your chocolate looks dull or has white streaks, it's likely gone out of temper or was exposed to moisture. This is usually caused by heating it too quickly or getting a single drop of water in the bowl.
Preventing Sliding Wafer Layers
Sometimes the top wafer wants to go for a ride while you're dipping it. This happens if the "glue" layer of chocolate hasn't fully set before the final dip.
| Problem | Root Cause | Solution |
|---|---|---|
| Chocolate is too thick | Too much cocoa solid, not enough fat | Add 1 tsp more coconut oil and stir. |
| Wafers are soggy | Dipping while chocolate is too hot | Let chocolate cool to lukewarm before dipping. |
| Grainy texture | Chocolate "seized" from steam/water | Start over; moisture ruins the fat emulsion. |
One mistake I once made was trying to rush the process by using a high heat setting. Chocolate is sensitive. Think of it like a Midwestern winter; you have to take it slow and steady, or things get messy fast.
- ✓ Always use a completely dry bowl and spatula to prevent seizing.
- ✓ Use a fork to lift the bars; it allows excess chocolate to drain through the tines.
- ✓ Keep the room cool; chocolate won't set properly in a steamy kitchen.
- ✓ Tap the side of the bowl firmly after dipping to remove air bubbles.
- ✓ Store the finished bars in a single layer to avoid scuffing the finish.
Adjusting the Recipe Size
Making a Half Batch
If you're just making a snack for two, halve all the ingredients. You can use a smaller bowl for melting to ensure you have enough depth for dipping. Reduce the initial chill time to about 5 minutes since there’s less thermal mass.
Doubling for a Crowd
When doubling, don't double the coconut oil entirely. Use about 1.5 times the amount (roughly 22ml) to keep the structure from becoming too soft at room temperature. Work in batches of 10 for dipping so your chocolate doesn't cool down too much and become thick.
Baking Adjustments
While this is a no bake recipe, if you find your wafers aren't quite crisp enough out of the box, you can toast them at 300°F (150°C) for 5 minutes.
Let them cool completely before starting the chocolate process, or they’ll melt your "glue" layer instantly.
Debunking Common Chocolate Myths
A big misconception is that you need a professional tempering machine to get a good snap. While tempering is great for long term shelf stability, the addition of coconut oil provides a "cheat" temper that works perfectly for home use. The oil stabilizes the fat crystals just enough to give you that satisfying break.
Another myth is that "darker is always better." For a true Copycat KitKat Bars experience, you actually want that semi sweet middle ground. Using 100% cacao would be far too bitter and wouldn't play nice with the vanilla in the wafers.
The blend of semi sweet and a touch of 70% dark is the sweet spot for that nostalgic flavor.
Storage Guidelines and Zero Waste Tips
Fridge Storage: Keep these in an airtight container for up to 2 weeks. The fridge is best because it maintains that crisp wafer texture. If they sit out on a warm counter, the wafers can eventually draw moisture from the air.
Freezer Storage: You can freeze these for up to 3 months. I actually prefer eating them straight from the freezer; the crunch is significantly more intense, almost like a frozen candy bar from a vending machine.
Zero Waste Tip: Don't throw away the leftover dipping chocolate! Stir in some crushed leftover wafer bits, raisins, or nuts, and drop spoonfuls onto parchment paper. You’ve just made "kitchen sink" clusters.
Also, those tiny broken wafer crumbs at the bottom of the bag are perfect for topping vanilla ice cream or folding into a brownie batter.
Perfect Flavor Pairings
These bars are naturally quite rich, so they pair beautifully with something that has a bit of acidity or salt. A cold glass of milk is the classic choice, but if you're feeling a bit more grown up, a sharp espresso or a tart raspberry coulis on the side is incredible.
If you're putting together a dessert spread, these provide a great textural contrast to softer items. They'd be a smash hit alongside a creamy cheesecake or even as a crunchy garnish for a chocolate mousse.
Just make sure to keep them chilled until right before serving so they stay at their peak "snap" levels for your guests.
 : PIN FOR LATER")
Recipe FAQs
What's the in-between stuff in a KitKat bar?
It is layered, crisp wafer cookie. For the copycat version, we use pre-made vanilla wafers stacked together to mimic that airy, layered structure found in commercial bars.
What is the filling of a KitKat made of?
The traditional filling is a simple, low-moisture wafer. This wafer is usually light, slightly sweetened, and often coated in a thin layer of chocolate cream to help bind the layers.
What are the core ingredients in KitKat bars?
The main components are wafers, sugar, flour, cocoa solids, and fats. The characteristic flavor comes from the blend of cocoa butter and the slightly malty flavor absorbed by the wafer layers.
What is used between the wafers in Kit Kats for the copycat recipe?
A thin layer of melted chocolate acts as the adhesive between the wafer layers. This ensures the entire bar sets up firmly when chilled, creating the necessary "snap." If you enjoyed mastering the precise chocolate coating here, see how the same principle works in our bourbon sweet potato recipe for balancing richness.
Is it true you must bake the wafers from scratch for an authentic copycat texture?
No, this is a common misconception. Baking wafers from scratch adds significant complexity and time; using high-quality, crisp store-bought vanilla wafers achieves the necessary texture easily for this quick method.
How do I ensure the final chocolate coating has a hard, satisfying snap?
Add a small amount of coconut oil to your melted chocolate. The coconut oil lowers the viscosity of the chocolate coating, allowing it to dry quickly and create a brittle shell instead of a soft, waxy exterior.
Can I substitute the dark chocolate chips in the coating?
Yes, you can substitute with butterscotch chips for a different profile. Replacing them with butterscotch chips adds a rich, caramelized flavor that complements the wafer base nicely, similar to the flavor base used in the Round Swamp Farm recipe.
Copycat Kitkat Bars Recipe

Ingredients:
Instructions:
Nutrition Facts:
| Calories | 206 kcal |
|---|---|
| Protein | 2.0 g |
| Fat | 11.6 g |
| Carbs | 23.6 g |
| Fiber | 1.8 g |
| Sugar | 14.2 g |
| Sodium | 45 mg |
