Paua Fritters Te Moana Magic Crispy New Zealand Abalone Recipe
- Treasures of Te Moana: Why Paua Demands Respect
- Cracking the Code: The Secret to Tender Paua Fritters
- Gathering Your Kaimoana Kit: Essential Ingredients & Tools
- The Building Blocks for Perfect Paua Fritters
- Mastering the Technique: Step-by-Step Paua Preparation
- From Raw Ingredient to Golden Fritter Perfection
- Deep Dive: Expert Tips for Handling Paua Like a Pro
- Serving Suggestions and Fritter Variations for Your Next Feast
- Recipe FAQs
- 📝 Recipe Card
Treasures of Te Moana: Why Paua Demands Respect
If you’ve ever had the chance to hold a freshly shucked Paua shell, you know why this is such a prized catch. It’s magnificent, dark, and holds the kind of iridescent beauty that people pay fortunes for. But let’s be real. We aren't here for the shell. We’re here for the meat.
Paua (New Zealand Abalone) is one of those ingredients that completely separates the home cooks from the confident chefs. The flavor is sweet, intensely savory, and utterly unique, especially when sourced fresh from Te Moana (the sea). But it’s also famous for being tougher than old boots if you look at it wrong.
Truly. I once tried to just slice and sauté it, thinking I could cheat the system. I failed gloriously. It was like chewing on a fancy rubber band.
So, let's establish Rule Number One when cooking this specific kaimoana: respect the muscle structure. This recipe, the classic fritter, is the perfect way to honor the Paua's intense flavor while guaranteeing a tender texture. We’re going to blitz it, bind it lightly, and serve it golden and crispy.
You won't believe how easy the eating is once you manage the prep.
Cracking the Code: The Secret to Tender Paua Fritters
The difference between a chewy disappointment and a perfect, velvety Paua fritter isn't luck. It’s violence. Specifically, controlled, therapeutic violence with a meat mallet. Don’t skip this step. Seriously.
Understanding the Texture Challenge of NZ Abalone
Paua is essentially one giant, powerful foot muscle, designed to latch onto rocks and withstand heavy currents. That density is why it holds its shape when cooked, but also why it turns ridiculously chewy if simply sliced and pan-fried. The fibers are extremely tight.
If you don't physically break them down before cooking, heat will tighten them further, making the whole thing inedible. We need to introduce two things: mechanical tenderizing (pounding) and textural dilution (mincing into a batter).
More Than Just Seafood: The Cultural Significance of Paua
In New Zealand, Paua is more than just a menu item; it's a taonga (treasure). Historically and culturally, it holds immense mana (prestige). It often appears at hākari (feasts) and carries a deep sense of place.
When you cook this, you’re not just making fritters, you’re engaging with a piece of New Zealand cuisine heritage. That might sound dramatic, but it genuinely adds something to the experience, right? It makes you handle the ingredient with more care.
The Fritter Solution: Transforming Toughness into Tenderness
The fritter method is a genius move for this shellfish. Once the meat is heavily pounded and then finely minced, those tight muscle fibers are broken into submission. By combining this minced Paua with a light, slightly aerated batter (thanks, baking powder!), you eliminate the risk of chewing fatigue entirely.
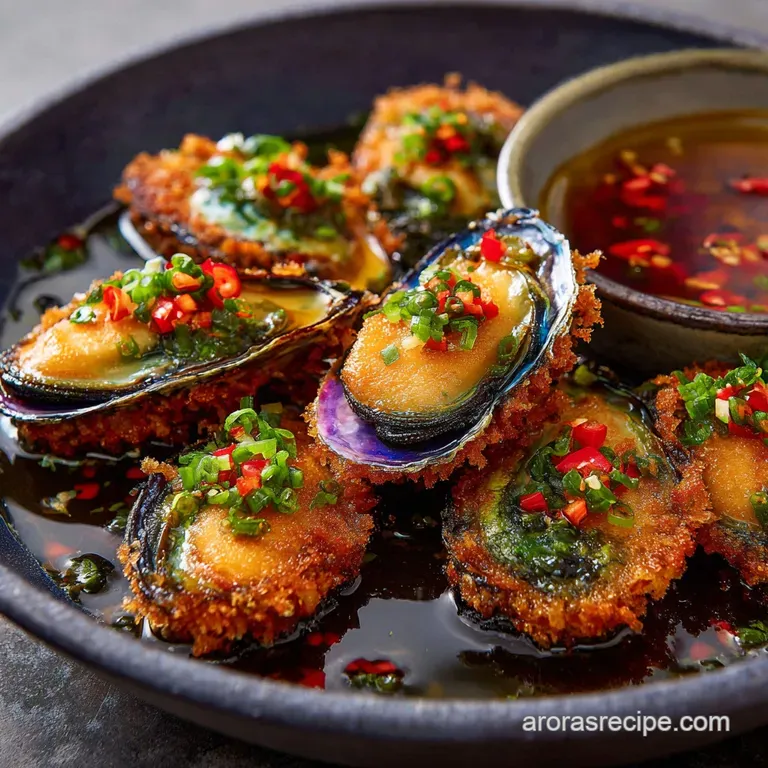
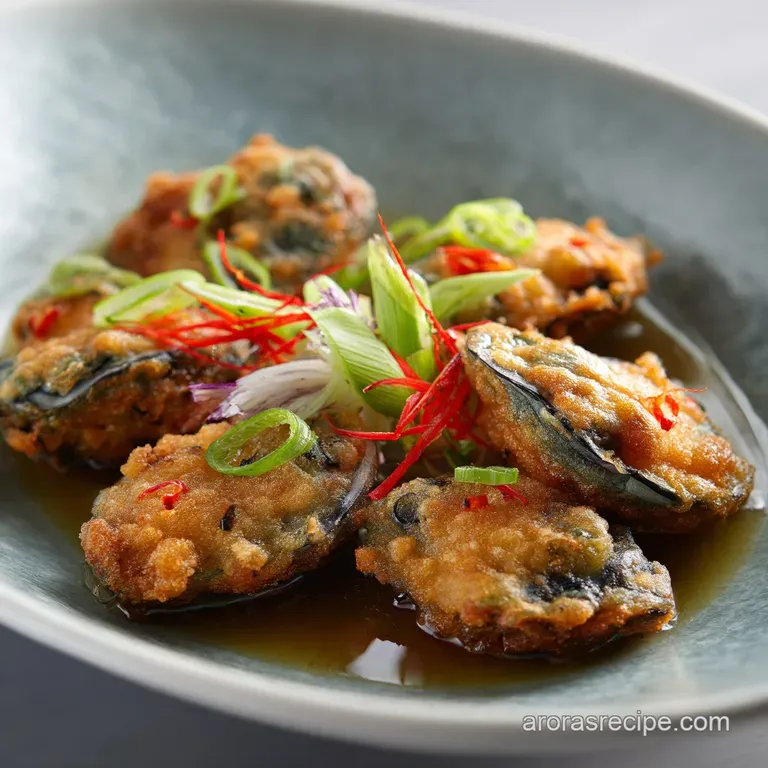
The interior remains moist and sweet, encased in a perfectly crisp golden crust.
Introducing the Zesty Lemon Kaimoana Aioli Pairing
Since the fritter itself is rich and slightly dense (even when tender), it absolutely screams for something sharp and creamy to cut through the richness. Enter the Aioli. We’re not messing around with fancy reductions here.
A simple, full fat mayo base spiked hard with fresh lemon zest and juice, plus a whisper of garlic and Dijon. It’s punchy. It’s fast. And it tastes like you spent hours on it.
Gathering Your Kaimoana Kit: Essential Ingredients & Tools
Don't panic if you don't have a specific tool. We can make substitutions, but let me stress the necessity of two key items. One for destruction, one for perfection.
| Essential Gear | Why You Need It |
|---|---|
| Meat Mallet | Non-negotiable for tenderizing. A rolling pin works in a pinch, but the mallet is better. |
| Food Processor | Guarantees the necessary fine mince consistency quickly. Saves your knife skills a massive workout. |
| Thermometer | Oil temperature is the difference between crispy and greasy. Get an instant read one. |
The Building Blocks for Perfect Paua Fritters
This list looks straightforward, but let’s talk nuances. Ingredient quality matters here because the Paua flavor is delicate; we don’t want to mask it.
Sourcing and Prepping Quality Paua Meat
Ideally, you’re getting Paua fresh from a responsible source. It should look dark (almost black/deep navy) and smell clean, like the sea. When you clean it, make sure you get rid of that tough, dark ‘skirt’ around the edge and any internal guts.
You want the clean, round white and-dark central muscle mass. Rinse it well.
Dry Ingredients vs. Wet Batter Ratios: A Critical Balance
We want a batter that acts more like a binding agent than a full pancake mix. Too much flour, and the Paua will taste heavy and doughy. Too little, and your fritter will fall apart in the oil. The small addition of baking powder is my little trick for creating lift and ensuring the fritter isn’t dense.
Crafting the Signature Zesty Aioli Base
Please, use good quality mayonnaise. This is not the time for the budget stuff. Because we’re using fresh lemon zest, the flavor explodes. I prefer grating the garlic instead of mincing it; it disperses the flavor better throughout the sauce without leaving chunks.
Essential Kitchen Gear for Mincing and Frying
The food processor is your best friend here. Trying to get the Paua fine enough with just a knife is exhausting, and you risk uneven pieces, which means uneven cooking. If you don't have a deep fryer, a heavy bottomed cast iron pan or Dutch oven works beautifully for frying.
Safety first: make sure your pan sides are high enough to prevent splatter.
Mastering the Technique: step-by-step Paua Preparation
Right then, let's crack on with the hands-on part. Remember, commitment is key, especially during the pounding phase.
From Raw Ingredient to Golden Fritter Perfection
This process is broken down into three crucial stages: physical preparation, batter resting, and frying temperature control. Nail these three, and you win.
The Critical Mincing and Conditioning Phase
After cleaning, place the Paua between cling film. Now, grab that mallet. Pound the meat firmly and systematically until it’s visibly thinner and feels almost floppy. This takes about three to five minutes per side. Once soft, chop it roughly and transfer it to the food processor.
"Do not over process the Paua. We want a textured mince, not a watery paste. A few short, sharp pulses are better than one long blitz. It should still have substance."
Mixing and Resting the Paua Fritter Batter
Whisk your dry ingredients first (flour, baking powder, salt). Whisk your wet ingredients (egg, milk) separately. Combine them until just mixed. Lumps are okay; overworked, tough gluten is not. Now fold in the minced Paua, spring onion, and parsley.
Cover this bowl and chill it for 30 minutes. Why? The chilling time lets the flour absorb the moisture fully. This prevents your fritters from spreading out too thin when they hit the hot oil.
Achieving the Perfect Fry Temperature and Crispness
Heat your oil to exactly 350°F (175° C) . This temperature is crucial. If it’s too cold, the batter turns into a sponge, soaking up oil. If it’s too hot, the outside burns before the inside cooks. Drop tablespoon sized amounts of batter into the hot oil.
Do not crowd the pan. This is my absolute cardinal rule. Overcrowding instantly drops the oil temperature by 20 degrees, and then you’re back to oily sponges. Fry them for about 2- 3 minutes per side until they achieve a rich, deep golden colour.
Assembling and Serving the Aioli Companion
While the fritters drain on a wire rack (not paper towels, a rack keeps them crispy!), give that chilled aioli one last whisk. Serve the piping hot fritters immediately, stacked next to a generous dollop of that zesty sauce. The hot-cold contrast is divine.
Deep Dive: Expert Tips for Handling Paua Like a Pro
I learned these tips the hard way (usually involving a lot of swearing and wasted Paua), so take them seriously.
- Pounding Technique: Use the flat side of the mallet, not the spiked side. You are tenderizing, not shredding. Aim for even thickness across the meat.
- Keep it Cold: Paua is better handled when it’s cold. If you live somewhere warm, chill the Paua itself, and keep the batter bowl chilled until just before frying.
- Test Fritter: Fry one small test fritter before committing to the full batch. If it’s too dry, add a splash more milk to the batter. If it falls apart, add a tablespoon more flour. Adjusting based on one test is easy; fixing 12 bad fritters is miserable.
- Salt Immediately: Sprinkle a little flaky sea salt right over the fritters the second they come out of the oil. This locks in the crispness and elevates the flavor.
Serving Suggestions and Fritter Variations for Your Next Feast
These fritters are so inherently flavorful, they don’t need much dressing up, but a fresh side really helps balance the richness.
Storing and Reheating Leftover Paua Fritters Safely
If you have leftovers (and that's a big if ), store them in an airtight container in the fridge for up to two days. Do not reheat these in the microwave. They will go instantly soggy and tough.
Reheat them gently in a toaster oven or standard oven at 350°F (175°C) for about 8- 10 minutes until warmed through and crisp again.
Nutritional Snapshot: The Benefits of Abalone
Paua, being a type of abalone, is incredibly high in protein and healthy fats. It’s a fantastic source of iodine, omega-3s, and various vitamins. While this recipe involves frying, the actual meat is extremely lean. You’re getting a powerhouse of good nutrition wrapped up in a crispy delight.
Regional Twists: Adapting the Recipe with Local Ingredients
If you want to shake things up, try swapping out the parsley for different local flavors. For a Pacific twist, substitute the milk with a tiny bit of creamy coconut milk and add a pinch of finely chopped fresh red chili to the batter.
If you love an earthy vibe, mix in finely chopped chives instead of spring onions and serve it with a homemade tartare. The Paua flavor is robust enough to handle mild spice and rich herbs.
Troubleshooting: Why is My Paua Fritter Tough? (And How to Fix It)
Nine times out of ten, if your fritter is tough, you skipped the pounding. It’s that simple.
If you did pound it thoroughly and it's still chewy, the next culprit is usually overcooking . If the oil temperature drops too low (below 340°F), you have to fry them longer to achieve color, and the prolonged exposure to heat tightens the muscle fibers.
Get that thermometer out! Control the temperature. Your teeth will thank you.

Recipe FAQs
I’ve heard Paua can be a bit rubbery. How do I make sure these fritters are spot on and tender?
The key is tenderising! You must pound the raw meat firmly with a meat mallet until it's noticeably pliable before mincing; skipping this crucial step means a chewy texture, tougher than old boots.
Can I make the Paua fritter batter ahead of time, and how should I store leftover fritters?
Absolutely, chilling the batter for 30 minutes is mandatory, but you can prepare it up to 12 hours in advance and keep it covered in the fridge, which actually helps the flour hydrate beautifully.
Store cooled leftover fritters in an airtight container for upemos 3 days, but be aware they may lose a little crispness upon reheating.
Paua is quite the luxury! If I can't find it, or if I want to stretch my budget, are there any good substitutes?
You’re spot on about the cost! For a good shout, try substituting up to half the Paua with finely minced fresh scallops or high-quality canned abalone, adjusting for less pounding time if the replacement shellfish is already tender.
I’m not keen on deep frying it's a bit of a faff. Can I bake or air-fry these fritters instead?
You can definitely try air-frying at 375°F (190°C) after lightly misting the fritters with oil, which offers a healthier crunch, although they won’t achieve the same rich, deep fried colour and flavour.
My fritter batter looks a bit too loose or too stiff what should I do to fix the consistency?
If the batter is too thick, add milk a teaspoon at a time until it's easily spoonable, or if it's too loose (like watery tea), stir in a small amount of sifted flour, ensuring you stop mixing as soon as everything is just combined.
Crispy Paua Fritters Recipe

Ingredients:
Instructions:
Nutrition Facts:
| Calories | 2901 kcal |
|---|---|
| Protein | 23.4 g |
| Fat | 40.9 g |
| Carbs | 62.4 g |
| Fiber | 4.0 g |
| Sodium | 806 mg |
