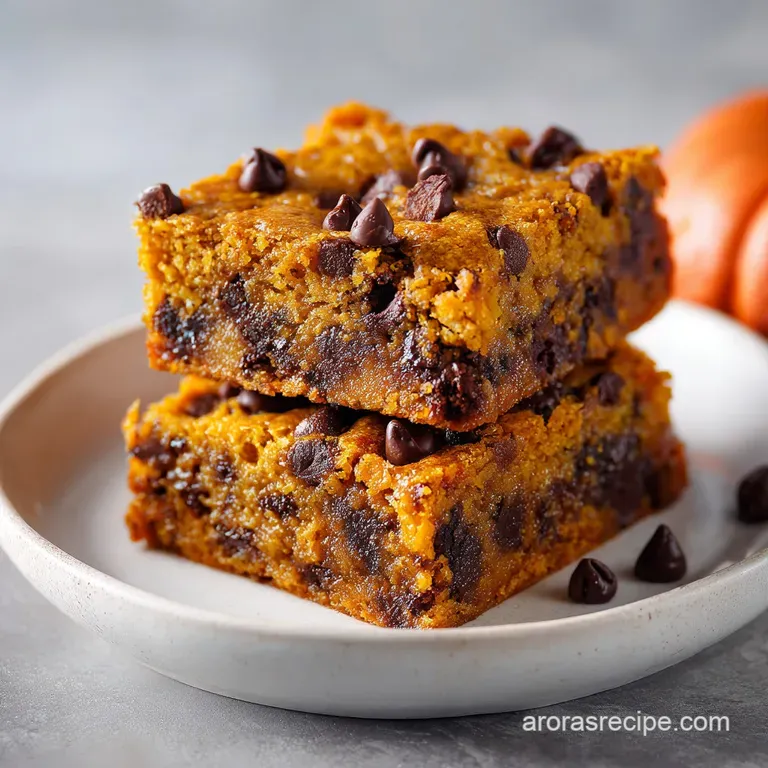
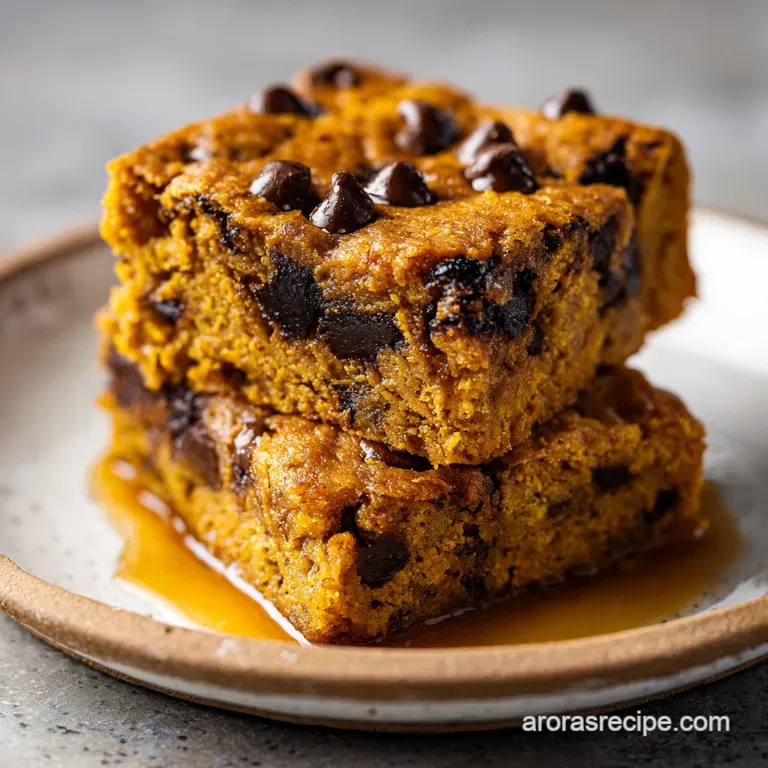
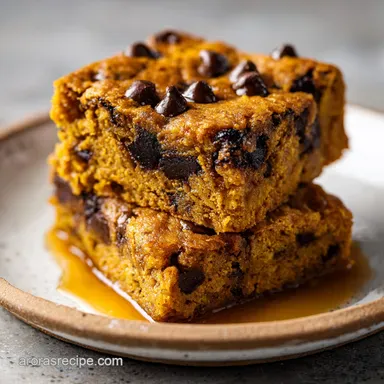
Pumpkin Chocolate Chip Bars: Velvety Texture
- Time: Active 15 minutes, Passive 25 minutes, Total 40 minutes
- Flavor/Texture Hook: Velvety pumpkin crumb with pockets of melty dark chocolate
- Perfect for: Potlucks, cozy rainy afternoons, or low stress weekend baking
- Creating the Most Crave Worthy Pumpkin Chocolate Chip Bars Ever
- Essential Technical Specifications for Your Upcoming Baking Success
- Breaking Down the Science of the Seasonal Spiced Rise
- The Chemistry of the Pumpkin Moisture Balance
- Gathering the Pantry Staples for This Southern Style Treat
- Essential Kitchen Tools for a Smooth Baking Experience
- Walking Through Each Step of the Baking Process
- Simple Ways to Avoid Common Mistakes and Kitchen Disasters
- How to Adjust This Recipe for Different Group Sizes
- Creative Flavor Variations for Your Personalized Dessert Bars
- Effective Methods to Store and Keep Your Bars Fresh
- Beautiful Ways to Present and Serve Your Homemade Treats
- Myths About Baking with Pumpkin
- Recipe FAQs
- 📝 Recipe Card
Creating the Most Crave Worthy Pumpkin Chocolate Chip Bars Ever
The very first time I pulled a tray of these out of the oven in my tiny Nashville kitchen, the smell was so intense it actually woke my husband up from a nap. There is something about the way ground cloves and cinnamon hit warm pumpkin puree that just feels like a hug for your house.
I remember standing over the counter, still in my apron, unable to wait for them to cool, and burning my tongue on a molten dark chocolate chip. It was worth it.
We have all been there with pumpkin bakes where the middle stays damp and weirdly translucent, right? I spent three straight Octobers trying to fix that "pumpkin bread sludge" issue before I realized that most recipes just have way too much liquid. This version is the result of those messy trials.
It is a solid, reliable bake that gives you that rich orange color and spicy kick without falling apart in your hands.
Trust me, these are going to become your new favorite thing to bring to a neighbor or just keep on the counter for "emergencies." We are skipping the fancy equipment and the complicated steps. We are just mixing up a bowl of comfort that happens to look like a gourmet treat.
Grab your favorite mixing spoon, and let's get into the kitchen.
Essential Technical Specifications for Your Upcoming Baking Success
Understanding how this recipe compares to traditional methods helps you appreciate why we use these specific ratios. Some recipes lean toward a cake like structure, while ours stays dense and satisfying.
| Method | Bake Time | Texture Result | Difficulty |
|---|---|---|---|
| Fast Method (This One) | 25 minutes | Fudgy, dense, and moist | Very Easy |
| Classic Cake Style | 40 minutes | Light, airy, and crumbly | Moderate |
| No Bake Version | 0 minutes | Soft, truffly, and heavy | Easy |
There is a sweet spot between a cookie and a cake that these Pumpkin Chocolate Chip Bars hit perfectly. To get that precise result, keep these three checkpoints in mind. First, your oven needs to be at exactly 180°C (350°F) before the pan goes in.
Second, the flour should weigh exactly 190g if you have a scale. Third, the center should feel slightly firm but have a tiny bit of "give" when pressed at the 25 minute mark.
Breaking Down the Science of the Seasonal Spiced Rise
Understanding the "why" behind your bake makes you a better cook every single time. Here is the logic behind our specific ingredient choices.
- Hydroscopic Balance: Coconut sugar and pumpkin puree both hold onto water, which keeps the bars velvety for days without them drying out.
- Starch Gelatinization: The 1.5 cups of all purpose flour provide just enough structure to trap the steam from the pumpkin, preventing a collapse.
- Emulsification Stability: Using a large egg binds the fats from the coconut oil with the water in the pumpkin, creating a smooth, cohesive batter.
- Chemical Leavening: Baking soda reacts with the slight acidity in the pumpkin puree to create tiny carbon dioxide bubbles for a soft bite.
When you think about the physics of this dish, it is all about managing moisture. Pumpkin is nearly 90 percent water, so if we do not use enough flour or a binding agent like an egg, the whole thing turns into a puddle. This recipe is also quite similar to the structural balance I use in my Oreo Cheesecake Bars Recipe, where the base has to be sturdy enough to support a heavy, moist filling.
The Chemistry of the Pumpkin Moisture Balance
| Ingredient | Science Role | Pro Secret |
|---|---|---|
| Pumpkin Puree | Provides humectants (moisture) | Blot with a paper towel for a denser, more brownie like texture |
| Baking Soda | Controls browning and lift | Always sift with flour to avoid bitter "soapy" clumps in one spot |
| Dark Brown Sugar | Adds acidity for the soda | Pack it tight in the cup to ensure the molasses content is high |
| All Purpose Flour | Creates the gluten network | Stop mixing the second the white streaks vanish to keep it tender |
A quick note on the flour: 190g is the magic number here. If you use too much, you end up with a dry brick. If you use too little, you get pumpkin soup. If you have a kitchen scale, use it. If not, fluff your flour with a fork before spooning it into the measuring cup and leveling it off with a knife.
Gathering the Pantry Staples for This Southern Style Treat
- 1 cup pumpkin puree (245g): Use plain canned pumpkin, not the pie mix. Why this? Gives pure flavor control without added spices.
- 3/4 cup coconut sugar or dark brown sugar (150g): Dark brown is my favorite for a deeper molasses kick. Why this? Provides the moisture needed for a fudgy texture.
- 1/4 cup melted coconut oil or browned butter (56g): Browned butter adds a nutty aroma that is incredible. Why this? Fat carries the spice flavors across your palate.
- 1 large egg: Room temperature works best for mixing. Why this? Acts as the glue for the entire structure.
- 1 tablespoon pure vanilla extract: Don't skimp on the real stuff. Why this? Rounds out the sharp edges of the spices.
- 1.5 cups all purpose flour (190g): Standard plain flour. Why this? Provides the essential gluten for "chew."
- 1 teaspoon baking soda: Ensure it is fresh. Why this? Reacts with pumpkin to create a soft crumb.
- 2 teaspoons ground cinnamon: The backbone of the flavor. Why this? Adds that classic warmth everyone expects.
- 1/2 teaspoon ground ginger: Adds a tiny bit of "zing." Why this? Prevents the bars from tasting one dimensional.
- 1/4 teaspoon ground nutmeg: Freshly grated is a dream. Why this? Offers an earthy, nutty undertone.
- 1/4 teaspoon ground cloves: A little goes a long way. Why this? Adds the deep, pungent aroma of fall.
- 1/2 teaspoon fine sea salt: Don't forget this. Why this? Enhances the sweetness of the chocolate.
- 1 cup dark chocolate chips (170g): At least 60% cacao. Why this? Bitterness cuts through the sweet pumpkin base.
If you find yourself missing an ingredient, don't panic. Home cooking is all about being flexible with what you have on hand.
| Original Ingredient | Substitute | Why It Works |
|---|---|---|
| Coconut Sugar | White Sugar + 1 tsp Molasses | Replicates the moisture and depth. Note: Slightly sweeter result. |
| Pumpkin Puree | Roasted Mashed Butternut Squash | Similar starch and water content. Note: More earthy flavor. |
| Coconut Oil | Vegetable or Canola Oil | Neutral fat with the same liquid state. Note: Loses slight nutty note. |
| Dark Chocolate Chips | Semi Sweet Chocolate Chunks | Chocolate is chocolate! Note: Chunks create bigger melty pools. |
One thing I have learned the hard way is that low-fat swaps usually fail here. You need the fat from the oil or butter to keep the flour from becoming tough. If you try to use applesauce instead of oil, the bars will end up rubbery. Stick to the fats for the best mouthfeel.
Essential Kitchen Tools for a Smooth Baking Experience
You really don't need a lot of gear for this, which is why I love it. I usually just use a large glass mixing bowl and a sturdy whisk. A silicone spatula is also helpful for folding in those chocolate chips without overworking the dough. For the pan, an 8x8 inch (20x20 cm) square pan is the standard.
I prefer metal pans for bars because they conduct heat more evenly than glass, which can sometimes leave the center underbaked.
If you are using a glass pan, you might need to add about 5 minutes to the total bake time. Also, parchment paper is your best friend here. If you leave a little "overhang" on the sides of the pan, you can just lift the entire block of bars out once they are cool.
It makes slicing them so much cleaner, and you won't scratch your pans with a knife.
Walking Through Each Step of the Baking Process
1. Prep and Emulsify
Preheat your oven to 180°C and line your square pan with parchment paper. In your large bowl, whisk together the 245g of pumpkin puree, 150g of sugar, and 56g of melted fat. Whisk it vigorously for about 1 minute until the mixture looks glossy and smooth.
2. Sifting and Folding
Add the egg and vanilla to the wet mixture and whisk until combined. In a separate smaller bowl, whisk the 190g of flour, baking soda, salt, and all those warm spices. Gently tip the dry ingredients into the wet ones. Use a spatula to fold them together until no white streaks of flour remain.
3. The Level Bake
Fold in 3/4 of your dark chocolate chips. Pour the batter into your prepared pan and use the back of a spoon to smooth the top. Sprinkle the remaining chocolate chips over the surface.
Bake for 25 minutes until the edges pull away slightly and a toothpick comes out with just a few moist crumbs.
Chef's Note: For a really professional look, press a few extra chocolate chips into the top of the bars immediately after they come out of the oven. They will melt into the surface and look like they came from a bakery!
Simple Ways to Avoid Common Mistakes and Kitchen Disasters
The most common issue I see with these bars is the texture becoming "cakey" instead of "fudgy." This almost always happens because of over mixing. When you stir flour into wet ingredients, you start developing gluten. A little gluten is good for structure, but too much makes the bars tough.
Stop stirring the absolute second the flour disappears.
Gummy Center Causes
If your bars look shiny and wet in the middle even after 25 minutes, your pumpkin might have had too much liquid. Different brands of canned pumpkin vary in water content.
If you see a lot of liquid sitting on top of the puree when you open the can, drain it off or blot it with a paper towel before measuring.
Chocolate Burning Issues
Chocolate chips can burn if they are exposed to direct heat on the top of the bar for too long. If your oven runs hot, the chips on top might turn bitter. You can loosely tent a piece of foil over the pan for the last 10 minutes of baking if you notice the chocolate is looking a bit too dark.
| Problem | Root Cause | Solution |
|---|---|---|
| Bars are dry/crumbly | Too much flour | Use a scale to measure 190g or don't pack the cup. |
| Bars didn't rise | Expired baking soda | Check the date; soda loses potency after 6 months. |
| Chips all sank to bottom | Batter was too thin | Ensure you didn't over melt the butter/oil until it was hot. |
Common Mistakes Checklist
- ✓ Use room temperature eggs to ensure they emulsify properly with the fats.
- ✓ Don't skip the salt; it is the only thing that makes the pumpkin flavor pop.
- ✓ Let the bars cool for at least 30 minutes before slicing to let the structure set.
- ✓ Avoid using "Pumpkin Pie Filling" which contains extra sugar and thickeners.
- ✓ Use a metal pan for the sharpest, most even edges.
How to Adjust This Recipe for Different Group Sizes
If you are cooking for a crowd or just for yourself, these bars are very easy to scale. If you want to double the recipe, use a 9x13 inch pan. The bake time will usually increase by about 10 to 15 minutes because the batter is thicker.
I suggest keeping the spices at 1.5x the amount instead of 2x so they don't become overwhelming.
To scale down for a small toaster oven, you can halve all the ingredients. Since you can't easily use half an egg, beat the egg in a small bowl first and then measure out two tablespoons of the liquid. Use a smaller loaf pan for baking, and start checking for doneness at the 18 minutes mark.
For baking, if you double the batch, I usually lower the oven temperature to 170°C to ensure the middle cooks through before the edges get too dark.
Creative Flavor Variations for Your Personalized Dessert Bars
The Nutty Crunch Twist
If you like a bit of texture, add 1/2 cup of toasted chopped pecans or walnuts to the batter. The bitterness of the nuts works perfectly with the sweet pumpkin. You could even use this same concept with my Cookie Recipe with chocolate chips for a standard cookie bar variation.
The Protein Boost Swap
For a slightly heartier version, you can swap 1/2 cup of the all purpose flour for oat flour or almond flour. This will make the bars a little denser and more "snack like." Just keep in mind that almond flour adds more moisture, so you might need to bake them for an extra 5 minutes to get the center right.
Decision Shortcut: If you want maximum fudge, blot the pumpkin puree and use browned butter. If you want a lighter snack, use coconut oil and add 1/4 cup extra flour.
If you want a "grown up" flavor, add a pinch of espresso powder to the dry ingredients.
Effective Methods to Store and Keep Your Bars Fresh
Because of the high moisture content in pumpkin, these bars can actually get better the next day as the spices meld. Store them in an airtight container at room temperature for up to 3 days.
If you live somewhere very humid, I recommend putting them in the fridge after the first 24 hours to prevent them from getting too soft. In the fridge, they will stay fresh for up to 6 days.
To freeze them, wrap individual bars in plastic wrap and then place them in a freezer bag. They freeze beautifully for up to 3 months. When you are ready to eat one, just pop it in the microwave for 20 seconds. It will taste like it just came out of the oven, with the chocolate all melty and the crumb soft again.
For a zero waste tip, if you have a little bit of pumpkin puree left in the can (usually about 1/2 cup), don't throw it out! You can mix it into your morning oatmeal or swirl it into a bowl of yogurt with some honey and cinnamon.
Beautiful Ways to Present and Serve Your Homemade Treats
While these are great straight out of the pan, you can really make them special with a few simple touches. A light dusting of powdered sugar over the top right before serving makes the orange color and dark chocolate really pop.
If you want a decadent dessert, serve a warm bar with a scoop of vanilla bean ice cream and a drizzle of salted caramel sauce.
You could even serve these as part of a fall dessert spread alongside my Sugar Cookies Recipe for a nice variety of textures. The soft pumpkin bars contrast beautifully with a crisp, buttery sugar cookie. Whatever you do, make sure to serve them with a big glass of milk or a hot cup of coffee. There is nothing better on a chilly afternoon.
Myths About Baking with Pumpkin
One common misconception is that you need to use "fresh" pumpkin for the best flavor. Honestly, I have found that canned pumpkin puree is actually superior for baking. It has a consistent water content and a very smooth texture that is hard to replicate at home without a high powered blender and a lot of straining.
Canned pumpkin is a baker's secret for reliability.
Another myth is that pumpkin pie spice is just cinnamon. While cinnamon is the main player, the "warmth" actually comes from the ginger and cloves. If you only use cinnamon, your bars will taste sweet but they won't have that characteristic "fall" depth.
Always use the full spice blend if you can, or even add a tiny pinch of black pepper to really make the spices sing.
Finally, some people think you have to use a lot of oil to keep pumpkin bakes moist. In reality, the pumpkin itself is doing most of the heavy lifting. We only use 56g of fat in this recipe because the pumpkin fibers hold onto moisture so well. Adding more oil would just make the bars greasy and heavy.
Trust the pumpkin!

Recipe FAQs
Can I substitute canned pumpkin puree with fresh pumpkin puree?
No, stick with canned for consistency. Canned pumpkin puree has a standardized, lower water content which is crucial for the dense bar structure; fresh puree varies too much.
What is the secret to preventing the center of the bars from being gummy or wet?
Balance the pumpkin moisture with precise flour measurement. If your pumpkin is very watery, blot it gently with a paper towel before adding it to the batter.
How long should I mix the dry ingredients into the wet ingredients?
Fold until just combined, stopping the moment the last white streak of flour disappears. Overmixing develops excess gluten, resulting in a tough, cakey bar instead of a fudgy one.
Is it true that these bars taste better on the second day?
Yes, they generally improve overnight. Allowing the bars to rest lets the spices fully permeate the crumb, deepening the overall autumn flavor profile.
How do I ensure the chocolate chips stay suspended in the batter instead of sinking?
Toss the chocolate chips in one tablespoon of the measured flour before folding them in. This light coating helps create friction and suspension within the batter, much like coating nuts before adding them to a cake, a technique you can apply to our Peanut Butter Chocolate recipe.
What oven temperature should I use for the most reliable bake time?
Preheat to exactly 350°F (180°C) before placing the pan inside. Using a lower temperature can cause the moisture from the pumpkin to leach out before the structure sets, leading to a greasy bottom.
Can I use applesauce instead of the melted coconut oil for a lower fat version?
No, substituting applesauce for oil is not recommended here. Oil is necessary for the required dense, fudgy mouthfeel; using applesauce will result in a rubbery, overly cakey texture.
Pumpkin Chocolate Chip Bars
Ingredients:
Instructions:
Nutrition Facts:
| Calories | 176 kcal |
|---|---|
| Protein | 2.4 g |
| Fat | 8.0 g |
| Carbs | 24.3 g |
| Fiber | 1.6 g |
| Sugar | 13.1 g |
| Sodium | 144 mg |
