San Giorgio Lasagna the Ultimate Sunday Feast Recipe with Rich Ragu
- The Ultimate Sunday Feast: Mastering San Giorgio Lasagna
- Why This Lasagna Recipe Is A True Culinary Centerpiece
- Gathering Your Culinary Arsenal: Essential Components and Tools
- The Workflow: Expert Steps for Assembly and Baking
- Troubleshooting & Expert Tips for Lasagna Perfection
- Storing, Freezing, and Reheating Your Leftovers Safely
- Recipe FAQs
- 📝 Recipe Card
The Ultimate Sunday Feast: Mastering San Giorgio Lasagna
Okay, friend, pull up a chair. I’m about to give you the blueprint for a lasagna that will absolutely ruin all other lasagnas for you. Seriously. We aren't talking about some watery, skimpy casserole you rush together on a Tuesday night.
This is a culinary event a deeply satisfying, soul and hugging, San Giorgio Lasagna inspired beast built for a Sunday afternoon with zero apologies for the richness.
Does it take time? Heck yes. But this is the kind of recipe that makes your kitchen smell like your Italian grandmother’s house (even if you don't have one). We are making the ragu from scratch, and that slow simmer is non and negotiable. Trust me, ditch the box recipe instructions you grew up with.
We’re going deeper.
Why This Lasagna Recipe Is A True Culinary Centerpiece
The secret to transitioning a dish from "good comfort food" to "monumental feast" lies entirely in patience and component preparation. When people ask for the classic san giorgio lasagna recipe, they are usually craving that hearty, robust taste of home the kind of lasagna you can actually cut into a square without it collapsing.
Deconstructing the Myth: What Defines the San Giorgio Style
If you look up the classic san giorgio lasagna recipe on box, it's famous for being dependable, but often it skips a few steps (like proper ricotta draining or a long ragu simmer) to save time.
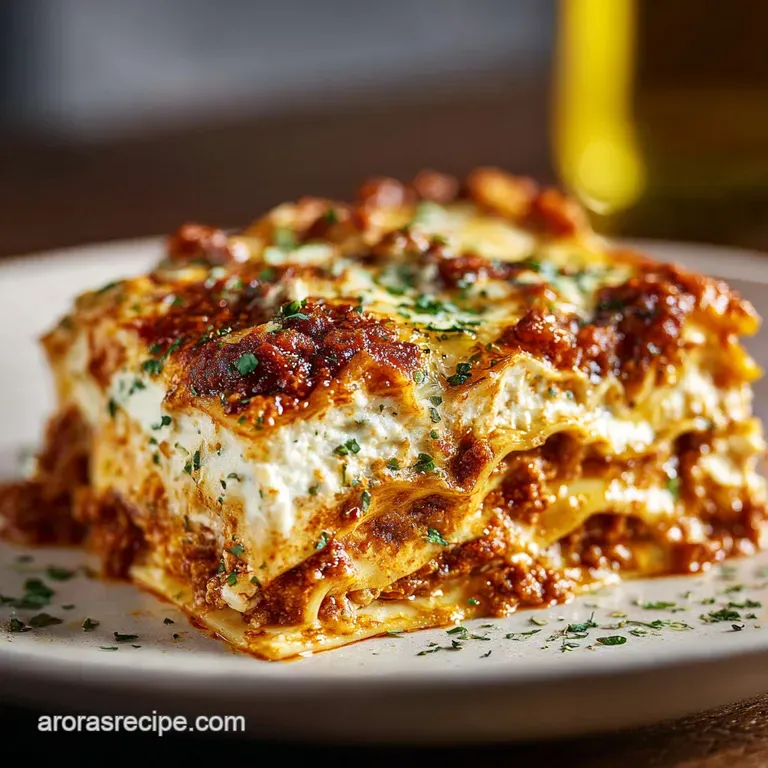
We are keeping the core structure the creamy ricotta layer, the mozzarella melt, the beefy sauce but we are vastly upgrading the flavor. My goal here is pure structural integrity and deep, long and developed flavor. We are aiming for layers so distinct you can count them.
Tracing the Roots of This Comfort Classic
This style of lasagna is squarely in the Italian and American comfort food tradition, distinguishing it from the thinner, often Béchamel based Bolognese versions of Italy. The defining characteristic? That huge, creamy layer of seasoned whole milk ricotta.
It’s what provides that beautiful, sharp contrast to the rich, slow and cooked meat ragu. This lasagna is about generosity.
The Unbeatable Difference of Homemade, Slow and Simmered Ragu
I used to be one of those cooks who browned the meat, dumped in a jar of sauce, and called it a day. That was a mistake. A massive one. The moment I started letting my ragu simmer for two hours after building a proper soffritto base of carrots, celery, and onion, and deglazing with red wine my lasagna game changed forever.
That low and slow process melds the San Marzano tomatoes, the sweet sausage, and the herbs into something deeply umami. It is the literal foundation of this homemade lasagna. Don't rush it.
Medium Difficulty, Monumental Reward
Let's be real: this is not a 30 minute weeknight dinner. We're juggling a long simmer time and a few separate prep tasks. That’s why I rate it medium difficulty. But honestly, the skills involved are basic chopping and stirring. The difficulty comes from managing the time .
When you pull this beautiful pan out of the oven, smelling of garlic and oregano, you realize every single minute spent was worth it.
Gathering Your Culinary Arsenal: Essential Components and Tools

You need quality ingredients for this much effort. Skip the pre and grated Parmesan that tastes like sawdust. Please.
Crafting the Perfect Ricotta Layer Base
The number one culprit of a messy, watery lasagna? Undrained ricotta. Water is the enemy. It dilutes the ragu, makes the noodles mushy, and gives the whole dish the infamous "lasagna slump." You need to buy whole milk ricotta and let it drain overnight in a sieve, lined with a coffee filter or cheesecloth, in the fridge.
Seriously, drain the ricotta. It’s the single most important structural tip I can give you. We mix that drained cheese with eggs (to bind it), fresh basil, salt, and a pinch of nutmeg. Yes, nutmeg. It adds this incredible, warming background note that balances the tomato acidity.
The Secret to a Deeply Flavorful Meat Ragu
We are using a blend of ground beef (I like 85/15) and mild Italian sausage. The fennel seeds in the sausage bring a whole different level of sweetness and spice that plain ground beef just can't touch.
Remember the soffritto —cooking the finely diced onion, celery, and carrots until glassy is how you start releasing their sugars and building flavor depth before the meat even hits the pot.
Choosing the Right Pasta Sheets: Fresh Versus Dried
I prefer standard san giorgio lasagna noodles (the kind you boil). I boil them until they are slightly past chewy but definitely not fully cooked we call this aggressive al dente . They need to be laid flat immediately after draining so they don't stick into one giant sheet.
If you absolutely must use the oven ready sheets, go ahead, but make sure your ragu is slightly thinner than usual, as those noodles drink up sauce like a dehydrated camel. I prefer the texture of the slightly pre and boiled standard sheets.
Must and Have Equipment for Stress and Free Assembly
You don't need fancy gear, just the right size.
| Equipment | Why You Need It |
|---|---|
| Large Dutch Oven (6 Qt+) | Necessary volume for the two and pound meat ragu. Heavy bottom prevents scorching. |
| Deep 9x13 Baking Dish | Crucial for holding all the glorious layers. A shallow dish means spillover (and a smoky oven). |
| Colander | For draining pasta and, more importantly, the ricotta! |
Related Recipes Worth Trying
- Vietnamese Breakfast The Ultimate Bánh Mì Ốp La Fried Egg Sandwich — Start your day right with an authentic Vietnamese Breakfast This Banh Mi Sandwich Recipe features perfectly runny fried eggs savory pâté and quick pickled...
- Crispy Banh Mi Recipe The Perfect Vietnamese Caramelised Pork Sandwich — Master the perfect Crispy Banh Miour authentic Vietnamese sandwich recipe features rich caramelized pork Thịt Nướng quick pickles and a shatteringly crisp...
- Rich Buona Beef Tuna Genovese Copycat The Ultimate Deli Sandwich — Recreate the iconic Buona Beef Tuna Genovese Copycat at home Our secret lies in slowcooked onions for that true Mediterranean tuna sandwich flavour A proper...
The Workflow: Expert Steps for Assembly and Baking
This is where we pull it all together. Think of it less like cooking, and more like engineering.
Stage One: Achieving the Deep, Slow and Simmered Ragu Flavor
Sauté your soffritto until truly soft about 8 to 10 minutes. Don’t rush this browning phase. When the vegetables are ready, add your tomato paste and cook it for two minutes until it turns a deep rust color.
This caramelizes the paste and eliminates the raw tomato flavor. Then brown your meats, drain the fat, pour in the wine, and scrape the bottom of the pot. That residue is pure flavor gold. Then, the long, slow, covered simmer for at least two hours. Seriously, go read a book or watch a movie.
Just don't forget to stir occasionally.
Preparing and Seasoning the Creamy Ricotta Mixture
Because you drained your ricotta, this is easy. In a bowl, you mix the cheese, the two lightly beaten eggs, Parmesan, basil, and the seasoning (salt, white pepper, and that essential 1/4 tsp of nutmeg). Mix until just combined. Don't overmix it, or you risk breaking the curd structure you worked so hard to preserve.
The Layering Technique for a Stable San Giorgio Lasagna
Preheat your oven to 375°F (190°C).
The first step is critical: a thin layer of sauce on the bottom of the dish. This prevents the bottom layer of noodles from fusing to the glass. Then we start the cycle: Pasta sheets, half the ricotta, one and third of the mozzarella, a generous layer of ragu. Repeat.
For the final top layer, we go pasta, the rest of the ragu, and the remaining mozzarella, topped with a little extra Parmesan for color.
Achieving the Perfect Golden and Brown Crust in the Oven
We bake this bad boy in two phases. First, cover it tightly with foil. This steams the lasagna, ensuring the noodles finish cooking and the interior heats evenly without drying out the top. Bake covered for 30 minutes.
Then, remove the foil and bake uncovered for the final 15 minutes. This is when the mozzarella gets that gorgeous, bubbly, golden and brown crust we all crave.
Troubleshooting & Expert Tips for Lasagna Perfection
- Preventing the Dreaded Grease Slick: After browning the beef and sausage, drain off all visible grease before adding the wine and tomatoes. A ragu should be rich, not oily.
- Handle Hot Noodles: Have a clean kitchen towel laid out next to your stove. As soon as you drain the al dente noodles, lay them flat, slightly overlapping. Do not rinse them; you want the starch to help the layers stick.
- Seasoning Layers: Taste your ragu and your ricotta mixture before assembling. If your ricotta is bland, the whole lasagna will be bland. Don't be shy with the salt.
CRUCIAL WARNING: Once the lasagna is out of the oven, resist the urge to slice immediately. You MUST let it rest for 20 minutes minimum. This allows the internal temperature to equalize and, crucially, lets the cheese layers set.
If you slice early, the entire magnificent structure will collapse into a soupy mess. Patience is the ultimate expert tip here.
Storing, Freezing, and Reheating Your Leftovers Safely
Preventing the Infamous 'Lasagna Slump' When Serving
See that note above? The 20 minute rest is the secret weapon against the slump. Use a sharp, non and serrated knife to cut clean squares. A metal spatula is your best tool for lifting the slices out of the dish cleanly.
Making Ahead: Prepping Components 24 Hours in Advance
This is a great make and ahead meal. You can (and should) make the ragu three days ahead. You can mix the ricotta filling 24 hours ahead. If you want to assemble the entire dish raw, wrap it tightly in foil and refrigerate for up to 24 hours.
If baking from cold, add 10- 15 minutes to the covered baking time to ensure it heats through.
Customizing Your Dish: Flavor Variations and Substitutions
If you want to play around with this traditional san giorgio lasagna structure, here are a few ways to switch it up without disrupting the integrity:
- Add Béchamel: For a truly decadent, classic Italian touch, replace the top ricotta layer with a simple Béchamel (butter, flour, milk sauce) for extra creaminess.
- Spice it up: Stir in a teaspoon of red pepper flakes when sautéing the garlic.
- Greens: Wilted, chopped spinach (squeezed bone and dry) can be mixed into the ricotta filling for extra nutrition and color.
The Best Way to Freeze and Thaw Leftovers Safely
Lasagna freezes beautifully. I recommend baking and cooling it completely, then slicing it into individual portions. Wrap each portion tightly in plastic wrap, then foil, and freeze for up to three months.
To reheat, remove the plastic, leave the foil on, and bake in a toaster oven or regular oven at 350°F (175°C) until piping hot about 30 to 45 minutes, depending on the size of the piece. Microwaving works in a pinch, but the oven is better for maintaining that crisp crust.

Recipe FAQs
This recipe is huge! Can I assemble the San Giorgio Lasagna ahead of time and bake it later?
Yes, prepping ahead works a treat! Assemble the entire dish (Stages 1-3), cover it tightly with cling film and foil, and refrigerate for up to 24 hours; just add 15-20 minutes to the covered baking time if baking from cold.
I always get watery lasagna what is the secret to getting clean, non-sloppy slices?
There are two critical steps for success: first, drain your ricotta overnight to remove excess moisture; and second, absolutely do not skip the non-negotiable 20-minute rest after baking, as this allows the layers to set up perfectly.
My family isn't keen on beef; can I make this ragu vegetarian or with just turkey?
Certainly; you can swap the beef and sausage mixture for 2 lbs of ground turkey or use high-quality plant based mince for a vegetarian version; just ensure the ragu simmers long enough to thicken thoroughly regardless of the meat choice.
The instructions say to boil the standard noodles; is it okay if I use the ‘no-boil’ sheets instead?
You can use the no-boil sheets as a time saver, but you must compensate by adding slightly more sauce to your layers (about 1/4 cup extra per layer) as these noodles soak up significantly more moisture during the bake.
What’s the best way to store and reheat any leftover Sunday feast?
Leftovers keep well refrigerated for 3-4 days; for longer storage, bake the lasagna completely, cool it, slice into individual portions, wrap them tightly, and freeze for up to three months, reheating them in the oven until piping hot.
San Giorgio Lasagna With Rich Ragu

Ingredients:
Instructions:
Nutrition Facts:
| Calories | 420 kcal |
|---|---|
| Protein | 0.0 g |
| Fat | 0.0 g |
| Carbs | 0.0 g |
