Thanksgiving Stuffing: Chefs Savory Sourdough and Sage Recipe
- The Ultimate Thanksgiving Stuffing: Chef’s Savory Sourdough Method
- Why This Sourdough Stuffing Recipe Guarantees Success
- Essential Ingredients for the Perfect Holiday Stuffing
- How to Make Chef’s Savory Sage Thanksgiving Stuffing (Step-by-Step)
- Troubleshooting and Pro Tips for Stuffing Perfection
- Making Ahead, Storage, and Reheating Guide
- The Best Pairings for Sourdough Stuffing
- Recipe FAQs
- 📝 Recipe Card
The Ultimate Thanksgiving Stuffing: Chef’s Savory Sourdough Method
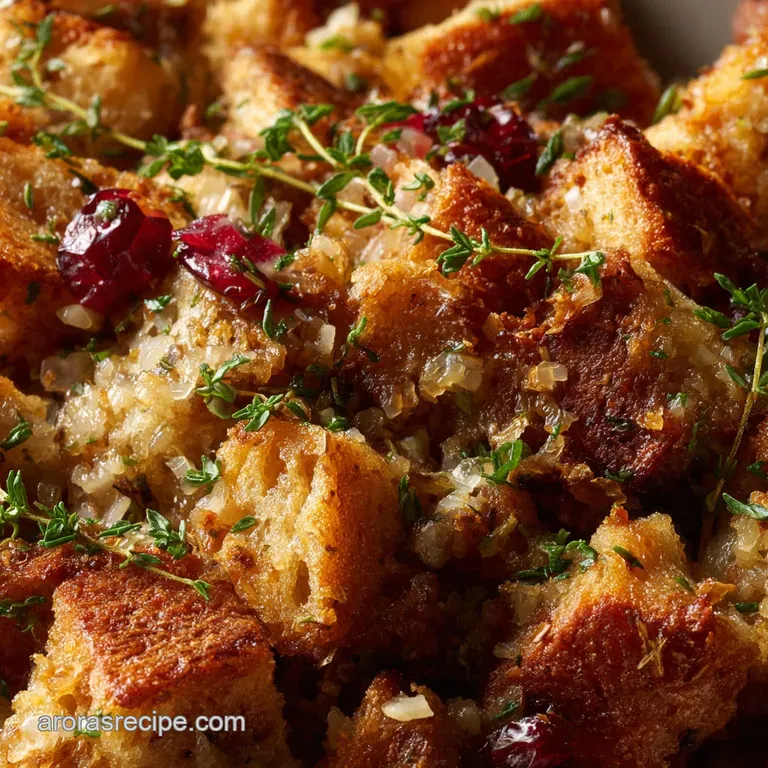
Stop right there. Can you already smell it? That mix of rich butter, aromatic sage, and perfectly toasted bread is the pure essence of the holidays. This recipe delivers a stuffing that’s beautifully crispy on the edges but unbelievably soft, moist, and fragrant inside.
I know Thanksgiving planning is intense, but truly, this simple stuffing recipe is a true lifesaver. Since we bake it in a casserole dish (which technically makes it a dressing, but let's not fight tradition!), it frees up precious oven space and eliminates food safety worries about cooking inside the bird.
It's surprisingly cheap to make, and it absolutely crushes anything you could pour out of a box.
We’re using a specific technique here the sourdough method to guarantee texture perfection every time. Forget the dry, lacklustre versions of the past, because we are making the ultimate, deeply satisfying, classic Thanksgiving Stuffing .
Why This Sourdough Stuffing Recipe Guarantees Success
The Culinary Cornerstone of Your Holiday Table
This isn't just a basic side dish; it’s the structural foundation of the entire Thanksgiving plate. If you get the stuffing wrong if it's dry, rubbery, or oddly flavourless the whole meal feels unbalanced.
This recipe focuses on layering flavour and controlling moisture, guaranteeing a cohesive texture.
A Note on Tradition: Stuffing vs. Dressing (Baking Outside the Bird)
Quick clarification, just in case: since we bake this glorious thing in a pan, it is technically a dressing. But listen, my grandma called it stuffing, and history is written by the grandmas, so we’re calling it stuffing.
Baking it outside the turkey is both safer and the only way to achieve that incredible, shatteringly crispy top crust .
Recipe Overview: Prep Time, Cook Time, and Yield
| Stage | Time Estimate | Notes |
|---|---|---|
| Bread Prep (Inactive) | 8– 12 hours | Air drying is non-negotiable. |
| Active Prep | 20 minutes | Chopping everything precisely. |
| Cook Time | 40– 45 minutes | Covered then uncovered. |
| Total Time | Approximately 1 hour 15 minutes (after bread is dried) |
The Power of Pre-Dried Bread: Preventing Soggy Stuffing
This step changes everything about the final texture. Stale bread still contains too much moisture, and if you use it right away, it will absorb the liquid too quickly and turn into a sticky, gloppy mess.
We fully dry the cubes either air-dried overnight or briefly toasted in the oven so they absorb the exact amount of butter and stock we intend them to. This structure control prevents sogginess.
Layering Aromatics: Achieving Deep, Earthy Sage Flavor
We sweat the celery and onion low and slow in a full stick of butter until they are completely translucent. This crucial process, called sweating , releases all their sweetness and deepens the flavour of the fat itself.
Adding the fresh sage and other herbs last ensures maximum fragrance without burning them, infusing the entire fat base perfectly.
high-quality Stock and Butter: The Secret to Supreme Moistness
The liquid is your flavour delivery system; don't skimp here. You must use high-quality, preferably homemade turkey or chicken stock because its flavour profile will form the core taste of the finished stuffing.
This liquid, combined with a generous amount of butter, ensures the finished product is supremely moist, guaranteeing the opposite of that sad, dry holiday brick.
Essential Ingredients for the Perfect Holiday Stuffing
Sourdough Selection: Density and Crust Quality Matters
I prefer rustic sourdough because the denser crumb holds up beautifully to the soaking liquid, providing that contrast of textures. Don’t use soft white sandwich bread here! If sourdough isn't your jam, a crusty French boule or pain de mie works just as well.
The Role of Fresh vs. Dried Sage
Use fresh sage, full stop. The earthy, slightly peppery aroma of fresh sage is what defines classic Thanksgiving stuffing flavor. If you absolutely must use dried sage, use one tablespoon (instead of two) and rub it between your palms before adding it to the butter mixture to wake up the oils.
Clarifying Stock Needs: Homemade vs. store-bought Quality
Low-sodium stock is vital because you want to control the salt level yourself. If you’re not using homemade, look for an organic, high-quality, low-sodium version from the carton. Since this dish relies so heavily on the liquid for moisture and savouriness, cheap stock will yield cheap results.
Aromatic Base: Celery, Onion, and Herb Prep
The "holy trinity" of celery, onion, and herbs (sage, thyme, rosemary) must be finely diced, almost minced. This ensures they soften completely during the sweating process and distribute evenly throughout the stuffing, making sure you don't get big, raw chunks of celery in your finished dish.
| Ingredient | Viable Substitute | Notes |
|---|---|---|
| Sourdough Bread | Crusty French Boule, Pain de Mie, or gluten-free Artisan Bread | Must be dense and thoroughly dried. |
| Unsalted Butter | high-quality Olive Oil or Vegetable Shortening | Use a 1:1 ratio, though butter adds superior flavour. |
| Fresh Sage | 1 tbsp Dried Rubbed Sage | Must be rubbed to release aromatics. |
| Chicken/Turkey Stock | high-quality Vegetable Stock | Final flavour will be lighter. |
| Eggs | 2 tbsp Cornstarch/Flax Egg Slurry (Vegan binder) | Use this only if necessary, as eggs add richness and stability. |
How to Make Chef’s Savory Sage Thanksgiving Stuffing (step-by-step)
Step 1: Preparing and Drying the Sourdough Cubes
Cut your bread into roughly 1 inch (2.5 cm) cubes, striving for uniformity. Spread them in an even layer across several large baking sheets. This is the step that defines success.
Either let them air-dry overnight, or if you're in a rush (I once skipped this and regretted it instantly), bake them in a cool oven, 250°F (120°C), for about 20 minutes until they feel light and crisp, not soft.
Toss the dry cubes with the four tablespoons of melted butter and a pinch of salt. Toast them lightly in a 350°F (175°C) oven for just 8– 10 minutes to set their structure and deepen the flavour.
Step 2: Sautéing the Aromatics and Building the Flavor Base
Melt the remaining eight tablespoons of butter in your largest skillet over medium heat. Add the finely diced onion and celery, cooking gently for about 8– 10 minutes until they are soft and translucent we are sweating, not browning them.
Introduce the minced garlic, sage, thyme, rosemary, and the optional diced apple. Cook for just one minute until the incredible aroma floods your kitchen. Season well with salt, pepper, and nutmeg, then remove from the heat immediately.
Step 3: Combining the Mixture and Ensuring Proper Saturation
Pour the hot butter and vegetable mixture over the dried bread cubes in your giant mixing bowl. Toss gently to coat every cube in that gorgeous, herb infused butter. In a separate bowl, whisk the two lightly beaten eggs into 3 ½ cups of the warm stock.
Pour this liquid mixture over the bread and vegetables, then toss very gently using a folding motion.
Chef's Note: You must check the moisture level here. Squeeze a handful; it should feel saturated but still hold its shape loosely. If it's too dry, slowly add the remaining stock until you hit that perfect level of plump moistness. Trust me on this.
Step 4: Baking for Maximum Crispness and Moisture
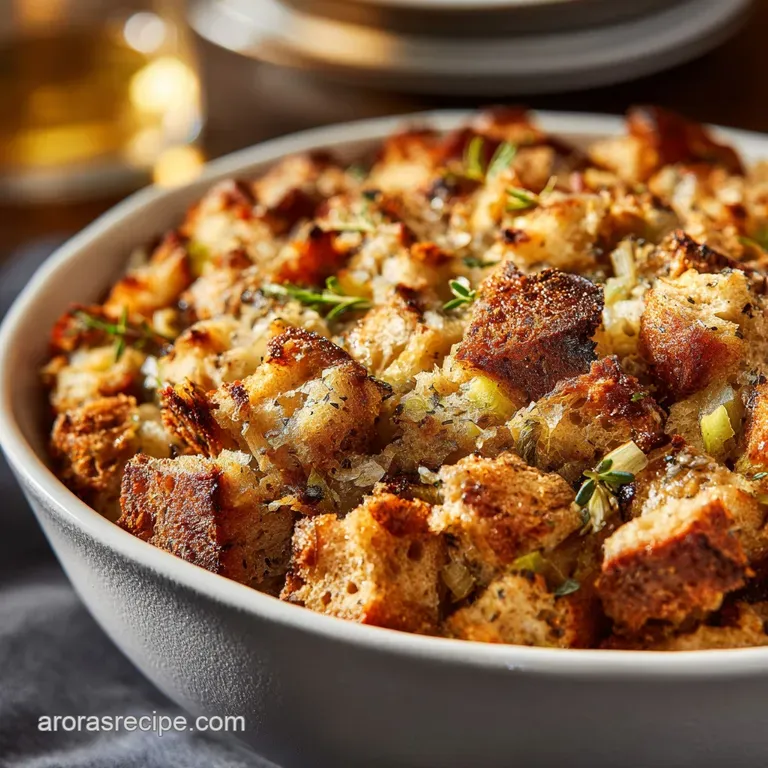
Transfer the fully combined mixture to your prepared 9x13 inch baking dish. Don't pack it down tightly; keep it loosely distributed for better texture. Cover the dish tightly with aluminum foil this traps the steam and ensures the inside remains perfectly moist.
Bake in a preheated 375°F (190°C) oven for 30 minutes, then remove the foil. Bake for another 10– 15 minutes until the top layer is brilliantly golden brown and beautifully crisp. Let it rest for 10 minutes before serving. Job done!
Troubleshooting and Pro Tips for Stuffing Perfection
Avoiding the Two Most Common Stuffing Failures (Dryness and Mushiness)
The number one cause of mushiness is failing to properly dry your bread, as we discussed. If your stuffing is dry, however, the culprit is usually inadequate stock. If you find your leftovers are too dry, stir in a quarter cup of warm stock or gravy before reheating to inject moisture back into the cubes.
Achieving the Ultimate Crispy Top Layer
Always cover the dish for the first 30 minutes to steam the interior, then always uncover it for the last segment. For an even richer, deep golden top layer, melt 2 tablespoons of extra butter and gently drizzle it over the top right before you remove the foil for the final bake.
This extra fat guarantees phenomenal browning.
Adjusting the Consistency Before Baking
If you realize the mixture is too wet, you have two options: add another half cup of very toasted bread cubes, or simply bake it uncovered for an extra five to ten minutes at the beginning. If it’s too dry, gently fold in a little more warm stock, one tablespoon at a time.
The mixture should always be extremely moist before it goes into the oven.
Making Ahead, Storage, and Reheating Guide
Preparing the Stuffing Mix 24 Hours in Advance
Stuffing is an excellent make-ahead dish. You can complete all the steps (from bread drying through the combining of wet and dry ingredients) and transfer the final mix to the casserole dish. Cover it tightly with plastic wrap and refrigerate for up to 24 hours.
CRITICAL: Let it sit at room temperature for 30 minutes before baking, and add 5- 10 minutes to the total covered baking time since it’s starting cold.
Safe Storage of Leftovers
Store leftover stuffing in an airtight container in the refrigerator for up to 4 days. If you need it to last longer, stuffing freezes surprisingly well. Place cooled leftovers in a freezer safe bag or container and freeze for up to 3 months.
Reheating Stuffing Without Drying It Out
To reheat, the microwave works fine for small portions, but the oven is better for maintaining texture. Cover the leftover stuffing with foil in a small oven safe dish and bake at 350°F (175°C) until heated through (about 15– 20 minutes).
For that crucial crispy texture, remove the foil for the last 5 minutes. If it looks dry, add a splash of stock or gravy before covering it.
The Best Pairings for Sourdough Stuffing
This savoury, herby masterpiece needs robust company!
For the main course, this stuffing stands up perfectly to a traditional turkey or a slow roasted herb crusted pork loin. If you’re looking for other ways to bring intense herb flavour to your meal, you might want to check out my recipe for Buttery Herb Thanksgiving Stuffing: The Ultimate Recipe for Crispy Tops — it uses a similar herb profile but with a different bread base.
Stuffing is meant to be drenched, so always serve it with a lake of rich, homemade gravy and tart cranberry sauce. If you’re considering ditching the homemade route altogether, don't worry, you can always enhance a quick fix. My guide on the Enhanced Stove Top Stuffing: The Ultimate Butter Basted Glow-Up will show you how to trick everyone into thinking it’s homemade!

Recipe FAQs
Why is my stuffing dry and crumbly instead of moist?
Dry stuffing is usually the result of insufficient liquid absorption before baking or excessive baking time. Ensure your dried bread cubes are thoroughly saturated with the stock mixture before they go into the oven, and always cover the stuffing dish for the first two-thirds of the baking time to trap essential steam.
How far in advance can I prepare the Chef's Savory Stuffing?
You can assemble the entire stuffing mixture, including the sautéd aromatics and stock, up to 24 hours ahead of time. Store it tightly covered in the refrigerator, but remember to bring it to room temperature and add about 1/4 cup of extra stock just before baking, as the bread continues to absorb moisture while chilling.
Is it safe to cook the stuffing inside the turkey, or should I bake it separately?
While traditional, cooking stuffing inside the turkey (in the cavity) requires careful temperature monitoring to avoid foodborne illness. The stuffing must reach an internal temperature of 165°F (74°C) to be considered safe, which often results in an overcooked turkey, so baking it separately is highly recommended for best results and safety.
Can I use a different type of bread instead of sourdough for this recipe?
Yes, the key is using bread that holds its shape well after being dried, such as Challah, rustic Italian bread, or pain de campagne. Avoid soft, highly processed sandwich breads, as they tend to turn mushy when saturated with the savory stock mixture.
The bottom layer of my stuffing is soggy and compressed. What went wrong?
Soggy stuffing often occurs when too much liquid is added or if the bread wasn't adequately dried out before mixing. To prevent this, confirm your bread cubes are truly stale or baked until crispy before adding the liquid, and ensure you use a shallow baking dish rather than a very deep one to encourage even heating.
How can I make this stuffing vegan or vegetarian friendly?
To convert this recipe, simply replace the chicken or turkey stock with a high-quality, flavorful vegetable stock and substitute the butter with a good quality vegan butter alternative. These substitutions will maintain the savory depth and moisture required for a perfect stuffing.
Can leftover stuffing be frozen, and what is the best way to reheat it?
Stuffing freezes excellently; wrap cooled portions tightly in foil and place them in an airtight container for up to three months. To reheat, thaw overnight in the refrigerator, then bake covered at 350°F (175°C) until hot throughout, uncovering for the final 10 minutes to restore the crispy top crust.
Savory Sage Sourdough Stuffing

Ingredients:
Instructions:
Nutrition Facts:
| Calories | 375 kcal |
|---|---|
| Fat | 20 g |
| Fiber | 4 g |
