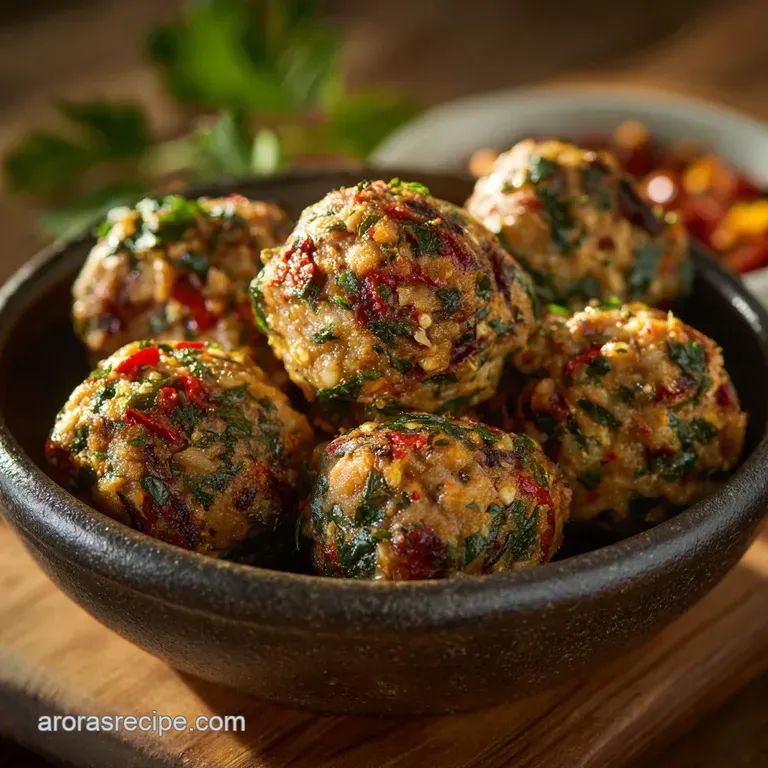
Ww2 Wrapped Gator Bites the Robust Portable Victory Rolls
- The Victory Roll: Why Resourcefulness Fueled These WW2 Wrapped Gator Bites
- Securing Your Supplies: Essential Components for the Perfect Roll
- Preparing the Foundation: Dough Selection and Preparation Tips
- From Filling to Fold: Preparing the Robust Gator Mixture
- Assembling the Hand and Held Ration: Wrapping and Sealing the Bites
- Oven, Skillet, or Air Fryer? Cooking Methods for WW2 Wrapped Gator Bites
- Extending the Shelf Life: Storage and Reheating WW2 Wrapped Gator Bites
- Alternative Proteins and Flavor Variations for the Victory Roll
- Recipe FAQs
- 📝 Recipe Card
The Victory Roll: Why Resourcefulness Fueled These WW2 Wrapped Gator Bites
Right, let’s talk resourcefulness. Forget fancy culinary techniques for a second. The greatest cooking triumphs often come from the toughest times, when you have to squeeze maximum flavour and nutrition out of minimal ingredients. That’s the entire ethos behind these WW2 Wrapped Gator Bites.
They’re hearty, portable, and utterly delicious. It was survival cooking, sure, but it was brilliant. These hand and held parcels are what you needed if you were out in the field, or just needing a solid dinner during rationing.
We’re taking that concept and applying it to a protein many people overlook: alligator.
Tracing the Southern Roots of Wartime Protein Availability
I know, right? Alligator? But think about the Gulf Coast regions, especially during the 1940s. While beef, bacon, and prime cuts of pork were heavily rationed and sent overseas to support the war effort, local game and readily available proteins stepped up to fill the gaps.
Alligator meat (specifically the tail) is incredibly lean, high in protein, and when sourced responsibly, it's basically a highly sustainable resource for those in Louisiana and Florida. It tastes like a mix between chicken and lean pork, maybe a bit firmer.
The key is seasoning it right and binding it well, which is exactly what we’re going to do.
Beyond Rationing: Crafting Maximum Flavor from Simple Means
The big mistake home cooks make with "simple" recipes is under and seasoning. When you only have a few ingredients, those ingredients have to work . We aren't relying on twenty different spices here.
We’re relying on the pungent kick of Dijon (or better yet, strong English mustard) and the deep umami of Worcester sauce. These things cut through the richness of the pastry fat and stop the gator from tasting bland.
Trust me, I once made a batch where I tried to be "subtle." They tasted like dry, mildly seasoned bread. Never again. We need assertive, robust flavour here.
Securing Your Supplies: Essential Components for the Perfect Roll
This recipe lives and dies by cold fat and quality meat. Seriously, don't skimp on either. For the pastry, if you’re not using all butter, try swapping half of it out for lard, which is what many cooks would have done historically. It gives you a flakier, sturdier, less and prone-to and leak structure.
For the filling, you need gator tail meat. It’s the tenderloin of the gator. Don't bother trying to use leg or jaw meat for this; it’s too chewy and fibrous for a fine mince.
Preparing the Foundation: Dough Selection and Preparation Tips
Sourcing the Star: Choosing the Best Cut of Alligator Meat
As I mentioned, the tail is your friend. Look for clean, white meat. If you buy it pre and minced, that’s fine, but if you’re grinding it yourself, keep it cold and pulse it in the food processor until it looks like ground turkey fine, but still having some texture.
Over and processing turns it into a gummy paste, and nobody wants that. If you find yourself with slightly larger chunks of meat, dice them down really small, like little peas. That prevents those weird, rubbery resistance bites.
Wartime Pantry Staples: Simple Spices for Maximum Impact
We are keeping it tight: salt, black pepper, thyme, and the mustard. The thyme is non and negotiable; it gives that earthy, slightly peppery warmth that complements game meat so well. Be generous with the black pepper. It should almost sting the back of your throat a little bit when you taste the raw filling mixture.
That means it’s going to be perfect once it’s baked into the fatty pastry.
The Quick Flaky Crust: Mastering the Shortcrust Pastry Technique
We’re aiming for rough puff or a sturdy shortcrust here. The secret, which I learned the hard way after many weeping, crumbly failures, is to ensure the butter is the temperature of a January morning. Ice cold.
When you cut the fat into the flour, you should still see distinct, pea and sized chunks of butter remaining. That’s what creates the pockets of steam during baking, leading to flake. If you mix it until it looks uniform, you’ll get a dense biscuit. We don’t want biscuits. We want flake.
Necessary Equipment: Tools for Mixing, Filling, and Sealing
Honestly, you don't need much. A good rolling pin, a large mixing bowl, and most importantly, a simple fork. That fork is going to be your best friend for sealing the edges. Skip the fancy pastry tools.
A metal spatula is also handy for lifting the filled bites onto the tray without stretching the dough and risking a tear.
From Filling to Fold: Preparing the Robust Gator Mixture
Once you have your minced gator, dice that onion small . You want flavour distribution, not big raw chunks of onion steaming in your pastry. Combine the gator, onions, mustard, Worcester, breadcrumbs, and the binding egg. Mix gently.
Use your hands, it’s the best way to ensure everything is evenly incorporated without overworking the protein.
Here’s my non and negotiable tip: Fry a tiny spoonful of the mix in a pan. If it tastes exactly how you want the final bite to taste, you’re good. If it’s weak, add more mustard, pepper, or salt. Adjusting the seasoning now is a thousand times easier than regretting it later.
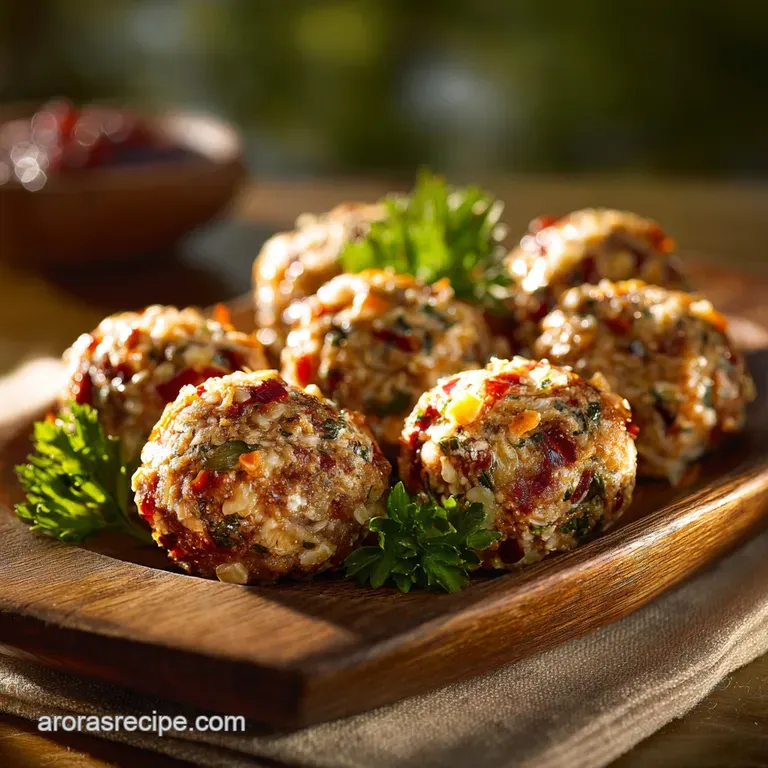
Assembling the Hand and Held Ration: Wrapping and Sealing the Bites
You’re basically making elegant, individual sausage rolls. Roll your dough out nice and thin (about 1/8 inch) and cut it into rectangles. Spoon the filling down the centre. Don’t overfill. I made that mistake once; the filling burst out the sides and turned my parchment paper into a sticky mess.
Moderation is key.
Then, brush the borders with your egg wash. This acts as the glue. Fold the pastry over and press those edges together firmly.
CRITICAL WARNING: This pastry seal is the only thing standing between you and a massive, messy disaster. Press down hard with the tines of a fork all along the edge. If you see even one thin spot, press again. We want the integrity of a bunker door here.
Oven, Skillet, or Air Fryer? Cooking Methods for WW2 Wrapped Gator Bites
The oven gives the most uniform bake, but I’ll be real, if you’re only making a small batch, the air fryer is ridiculously fast and effective for maximum crispness.
| Method | Time (Approx) | Notes |
|---|---|---|
| Oven (400°F/200° C) | 25 30 min | Best for large batches; consistent colour. |
| Air Fryer (375°F/190° C) | 16 20 min | Super crispy pastry; requires rotation. |
Achieving the Right Consistency for the Savory Filling
Soggy bottoms are a crime. Don't commit the crime. The breadcrumbs and the single egg are there to prevent the meat mixture from releasing too much moisture during the bake. If your filling still looks wet after mixing, add another tablespoon of breadcrumbs.
The filling needs to be firm enough to hold its shape on the pastry, not runny.
Marinating and Seasoning for Optimal Depth of Flavor
While you can mix the filling and bake immediately, letting the gator mixture rest in the fridge for 30 minutes (or even overnight) allows the mustard and Worcester sauce to really penetrate the meat fibres. This is how you get serious depth of flavour without a lot of ingredients.
The Perfect Seal: Techniques to Prevent Filling Leaks
Use cold egg wash as your glue and crimp with that fork until the edges look like thick rope. If you have the time, stick the assembled, sealed bites back in the fridge for 15 minutes before baking. Cold dough holds its shape better and is less likely to leak when it hits the heat.
Golden Finish: Egg Washing and Scoring the Pastry Top
Use the full egg wash (egg beaten with a tiny splash of water or milk). Brush it on thickly. This gives you that gorgeous, deep golden brown colour that makes them look professional. Don't forget those two or three small slashes in the top of the pastry. They are vents.
They let steam out, which keeps your pastry airy and prevents the rolls from splitting down the middle.
Monitoring Internal Temperature for Perfectly Cooked Gator
Alligator is lean, so it cooks quickly. You’re looking for an internal temperature of 165°F (74°C). If the pastry is getting dark but the internal temperature isn't there, cover the bites loosely with foil for the last five minutes.
Tips for Achieving a Deep Golden, Crispy Crust
- Preheat is King: Ensure your oven is fully up to 400°F before the rolls go in. Cold ovens = soft pastry.
- Don't Crowd the Tray: Give each bite space. If they’re touching, they steam instead of baking crispy.
Extending the Shelf Life: Storage and Reheating WW2 Wrapped Gator Bites
These are fantastic for batch cooking. They hold up well in the fridge for about three days, but they are absolutely glorious when frozen unbaked.
Freezing Instructions for Large Batch Preparation
Assemble the WW2 Wrapped Gator Bites fully (fill, seal, egg wash, and vent), but skip the baking step. Place them on a parchment and lined tray and freeze until solid. Once they are hard, transfer them to a freezer bag or airtight container. To cook from frozen, don't thaw them.
Just transfer them to the preheated oven, add about 10– 15 minutes to the cooking time, and watch for that golden colour.
Best Practices for Keeping Rolls Crispy Upon Reheating
Whatever you do, do not reheat these in the microwave. It turns that beautiful flaky crust into a damp, sad sponge. Use the air fryer (350°F/175°C for 5– 8 minutes) or the oven (350°F/175°C for 10– 12 minutes) until the pastry is hot and revived.
Alternative Proteins and Flavor Variations for the Victory Roll
If gator is just not happening for you, don't worry. This recipe concept works beautifully with other, easier and to-find meats.
Swapping Gator: Using Poultry or Pork as a Modern Substitute
Because gator is very lean, the best modern swap is pork shoulder (ground) or chicken thigh meat (ground). Avoid breast meat, which will dry out too easily and needs a lot more fat added.
The dark meat in the thigh is naturally moister and will hold up to the seasoning better.
Pairing Sauces: Mustards, Chutneys, and Tangy Dips
These WW2 Wrapped Gator Bites are begging for something sharp to cut through the fat and meat.
- A massive dollop of tangy Branston Pickle is the absolute classic wartime pairing.
- A strong, slightly sweet Apple or Pear Chutney works perfectly if you want something fruitier.
- For a modern take, mix strong horseradish into sour cream for a powerful, creamy dip. It’s heaven.

Recipe FAQs
Crikey, where can I find alligator meat, or what’s the best swap for these WW2 Wrapped Gator Bites?
Don’t fret, old chap! If gator is a bit tricky to source, you can use minced lean pork, boneless chicken thigh, or even robust turkey; the key is choosing a slightly darker, highly flavourful meat that stands up to the pastry.
My pastry always gets a bit of a damp patch underneath how do I avoid a proper soggy bottom?
The trick is a very tight seal, venting the top with a few small slits to allow steam to escape, and critically, ensuring the filling mixture isn't too wet the breadcrumbs are essential here for moisture control.
Are these wartime classics good for making ahead, like proper picnic food?
Absolutely! These are brilliant made ahead; store fully baked bites in an airtight tin for up to 3 days, or freeze the assembled, unbaked rolls (egg washed) for a quick future supper.
I’ve heard gator can be chewy how do I guarantee a tender, flavourful filling?
Alligator meat is very lean, so mince it finely to break down the fibres and ensure it is thoroughly mixed with the egg and breadcrumbs for binding; also, crucially, don't over bake the bites.
Why the name "WW2 Wrapped Gator Bites"? Is that about the flavour profile?
It’s a tribute to the resourcefulness and hearty, robust, hand held savory pastries like elevated sausage rolls and pasties that were essential for comfort and energy during Britain's rationing era.
What dipping sauces work best with the robust mustard and Worcester flavour?
You need something sharp and tangy to cut through the richness of the pastry; a proper dollop of sweet and sour Branston Pickle, or a homemade apple and tomato chutney, is spot on.
Ww2 Wrapped Gator Bites Victory Rolls

Ingredients:
Instructions:
Nutrition Facts:
| Calories | 220 kcal |
|---|---|
| Protein | 18.0 g |
| Fat | 16.0 g |
| Carbs | 2.0 g |
