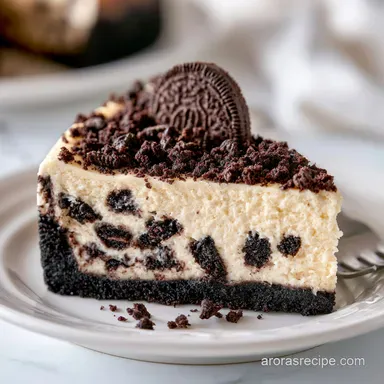
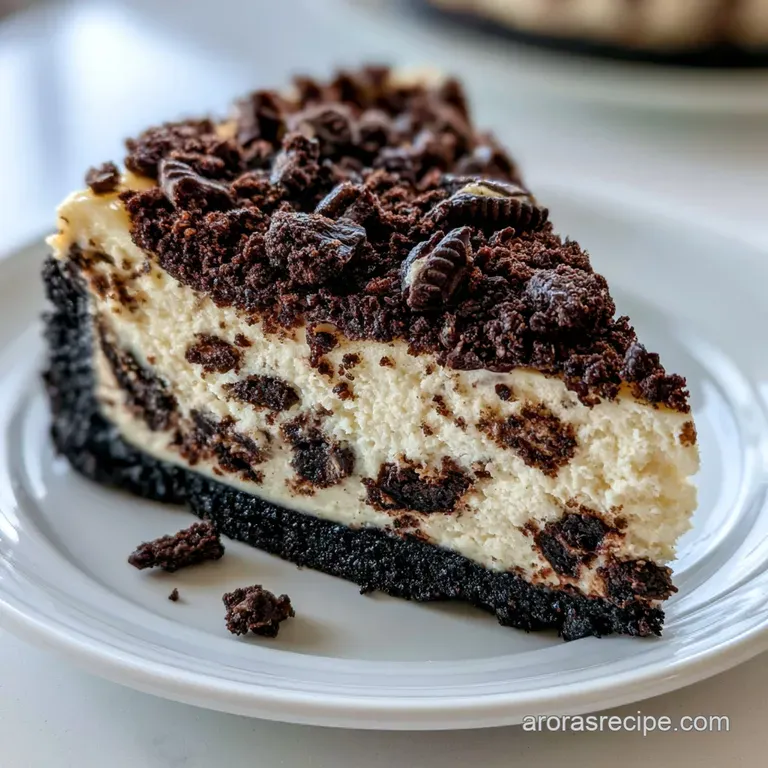
Ultimate Baked Oreo Cheesecake: Velvety and Rich
- Time: 30 min active + 6 hours chilling = Total 7 hours 30 mins
- Flavor/Texture Hook: Velvety cream cheese filling with a shattering cocoa crust
- Perfect for: Holiday parties, birthday celebrations, or high effort weekend treats
Ever wonder why some cheesecakes feel like a heavy brick in your stomach, while others practically melt the second they hit your tongue? It's usually because the baker rushed the cooling process or used cold cream cheese, which creates those tiny, annoying lumps that just won't go away.
I remember the first time I tried a fancy version of this at a bakery, and it had this incredible, deep cocoa crunch that contrasted with a filling so smooth it felt like silk. I spent the next few weekends playing with the ratio of crushed cookies to butter, trying to get that specific "shatter" when you press your fork into the crust.
This oreo cheesecake recipe is my go to for when I want something that feels special but doesn't require professional gear. We're going for a homestyle, hearty slice that's rich enough to satisfy a crowd but balanced with a bit of tang from the sour cream.
Perfecting Your Oreo Cheesecake Recipe
The secret to a professional result at home isn't a fancy oven, but how you handle the ingredients. If you've ever had a cheesecake that cracked down the middle or felt grainy, you were likely fighting against the physics of the batter.
Room Temp Magic: Using ingredients at the same temperature prevents the batter from "breaking" or separating, which keeps the texture velvety.
The Egg Rule: Beating eggs on high incorporates too much air, which causes the cake to puff up like a soufflé and then collapse, creating cracks.
Gradual Cooling: Moving a hot cake to a cold fridge causes the edges to shrink faster than the center, which is exactly how you get those deep fissures on top.
Fat Stability: The combination of full fat cream cheese and sour cream creates a stable structure that doesn't weep water after it's sliced.
But wait, do you always have to bake it? Some people swear by the no bake route. Let's look at the trade offs.
| Feature | No Bake Version | Baked Version (This Recipe) | Best For |
|---|---|---|---|
| Texture | Mousse like / Airy | Dense / Velvety | Baked for richness |
| Prep Time | 15-20 minutes | 30 minutes active | No bake for speed |
| Stability | Soft / Needs fridge | Firm / Holds shape | Baked for slicing |
| Flavor | Lighter, sweeter | Deep, tangy, rich | Baked for authenticity |
Before we get into the shopping list, it's helpful to understand what the core components are actually doing in your pan.
Component Analysis
| Ingredient | Science Role | Pro Secret |
|---|---|---|
| Full Fat Cream Cheese | Structure & Body | Must be soft to avoid lumps |
| Sour Cream | Tang & Moisture | Prevents the cake from feeling "dry" |
| Eggs | Binding & Lift | Add slowly to keep air out |
| Oreo Crumbs | Flavor Base | Add a pinch of salt to cut the sugar |
The Full Grocery List
When you're heading to the store, don't be tempted by the "light" or "whipped" cream cheese versions. They contain more air and less fat, which means your cheesecake won't set properly and will likely turn into a puddle. Trust me, the full fat stuff is where the magic happens.
- 1.5 cups (180g) Oreo crumbs Why this? Provides the signature cocoa base (Sub: Chocolate wafers for a less sweet crust)
- 5 tbsp (70g) melted unsalted butter Why this? Binds the crumbs into a solid disc (Sub: Coconut oil for a dairy-free crust)
- 0.25 tsp (1g) salt Why this? Balances the intense sweetness (Sub: Fine sea salt)
- 32 oz (900g) full fat cream cheese, room temperature Why this? The primary structure of the cake (Sub: Mascarpone for an even richer taste)
- 1 cup (200g) granulated sugar Why this? Classic sweetness (Sub: Caster sugar for a finer grain)
- 1 cup (240ml) sour cream, room temperature Why this? Adds a velvety, tangy finish (Sub: Greek yogurt, though it's slightly thicker)
- 1 tsp (5ml) vanilla extract Why this? Rounds out the cocoa flavor (Sub: Almond extract for a nutty twist)
- 3 large (150g) eggs, room temperature Why this? Sets the filling during baking (Sub: 3 eggs + 1 yolk for extra richness)
- 1 cup (120g) crushed Oreos, roughly chopped Why this? Adds texture and visual appeal (Sub: Dark chocolate chunks)
Since we're using a lot of room temperature items, I recommend taking your cream cheese and eggs out of the fridge at least 2 hours before you start. According to King Arthur Baking, temperature consistency is the most critical factor in emulsion based batters.
Essential Tools For Success
You don't need a professional kitchen, but a few specific tools make this oreo cheesecake recipe much more stress free.
- 9 inch Springform Pan: Essential for getting the cake out without it crumbling.
- Electric Hand Mixer or Stand Mixer: A KitchenAid is great, but a hand mixer works perfectly fine here.
- Food Processor: Use this for the crust to get a consistent "wet sand" texture.
- Rubber Spatula: For folding in the cookie chunks without over mixing.
- Wooden Spoon: To prop the oven door open during the cooling phase.
Step-by-step Baking Flow
To make this easy, I've broken the process into four phases. This helps you organize your workspace and prevents you from feeling overwhelmed.
Phase 1: Constructing the Base
- Combine Oreo crumbs, melted butter, and salt in a food processor until the mixture resembles wet sand.
- Press the mixture firmly into the bottom of a 9 inch springform pan, ensuring it is packed tight to avoid air pockets. Note: Use the bottom of a flat glass to press it down
- Bake the crust at 350°F (175°C) for 10 minutes, then set aside to cool. This ensures the crust stays crispy and doesn't get soggy from the filling.
Phase 2: Creating the Silk Filling
- Beat the room temperature cream cheese and sugar on medium low speed until smooth and creamy.
- Slowly incorporate the sour cream and vanilla extract into the cream cheese mixture. Note: Keep the speed low to avoid adding air
- Add eggs one at a time, mixing on the lowest speed only until just combined.
Phase 3: The Controlled Bake
- Fold in the chopped Oreo chunks by hand to keep them intact.
- Pour the batter over the pre baked crust.
- Bake at 325°F (160°C) for 55–65 minutes until the edges are set but the center 2 inches still have a slight wobble.
Phase 4: The Gradual Cool Down
- Turn off the oven and prop the door open slightly with a wooden spoon; let the cheesecake sit inside for 60 minutes.
- Remove from the oven and chill in the refrigerator for a minimum of 6 hours before serving.
Chef's Note: Don't panic when you see the center wobble. If you bake it until the center is firm, you've overcooked it, and the texture will be more like a sponge cake than a velvety cheesecake.
Solving Common Baking Mishaps

Even the best of us hit a snag. The most common issue with this oreo cheesecake recipe is the dreaded top crack, but it's almost always a temperature problem, not a recipe failure.
Troubleshooting Common Issues
| Issue | Solution |
|---|---|
| Why Your Top Cracked | This happens when the cake expands too quickly and then shrinks rapidly when hitting cold air. The "oven door open" trick mentioned in the steps is the primary fix for this. |
| Why Your Filling is Lumpy | Lumps happen when the cream cheese is too cold. The sugar can't dissolve into the cold fat, creating little pockets of unmixed cheese. |
| Why Your Crust is Too Soft | If the crust feels like a cookie rather than a crisp base, it's usually because the butter wasn't melted fully or the crust wasn't pre baked. |
Success Checklist:
- ✓ All dairy and eggs are room temperature
- ✓ Mixer stayed on low/medium low speed
- ✓ Oven temperature was verified with a thermometer
- ✓ Cake was chilled for at least 6 hours
- ✓ Crust was pressed firmly with a flat object
Creative Twist And Scaling
If you're not feeding a whole crowd, you can easily adjust this. But remember, cheesecake is sensitive to volume changes.
Scaling Down (Half Batch): Use a 6 inch pan. Reduce the baking time by about 20%, but still look for that center wobble. For the eggs, beat one egg in a small bowl and use only half of it to keep the ratio exact.
Scaling Up (Double Batch): Work in batches if your mixer is small. If baking two cakes at once, lower the oven temp by 25°F and extend the time by 10-15 minutes to ensure the heat circulates evenly.
Fun Variations:
- Mini Oreo Cheesecakes: Use a muffin tin. Bake for 18-22 minutes at 325°F. These are great for parties.
- Oreo Cheesecake Cupcakes: Bake a chocolate cupcake first, core out the center, and fill it with a no bake version of this filling.
- Lower Sugar Twist: Replace half the granulated sugar with a monk fruit sweetener. Note: The texture may be slightly less creamy.
If you're looking for other ways to use your cream cheese, you might enjoy my Classic Cheesecake Recipe for a more traditional New York style.
Storage And Waste Tips
A cheesecake actually gets better after 24 hours in the fridge because the flavors meld and the structure firms up.
Storage Guidelines:
- Fridge: Store in an airtight container or cover the pan tightly with foil. It stays fresh for 5 days.
- Freezer: You can freeze slices individually wrapped in parchment and foil for up to 3 months. Thaw slowly in the fridge overnight.
- Reheating: Never heat a cheesecake! If it's too cold, let it sit at room temperature for 20 minutes before serving.
Zero Waste Tips: Don't toss the leftover Oreo crumbs at the bottom of the bag. Mix them into your morning oatmeal or use them as a topping for vanilla ice cream. If you have leftover sour cream, it makes a great base for a savory dip with chives and garlic.
The Best Serving Pairings
Since this oreo cheesecake recipe is quite rich, you want something to cut through that heaviness. A handful of fresh raspberries or a drizzle of tart raspberry coulis works wonders.
For those who want a truly decadent experience, try serving a slice with a side of Easy White Chocolate Dipping Sauce. The sweetness of the white chocolate complements the bitter cocoa of the Oreos perfectly.
Another great option is a simple cup of strong, unsweetened black coffee. The bitterness of the coffee cleanses the palate between bites of the velvety cream cheese.
Quick Serving Decision
- If you want a tart contrast → Add fresh berries
- If you want maximum decadence → Add white chocolate sauce
- If you want a balanced treat → Serve with black coffee
Right then, you've got everything you need. Just remember: be patient with the cooling, keep your mixer on low, and let that cake chill. Trust me, the wait is the hardest part, but the first bite of that shattering crust and silky filling makes it all worth it. Happy baking!
Recipe FAQs
How to make a simple Oreo cheesecake?
Bake a 350°F crust, then mix room temperature cream cheese, sugar, sour cream, vanilla, and eggs. Fold in Oreo chunks and bake at 325°F for 55-65 minutes before chilling for 6 hours.
What are common cheesecake mistakes?
Overmixing the batter or using cold ingredients. Incorporating too much air causes the cake to rise and collapse, while cold cream cheese leads to a lumpy filling.
Should I use salted or unsalted butter for Oreo cheesecake?
Use unsalted butter. This ensures you control the salt content precisely as specified in the recipe to balance the sweetness.
Is cheesecake very high in calories?
Yes, it is calorie dense. One slice contains 542 kcal, but you can balance your menu with a lighter starter like our roasted tomato soup.
Why did my cheesecake crack on top?
Rapid temperature changes during cooling. Prevent this by turning off the oven and propping the door open with a wooden spoon for 60 minutes after baking.
Is it true that cold cream cheese works just as well as room temperature?
No, this is a common misconception. Cold cream cheese prevents sugar from dissolving, which creates lumpy pockets in the batter.
How long should I refrigerate the cheesecake before serving?
Chill for at least 6 hours. For the best texture and flavor, let the cake set for 24 hours in the fridge.
Baked Oreo Cheesecake Recipe