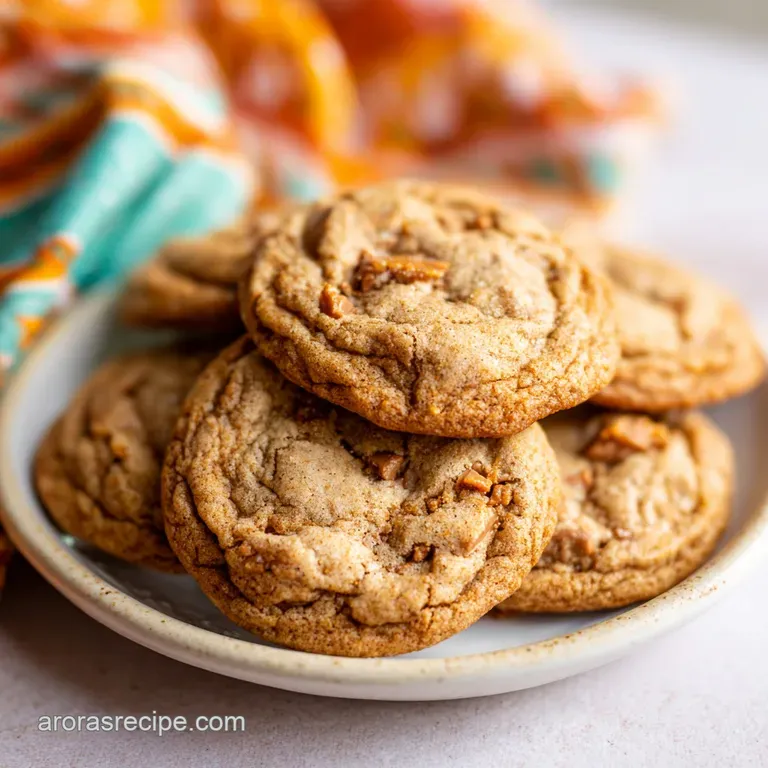
Brown Butter Butterfinger Cookies
- Time: Active 45 minutes, Passive 10 minutes, Total 55 minutes
- Flavor/Texture Hook: Shatter crisp toffee edges with a velvety, brown butter center
- Perfect for: Bake sales, nostalgic cravings, or a weekend comfort project
- Master the Art of Chewy Butterfinger Cookies
- Why These Toffee Treats Work So Well
- Essential Cookie Specs and Baking Times
- Selecting Quality Ingredients for Maximum Flavor
- Tools Required for a Perfect Batch
- Step by Step Guide to Baking Gold
- Solving Common Baking Flubs and Fails
- Tasty Swaps and Creative Recipe Twists
- Debunking Common Baking Myths
- Keeping Your Cookies Fresh and Soft
- Creative Ways to Serve Your Treats
- Recipe FAQs
- 📝 Recipe Card
Master the Art of Chewy Butterfinger Cookies
You know that specific, high pitched crinkle of a yellow candy wrapper? It’s the sound of pure nostalgia for me. Growing up in Nashville, my Aunt Sarah used to keep a "secret" stash of these bars in a ceramic jar on the highest shelf.
She thought she was being sneaky, but the moment that wrapper snapped, every kid in the house was in the kitchen faster than you could say "peanut butter." We didn’t just eat them plain, though - we waited for the weekends when she’d pull out the heavy wooden rolling pin and let us smash them into a million golden shards for her legendary cookie dough.
The smell of these baking is something you never forget. It’s not just sugar, it’s that deep, toasted aroma of roasted peanuts meeting caramelizing butter. I’ve spent years tweaking her old recipe because I wanted that specific "shatter" you get from the candy, but without the cookie turning into a hard brick the next day.
This version is exactly what I was hunting for - a dough so tender it almost melts, punctuated by those crunchy, salty bits that stick to your teeth in the best possible way.
Right then, we are going for a cookie that has a presence. We aren’t looking for thin, wimpy wafers here. We want a substantial, hearty treat that can hold up to the heavy lifting of all that candy.
If you have ever felt let down by a cookie that was all dough and no "stuff," this is the recipe that is going to change your mind. It’s comforting, it’s a little bit messy, and it’s exactly what a homemade treat should be.
Why These Toffee Treats Work So Well
There is actual logic behind why this specific combination of ingredients creates such a legendary texture. It isn't just about throwing candy into a bowl, it's about managing moisture and fat to make sure the candy doesn't just dissolve into a puddle of syrup.
- Fat Saturation: Using 226g of unsalted butter provides the necessary lipids to coat the flour proteins, which limits gluten development and ensures a tender, short crumb.
- Maillard Magic: The combination of 200g light brown sugar and 100g granulated sugar creates a complex browning reaction that complements the roasted peanut notes in the candy.
- Emulsion Stability: Adding an extra egg yolk introduces more lecithin, which binds the fats and liquids together for a silky, rich mouthfeel that won't feel greasy.
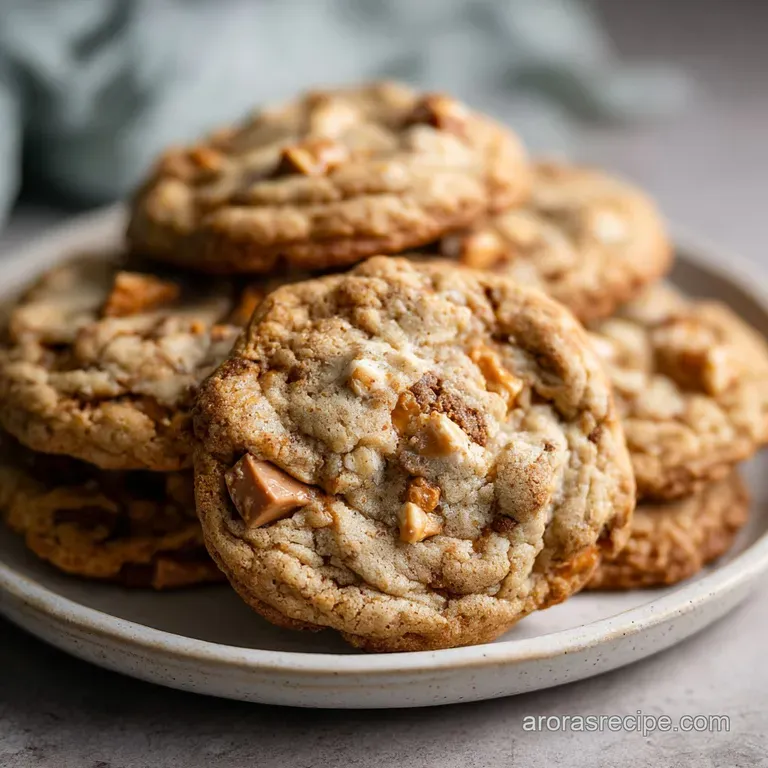
- The Physics of the Toffee Melt: As the cookies bake at 180°C, the candy shards reach a semi liquid state where they bond with the dough, creating a "honeycomb" internal structure.
- Sodium Contrast: The 1/2 tsp of sea salt cuts through the intense sweetness of the candy, making the peanut flavor pop rather than getting lost in the sugar.
The Science of the Toffee Melt
In this recipe, the candy pieces undergo a secondary caramelization process inside the dough. Because Butterfingers are made of aerated toffee layers, they don't just melt like chocolate chips - they partially dissolve, creating tiny pockets of concentrated peanut flavor and "lacey" crispy edges where the candy touches the hot pan.
| Method | Time | Texture | Best For |
|---|---|---|---|
| Standard Oven | 10 minutes | Evenly golden, soft center | Classic chewy cookie fans |
| Stovetop Skillet | 15 minutes | Extra crispy bottom, gooey top | Deep dish dessert lovers |
| Toaster Oven | 12 minutes | Darker edges, very toasted | Small batches or quick fixes |
The stovetop method is a fun twist if you want a giant "cookie cake" feel, but for that classic bakery look, the oven is your best friend. The dry heat of the oven allows the edges to set while the center remains slightly underdone, which is the secret to a long lasting chew.
Essential Cookie Specs and Baking Times
When you are planning your bake, timing is everything. This isn't a "mix and dump" recipe if you want the best results. You need to account for the chill time, which is the most important step for preventing your cookies from turning into thin pancakes.
Trust me on this - I’ve rushed it before, and while a giant cookie sheet pancake tastes fine, it’s not the look we’re going for.
We are aiming for 24 large cookies, which means each dough ball is going to be about the size of a golf ball. This size allows for the perfect ratio of crispy edge to fudgy center. If you make them too small, the candy to dough ratio gets skewed and they can become overly crunchy.
- Preparation:45 minutes (includes chopping and chilling)
- Baking:10 minutes per batch
- Total Investment:55 minutes
- Yield: 24 large, golden brown treats
If you're looking for a different vibe, you might also enjoy my Peanut Butter Cookies recipe which focuses more on the creamy side of things. But if it’s the crunch you’re after, keep reading.
Selecting Quality Ingredients for Maximum Flavor
Everything starts with the butter. Since we aren't using a ton of spices, the quality of your dairy and sugar is going to stand out. I always opt for unsalted butter so I can control the salt level myself. If you only have salted, just cut the sea salt in the recipe in half.
- 1 cup (226g) Unsalted Butter: Why this? Provides the foundational flavor and creates a tender, melt in-the mouth texture.
- 1 cup (200g) Light Brown Sugar: Why this? The molasses content ensures the cookies stay soft and chewy for days.
- 1/2 cup (100g) Granulated White Sugar: Why this? Helps the edges crisp up and provides the necessary structure.
- 1 large Egg + 1 Egg Yolk: Why this? The extra yolk adds richness without making the dough too cakey.
- 2 tsp Pure Vanilla Extract: Why this? Acts as a background note that makes the chocolate and peanut butter sing.
- 2 1/4 cups (280g) All Purpose Flour: Why this? The perfect protein level to hold all that heavy candy together.
- 1 tsp Baking Soda: Why this? Promotes browning and gives the cookies a slight, soft lift.
- 1/2 tsp Sea Salt: Why this? Essential for balancing the sugars and highlighting the toffee notes.
- 2 cups (250g) Butterfinger candy bars: Why this? The star of the show, providing both texture and flavor.
| Ingredient | Science Role | Pro Secret |
|---|---|---|
| Brown Sugar | Hygroscopic moisture | Pack it tight to ensure accurate measurement and moisture levels. |
| Baking Soda | pH balancer | Sift it with the flour to avoid "soapy" tasting clumps in your dough. |
| Egg Yolk | Emulsifier | Ensure it is room temperature to prevent the butter from curdling. |
| Butter | Tenderizer | Cream it with sugars for at least 3 minutes for a lighter texture. |
It is worth mentioning that for another decadent treat, you should try my Chocolate Chip Cookies recipe which uses a similar brown butter base. The richness is just out of this world.
Tools Required for a Perfect Batch
You don't need a professional kitchen, but a few specific tools make this a lot easier. A stand mixer is great, but a hand mixer works just as well. The real key is having a good, sharp knife for the candy.
- Heavy Knife: A chef's knife is best for chopping the candy bars. You want various sizes - some fine dust and some chunky nuggets.
- Baking Sheets: Light colored aluminum pans are better than dark ones, as dark pans can scorch the candy on the bottom of the cookies.
- Parchment Paper: This is mandatory. The candy gets sticky when it melts, and without parchment, you'll be chiseling your cookies off the pan.
- Cookie Scoop: A 3 tablespoon scoop ensures all 24 cookies are the same size, so they bake evenly.
- Cooling Rack: Getting the cookies off the hot pan after a few minutes prevents the bottoms from over baking.
Chef's Tip: Freeze your candy bars for 15 minutes before chopping. This prevents the chocolate coating from melting all over your hands and makes for cleaner, sharper shards.
step-by-step Guide to Baking Gold
Before you start, make sure your eggs are at room temperature. If you forgot to take them out, just put them in a bowl of warm water for 5 minutes. It makes a huge difference in how the dough comes together.
- Chop the candy. Take your 250g of Butterfingers and roughly chop them into 1cm pieces. Note: Keep the "dust" created during chopping; it adds great flavor to the dough.
- Cream the butter. Beat the 226g of softened butter with the 200g brown sugar and 100g white sugar. Cook 3 mins until pale and fluffy.
- Add the liquids. Incorporate the egg, the extra egg yolk, and the 2 tsp of vanilla extract. Note: Scrape the sides of the bowl to ensure everything is fully emulsified.
- Whisk dry ingredients. In a separate bowl, stir together the 280g flour, 1 tsp baking soda, and 1/2 tsp sea salt.
- Combine carefully. Gradually add the dry mix to the wet mix on low speed. Stop as soon as the last streak of flour disappears.
- Fold in candy. Use a spatula to stir in the 250g of chopped candy pieces by hand. Note: Over mixing here will make the cookies tough.
- Chill the dough. Cover and refrigerate for at least 30 minutes. Wait until the dough feels firm to the touch.
- Preheat and prep. Set your oven to 180°C and line two large baking sheets with parchment paper.
- Scoop the dough. Form 24 balls and space them 5cm apart on the sheets.
- Bake to perfection. Slide the pans in for 10 minutes until the edges are golden and the centers look slightly soft.
Chef's Tip: As soon as the cookies come out of the oven, place a large circular glass or cookie cutter over each cookie and gently "scoot" it in a circular motion. This rounds out the edges and creates a perfectly symmetrical bakery style shape.
Solving Common Baking Flubs and Fails
Even the best of us have bad bake days. Usually, if something goes wrong with this recipe, it’s related to temperature - either the butter was too hot or the oven wasn't calibrated correctly.
Why Your Cookies Spread Too Much
If your cookies turned into one giant sheet, your butter was likely too soft when you started, or you skipped the chilling step. When the fat is too warm, it melts before the flour structure can set in the oven. Also, make sure you aren't placing dough balls onto a hot baking sheet from a previous batch.
| Problem | Root Cause | Solution |
|---|---|---|
| Thin/Greasy Edges | Butter was melted, not softened | Use cool, room temp butter that holds a finger indent but isn't oily. |
| Hard/Dry Texture | Too much flour or over baked | Weigh your flour (280g) and pull them out while centers look "underdone." |
| Candy Sticking to Pan | Didn't use parchment paper | Always use parchment or a silicone mat; the sugar in candy bonds to metal. |
Common Mistakes Checklist
- ✓ Don't over mix the dough once the flour is added (prevents rubbery cookies).
- ✓ Ensure the baking soda is fresh; if it's over 6 months old, the cookies won't brown properly.
- ✓ Use room temperature eggs to avoid breaking the butter emulsion.
- ✓ Actually wait for the 30 minute chill time; it hydrates the flour for a better chew.
- ✓ Let the cookies rest on the pan for 5 minutes before moving them (they are fragile when hot).
Tasty Swaps and Creative Recipe Twists
I'm a purist, but sometimes you have to work with what's in the pantry. You can definitely play around with the add ins here as long as you keep the base dough the same.
| Original Ingredient | Substitute | Why It Works |
|---|---|---|
| Butterfinger Bars | Heath or Skor Bars | Similar toffee profile, though less "peanutty." |
| Light Brown Sugar | Dark Brown Sugar | Adds a deeper, more intense molasses flavor and extra moisture. |
| All Purpose Flour | 1 to-1 gluten-free Flour | Works well, though cookies may be slightly grainier. |
If you want to really lean into the peanut theme, you can swap the Butterfinger bars for the components in my Peanut Butter Blossom Cookies recipe, or even mix in half chocolate chips and half candy pieces.
Adapting for Smaller or Larger Batches
If you want to scale this recipe down for a small craving, it’s easier than you think.
- To Halve (12 cookies): Use 113g butter, 100g brown sugar, 50g white sugar, and 140g flour. For the egg, beat one whole egg in a cup and use exactly half of it (skip the extra yolk).
- To Double (48 cookies): Double everything exactly, but only use 1.5x the salt and baking soda. You’ll need to work in batches, keeping the dough in the fridge between tray rotations.
Debunking Common Baking Myths
One big myth is that you must sift your flour every time. For these cookies, you really don't need to unless your flour is exceptionally clumpy. Stirring the dry ingredients with a whisk is usually enough to aerate them.
Another misconception is that "more candy is always better." Honestly, don't overdo it. If you add more than 2 cups, there won't be enough dough to hold the candy in place, and the cookies will literally fall apart as you try to pick them up. Balance is the secret here.
Finally,, some people think you can't freeze dough with candy in it. You absolutely can! I often make a double batch and freeze half. The candy stays perfectly crunchy once baked from frozen.
Keeping Your Cookies Fresh and Soft
Because of the high moisture content from the brown sugar and egg yolk, these stay soft for a surprisingly long time.
- Storage: Keep them in an airtight container at room temperature for up to 5 days.
- Zero Waste Tip: If they do start to get a bit stale after a week, crumble them up! Those Butterfinger cookie crumbs are incredible as a topping for vanilla bean ice cream or folded into a milkshake.
- Freezing: You can freeze baked cookies for up to 3 months. Just wrap them individually in plastic wrap and then store them in a freezer bag.
- Reheating: For that "fresh from the oven" feel, pop a cookie in the microwave for 8-10 seconds. It softens the toffee and makes the center gooey again.
Creative Ways to Serve Your Treats
While these are perfect with a cold glass of milk, you can definitely level up the presentation if you're hosting. I love serving them warm in a small cast iron skillet with a scoop of salted caramel gelato on top. The way the ice cream melts into the toffee crevices is just... well, you have to try it.
Another Nashville favorite is the "Cookie Sandwich." Take two cookies, smear a layer of creamy peanut butter on one, a layer of chocolate ganache on the other, and squish them together. It’s a lot, I know, but for a special occasion, it is an absolute showstopper.
Right then, you've got the science, the steps, and the secrets. Now get that yellow wrapper crinkling and start baking. You won't regret it!

Recipe FAQs
Why were Butterfingers discontinued?
No, they have not been officially discontinued. They were temporarily hard to find during a brand restructuring, but have largely returned to major retailers.
What is the most popular Dutch cookie?
Stroopwafels are generally considered the most popular. These are thin, crisp waffles held together by a sweet caramel like syrup filling.
What is the crunchy stuff in Butterfingers?
The crunchy stuff is aerated, crisp peanut butter toffee. This brittle texture contrasts with the surrounding cookie dough, creating the signature texture you want in these cookies.
Does butter or shortening make cookies softer?
Butter makes cookies taste better, but shortening often yields a softer, taller cookie. Shortening is 100% fat and remains solid longer during baking, allowing structure to set before spreading.
How do I stop my cookies from spreading too thin?
Chill the dough for at least 30 minutes before baking. The cold fat takes longer to melt in the oven, giving the flour structure time to set and preventing excessive spread.
Can I substitute the whole egg with just an extra yolk?
No, you need the white for structure, but you can add an extra yolk for richness. Using only a yolk results in a cookie that is too tender and spreads too much, though the added richness is great; see how the principle of balanced moisture helps structure in our Sugar Cookies Recipe.
What temperature should I bake these cookies at?
Bake at 180°C (350°F) for 10 minutes. This medium high heat is perfect for setting the edges quickly while keeping the center fudgy and chewy.
Chewy Brown Butter Butterfinger Cookies
Ingredients:
Instructions:
Nutrition Facts:
| Calories | 210 calories |
|---|---|
| Protein | 2.2 g |
| Fat | 9.9 g |
| Carbs | 28.7 g |
| Fiber | 0.4 g |
| Sugar | 17.6 g |
| Sodium | 121 mg |
