Easy Key Lime Cheesecake: Creamy and Velvety
- Time:30 minutes active + 60 minutes baking + 6 hours chilling = Total 7 hours 30 mins
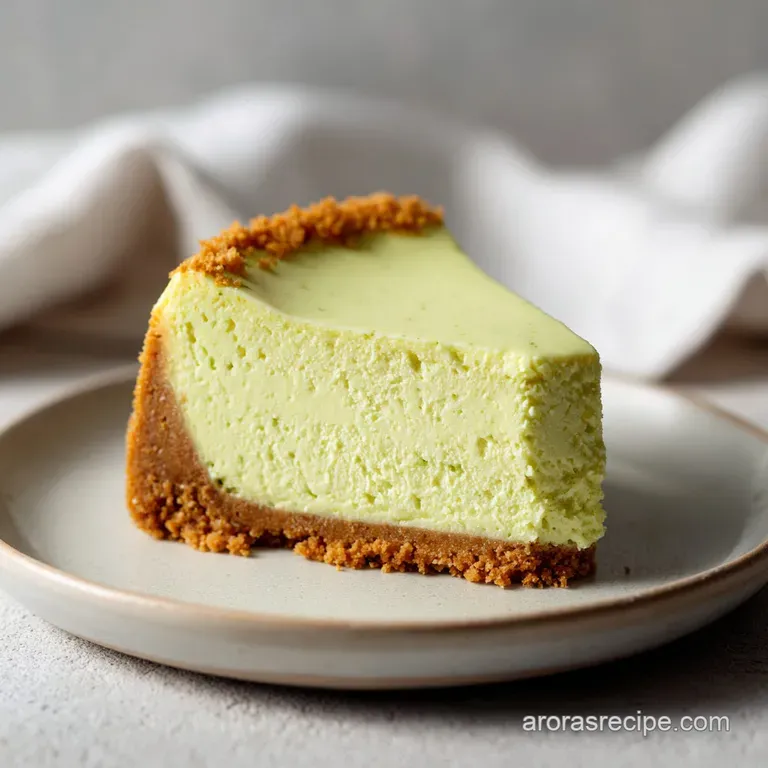
- Flavor/Texture Hook: Velvety filling with a shatter crisp graham crust and a bright, tangy finish
- Perfect for: Summer potlucks, holiday dinner parties, or anyone craving a high end bakery dessert at home
- Get the Zesty Vibe with this easy key lime cheesecake
- Why the Condensed Milk is Secretly a Hero
- Choosing Your Baking Method
- Component Analysis for Better Baking
- The Essential Toolkit for a Smooth Bake
- Step by Step to a Creamy Slice
- Fixing the Common Cheesecake Hiccups
- Troubleshooting Common Issues
- Switching Ingredients for Different Diets
- Keeping Your Slices Fresh and Zesty
- Finishing Touches for a Wow Factor
- Recipe FAQs
- 📝 Recipe Card
Get the Zesty Vibe with this easy key lime cheesecake
Ever wonder why a key lime dessert tastes so different from a standard lime treat? It's not just the size of the fruit, it's that specific, floral acidity that hits the back of your tongue. I remember the first time I tried to make a cheesecake for a family reunion back in Nashville.
I wanted something that screamed "summer" but didn't want to spend all day fighting with a temperamental oven.
The smell of fresh lime zest hitting a bowl of softened cream cheese is honestly one of my favorite kitchen scents. It's bright, clean, and immediately makes the whole house feel like a vacation.
This version is the result of me realizing that you don't need a culinary degree to get that professional, silky smooth slice that doesn't collapse the second it hits the plate.
We're going for a balance here: a crust that provides a salty, buttery snap and a filling that's lush and tart. It's not too sweet, which is the trap most people fall into. By the time you top it with a cloud of whipped cream, you've got a dessert that looks like it cost 60 dollars at a bistro but only took a bit of patience and some basic pantry staples to pull off.
Why the Condensed Milk is Secretly a Hero
I used to think adding condensed milk was a "shortcut," but it's actually a brilliant way to stabilize the texture. If you've ever had a cheesecake that felt more like a dense omelet, it's usually because too much air was beaten into the eggs or the protein tightened up too much during baking.
Texture Stability: The high sugar and protein content in sweetened condensed milk creates a buffer, preventing the eggs from over coagulating. This keeps the filling velvety instead of spongy.
Acidity Balance: The concentrated sweetness of the milk acts as a foil to the sharp key lime juice. This prevents the acid from breaking down the cream cheese structure too quickly before the cake sets.
Moisture Retention: Because the milk is reduced, it adds a creamy density without adding excess water, which is usually what causes that dreaded "soggy middle" in many home recipes. If you love this style of filling, you might also appreciate the texture in my Classic Cheesecake Recipe, though that one is more traditional.
Air Control: By mixing the condensed milk in before the eggs, we create a dense base. This means when we add the eggs, they don't whip up into a foam, which is the main cause of those giant cracks on top.
Choosing Your Baking Method
Before you dive in, you might be wondering if you can just skip the oven. While no bake versions exist, they rely on gelatin or freezing, which changes the mouthfeel completely. Here's how the baked version stacks up.
| Method | Total Time | Texture | Best For |
|---|---|---|---|
| Baked (This Recipe) | 7 hours 30 mins | Velvety & Dense | Special occasions, deep flavor |
| No Bake | 4 hours | Airy & Mousse like | Quick prep, extreme heat days |
| Frozen | 6 hours | Icy & Firm | Individual portions, summer heat |
The baked method is the only way to get that authentic, rich cheesecake experience. The heat transforms the proteins and sugars into something far more complex than a chilled cream mixture. Trust me, the wait is worth the result.
Component Analysis for Better Baking
Not all ingredients are created equal. For a budget friendly approach, you don't need the most expensive organic brands, but you do need the right types of fats and acids.
| Ingredient | Science Role | Pro Secret |
|---|---|---|
| Cream Cheese | Structure & Body | Must be truly softened to avoid lumps |
| Condensed Milk | Sweetener & Binder | Provides the "silky" mouthfeel |
| Key Lime Juice | Flavor & Set | The acid helps "tighten" the proteins |
| Graham Crumbs | Texture Contrast | Adding a pinch of salt prevents it from being cloying |
For the Buttery Crust
The goal here is a base that doesn't crumble into a million pieces when you slice it. Using 180g of graham cracker crumbs mixed with melted butter creates a hydrophobic barrier. This means the moisture from the filling doesn't seep into the crust as easily, keeping it snappy.
For the Creamy Filling
The key is the temperature. When you blend 680g of softened cream cheese with sugar, you're creating a stable emulsion. If the cheese is cold, you'll get tiny white lumps that no amount of whisking will fix. I usually leave mine on the counter for about 2 hours before starting.
For the Zesty Topping
Freshly whipped cream is essential. The lightness of the cream offsets the richness of the cheesecake. Adding a touch of powdered sugar stabilizes the peaks, so the topping doesn't slide off the cake as it sits on the table.
The Essential Toolkit for a Smooth Bake
You don't need a professional kitchen, but a few specific tools make a huge difference in the final look of the cake.
First, a 9 inch springform pan is non negotiable. Trying to lift a cheesecake out of a standard cake pan is a recipe for disaster. The springform allows you to release the sides without touching the cake, which is crucial for keeping those edges clean.
Next, you'll need a roasting pan or a large baking dish that can hold the springform pan. This is for the water bath. If you don't have a roasting pan, a large cake pan or even a disposable aluminum tray works. The goal is to surround the cheesecake with hot water to keep the oven temperature stable.
Finally, a hand mixer or a stand mixer (like a KitchenAid) will save your arms. You want the cream cheese to be completely smooth, and doing that by hand is a workout I wouldn't wish on anyone. A rubber spatula is also key for folding in the eggs without adding air.
Step by step to a Creamy Slice

Right then, let's get into the actual process. Follow these steps closely, and pay attention to the sensory cues.
- Combine 180g graham cracker crumbs, 75g melted butter, 25g sugar, and 1.5g salt. Mix until the texture resembles wet sand. Note: Don't overmix or the butter will pool.
- Firmly press the mixture into the bottom and 1 inch up the sides of a 9 inch springform pan. Use the bottom of a measuring cup to get it really packed down.
- Bake the crust at 175°C (350°F) for 8-10 minutes until golden and fragrant. Let it cool completely before adding the filling.
- Beat 680g softened cream cheese and 200g sugar on medium speed for about 3 minutes until smooth and fluffy.
- Blend in 397g sweetened condensed milk and 5ml vanilla extract. Mix until the color is uniform.
- Stir in 120ml key lime juice and 6g zest until the batter visibly thickens.
- Add 3 large eggs one at a time on low speed, mixing just until the yellow disappears. Note: Over mixing here causes the cake to rise and then collapse, creating cracks.
- Pour the filling into the cooled crust. Place the springform pan in a roasting pan and fill the roasting pan with hot water until it reaches halfway up the side of the springform.
- Bake 60 minutes until the edges are set but the center still has a slight wobble. Turn off the oven and leave the door ajar for 30 minutes before moving the cake to the fridge.
- Once chilled for 6 hours, whip 240ml chilled heavy cream and 25g powdered sugar until stiff peaks form. Spread over the top and garnish with 2g lime zest.
Fixing the Common Cheesecake Hiccups
Even for seasoned cooks, cheesecakes can be temperamental. Most issues come down to temperature or air.
Troubleshooting Common Issues
| Issue | Solution | ||
|---|---|---|---|
| Why Your Top Cracked | Cracks usually happen because the cake expanded too quickly in the oven or was cooled too fast. The water bath prevents this by insulating the cake, but if you open the oven door every five minutes, y | ||
| Why the Center Is Too Soft | If the center feels like custard after 6 hours in the fridge, it likely wasn't baked long enough or didn't have enough time to set. Remember, the cheesecake continues to firm up as it cools. Don't pan | ||
| Why the Crust Is Soggy | This usually happens if the crust wasn't pre baked or wasn't pressed firmly enough. The pre bake step creates a toasted seal that keeps the filling from soaking into the crumbs. | Problem | Root Cause |
Switching Ingredients for Different Diets
You can definitely tweak this recipe to fit your needs without losing that signature tang.
| Original Ingredient | Substitute | Why It Works |
|---|---|---|
| Graham Cracker Crumbs | Digestive Biscuits (180g) | Similar texture and sweetness. Note: Slightly more buttery flavor |
| Heavy Whipping Cream | Full fat Coconut Cream (240ml) | Similar fat content. Note: Adds a tropical nuttiness |
| Granulated Sugar | Monkfruit Sweetener (200g) | Maintains sweetness. Note: May slightly alter the browning of the crust |
| Key Lime Juice | Regular Persian Lime Juice (120ml) | Similar acidity. Note: Less floral, more "sharp" citrus taste |
If you're looking for something completely different but still fruity, my Blackberry Cobbler recipe is a great alternative for those who prefer a warm, jammy dessert over something creamy.
Adjusting for Different Pan Sizes
If you only have an 8 inch pan, the filling will be deeper. You'll need to increase the bake time by about 10-15 minutes. Keep an eye on that center wobble.
Making it a Mini Dessert
You can divide this batter into 12 individual ramekins. Since they are smaller, they'll bake much faster usually around 25-30 minutes. Skip the water bath for ramekins, but keep them on a baking sheet to catch any drips.
Keeping Your Slices Fresh and Zesty
Cheesecake actually improves after a day in the fridge because the flavors have more time to meld.
Refrigerator Storage: Store your cheesecake in the fridge for up to 5 days. Keep it covered with a loose piece of foil or plastic wrap to prevent it from absorbing other fridge smells.
Always slice with a hot knife (dip the knife in hot water and wipe it dry between every single slice) to get those clean, professional edges.
Freezing Guidelines: This cake freezes surprisingly well. Wrap the un topped cheesecake in a double layer of plastic wrap and then foil. It will stay fresh for up to 2 months. When you're ready to eat it, thaw it slowly in the fridge overnight.
Never thaw it on the counter, or the temperature difference will cause the cake to weep moisture.
Zero Waste Tips: Don't throw away the leftover lime peels after zesting! You can put them in a jar with sugar to make lime infused sugar for your morning coffee or tea.
Also, if you have leftover graham cracker crumbs, mix them with a bit of melted butter and sugar to make a quick crumble topping for yogurt.
Finishing Touches for a Wow Factor
While the cheesecake is stunning on its own, a few final touches can make it feel like a restaurant dessert.
I love adding thin, translucent slices of fresh lime arranged in a concentric circle on top of the whipped cream. It looks sophisticated but takes about two minutes. Another great trick is to toast some shredded coconut and sprinkle it around the edges for a bit of crunch and a tropical vibe.
For those who like a bit more contrast, a few fresh raspberries or blueberries scattered on top provide a pop of color and a different kind of tartness that complements the lime perfectly.
If you're serving this at a party, I recommend placing the cake on a chilled platter. It keeps the whipped cream from softening too quickly while guests are chatting. Pair it with a crisp glass of Prosecco or a cold iced tea to balance out the richness.
This easy key lime cheesecake is all about that contrast between the heavy, creamy base and the bright, airy topping, so keep your garnishes light and fresh.
Recipe FAQs
Why did my cheesecake crack on top?
Use a water bath. Placing the springform pan in a roasting pan filled with hot water insulates the cake. Cooling the cake slowly with the oven door ajar also prevents the surface from splitting.
Why is the center still too soft after baking?
Refrigerate for at least 6 hours. The filling continues to firm up as it chills. If it feels like custard, it simply needs more time in the fridge to set completely.
What can I serve with this cheesecake?
Fresh berries or a drizzle of honey. This dessert also pairs beautifully with buttery shortbread cookies for a complete dessert platter.
How to prevent the crust from becoming soggy?
Bake the crust at 350°F (175°C) for 8 10 minutes. Let the crust cool completely before pouring in the filling to maintain its crisp texture.
Is it true that I should beat the eggs on high speed to make it fluffy?
No, this is a common misconception. Mix eggs on low speed just until the yellow disappears. Incorporating too much air creates bubbles that cause the cake to rise and then collapse.
How to get a smooth, lump free filling?
Beat softened cream cheese and sugar on medium speed for 3 minutes. Ensure the cream cheese is fully softened before starting to eliminate any stubborn clumps.
Can I make this cheesecake a day in advance?
Yes, it is actually better. An overnight chill allows the flavors to meld and the texture to firm up more consistently.
Easy Key Lime Cheesecake

